
 Adobe today released version 2.3 of the cloud-based Lightroom (CC) Desktop application, along with Lightroom iOS 4.3 and Android 4.3. In addition to new camera support, new lens profiles, and bug fixes, there are significant new features, including a way to recover recently deleted photo files and new editing tools.
An update to Lightroom Classic was also released – see my Lightroom Classic article for details on this.
If you previously were prompted to agree to auto-update Lightroom Desktop and if you agreed, then go to Help>System Info to verify that you are now using version 2.3. Otherwise to update to 2.3, go to Help>Updates, and on the Apps tab click on Update next to Lightroom (not Lightroom Classic or Lightroom CC 2015.).
To update Lightroom Mobile, find the Lightroom app in the iOS App Store or the Android app in the Google Play store and update.
In This Article:
- Lightroom CC Name Change
- Recently Deleted Photos Are Now Recoverable
- Texture Editing Tool
- Defringe for Green and Purple Fringing
- Shared Albums: Email Invitations, Group Albums
- Interactive Tutorials
- New Cameras Now Supported
- New Lens Profiles
- Nikon Z6, Z7 Camera Profiles
- Lightroom Desktop: Miscellaneous
- Lightroom Android
(These links above to sections below may or may not work depending on what device and system you are using. If they don’t, then scroll down.)
Lightroom CC Name Change
From now on, the cloud-based Lightroom CC service will be known as “Lightroom“. Adobe is dropping “CC” from most application names, including Lightroom CC and Lightroom Classic CC. When necessary to distinguish among the Lightroom desktop application, and mobile and web versions, the components of the cloud-based Lightroom will be known as:
- Lightroom Desktop
- Lightroom Mobile (Lightroom iOS, Lightroom Android)
- Lightroom Web
This will make it even harder than it is today to find cloud-based Lightroom resources on the web, since “Lightroom” for 10+ years has meant the application now known as Lightroom Classic. You’ll also need to be very clear with those you communicate with about exactly which version you are using. Read my article on the Lightroom name changes for suggestions on how to work through this.
Recently Deleted Photos Are Now Recoverable
The cloud-based Lightroom has been somewhat dangerous to use since its inception in 2017 because, as I warned about, it’s not hard to accidentally have more photos selected than you intend to when you go to delete, and if you’re not paying attention you’ll delete them all. Up until now there has been no way to recover them – but now there is! Deleted files will now be saved in your account for 60 days, and they won’t count towards cloud storage limits.
To recover deleted files:
- Go to Lightroom Web and sign in.
- Go to the Deleted collection, shown as #1 in the screenshot below.
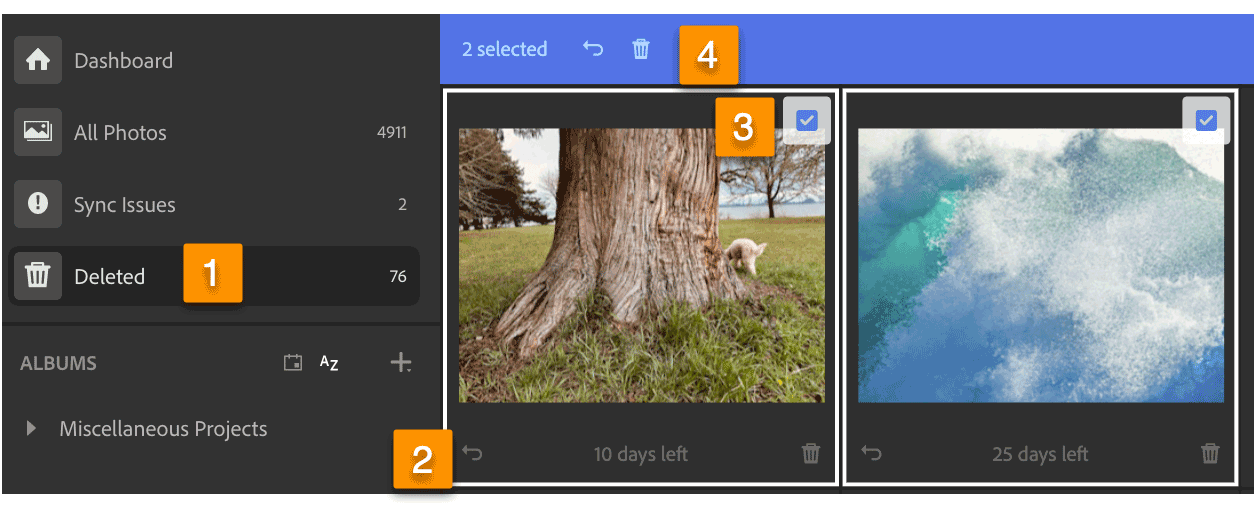
- To recover an individual file, click on the Back icon in the bottom left of the thumbnail (#2).
- To recover more than one, check them (#3), and then click on the Back icon in the blue bar (#4).
- To delete photos permanently now rather than waiting for them to be removed 60 days after initial deletion, click on the Trash Can icon in an individual thumbnail or in the blue bar after selecting more than one.
Texture Editing Tool
Now throughout the Lightroom ecosystem – in cloud-based Lightroom Desktop, iOS, Android, Web (as well in Lightroom Classic) – there is a new Texture slider in the Effects panel and in the brush and linear and radial gradients. (It’s in the Basic panel in Lightroom Classic, and in the adjustment brush and the radial and graduated filters.) Texture adds or reduces contrast around medium-size details, accentuating them or smoothing them out.
Positive values of texture increase presence – making elements in your scene look more real and less like remote two-dimensional representations. Texture for the most part leaves small details, like noise, alone so that they aren’t accentuated, and it leaves large elements – major edges and shapes – alone, so that they aren’t distorted.


Negative values of Texture smooth out and downplay medium size details. Usually negative Texture provides more appealing skin smoothing than the old standby, negative Clarity, since Texture is better at leaving edges and some fine detail alone and therefore doesn’t cause faces to glow.
Watch my video tutorial below for details on Texture and how it differs from Clarity and sharpening, or read on below the video for more information.
For best quality, after hitting Play click on the sprocket wheel in the bottom right and choose 720/HD.
More Examples and Details (Also Covered in the Video Above)
The next two image examples show, first, positive texture applied to accentuate ripples in the water, and then second, negative texture applied, to smooth the ripples. Notice with both that texture leaves the larger elements in the scene alone – it doesn’t distort major lines or shapes.


In the image below I applied -65 of texture on just the skin, using the brush. In the Brush tool (and linear and radial filters) there is a new Soften Skin (Lite) preset that uses both negative texture and clarity – so do experiment with texture alone and combining it with clarity.


Texture vs. Clarity and Sharpening
As you can see in my video tutorial above (which I recommend!), sharpening enhances edge contrast in a very narrow way, by default only one pixel out from an edge, with the purpose of making edges look crisper. Depending on sharpening settings, edges of all details are candidates for sharpening, including edges of noise and other artifacts. Texture focuses on medium size details, not fine detail, and contrast is increased/decreased further out from edges than sharpening. With this contrast enhancement Texture makes objects and your scene look more three dimensional and brings out texture (or reduces texture) in lower contrast surfaces. Clarity focuses on larger elements than texture, and enhances contrast much further out from edges than texture (depending on Clarity setting used). In terms of what order to use them in, I recommend applying Texture, then Clarity while doing your basic tonal work (along with Light controls), and leaving sharpening to be the last step in your workflow.
Texture and Process Version
Applying Texture will automatically update process version 3 and 4 images to process version 5. The Texture slider will not be available in the Basic panel if the image is in process version 1 or 2 – first update the process version by clicking on the lightning bolt below the histogram.
Defringe for Green and Purple Fringing
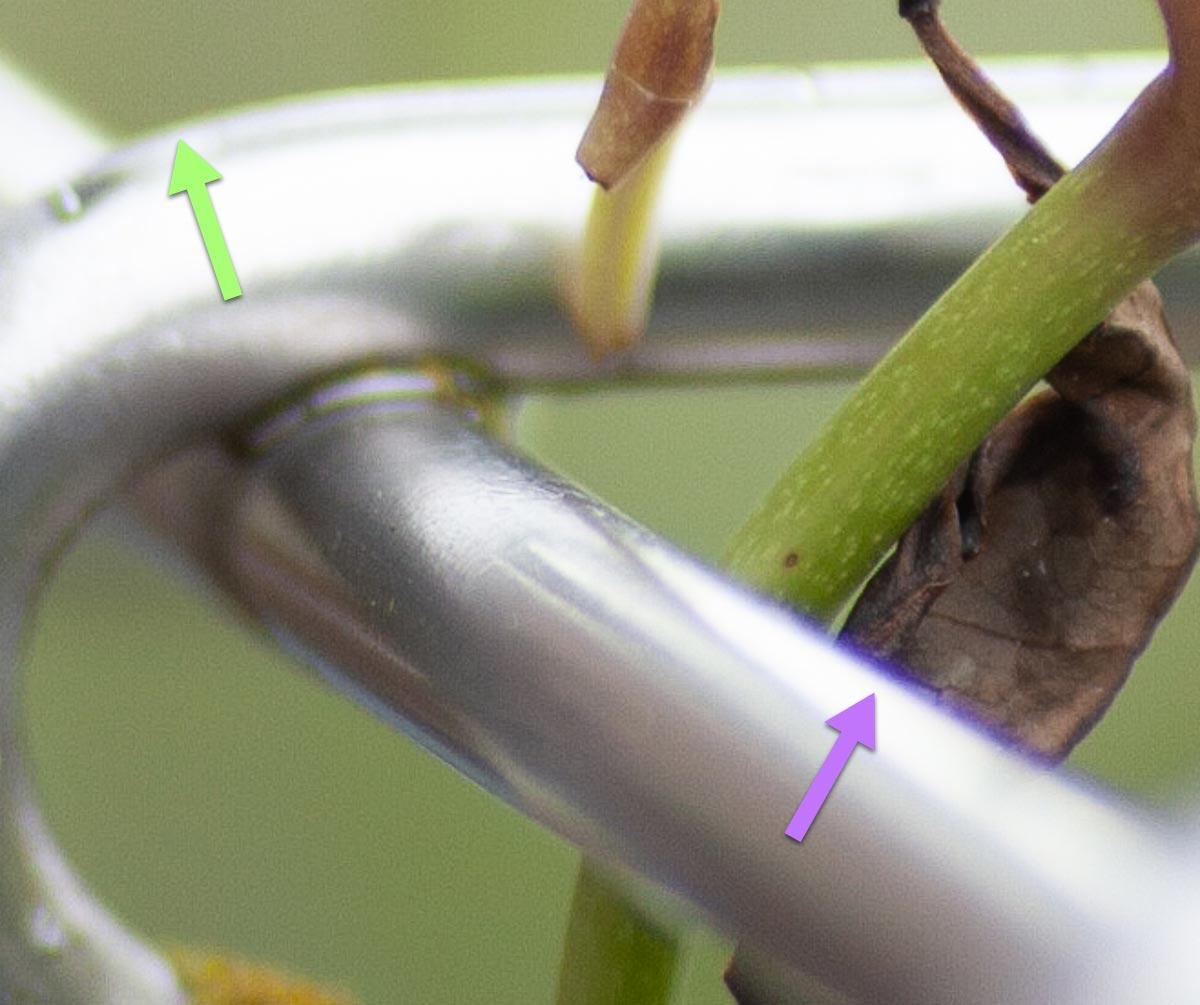
In Lightroom Desktop, one can now fix green and purple fringing, which can occur when shooting with a very shallow depth of field, and also with backlighting:
Defringe is located in the Optics panel. To use it:
- Click on the three-square icon (#1 below) to open the Defringe panel.
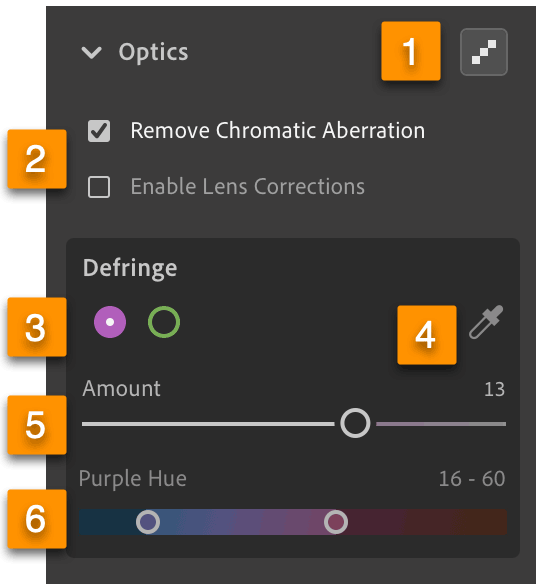
- Remove chromatic aberration (red/cyan and blue/yellow) first (#2).
- Choose to work on purple or green (#3).
- Click on the eyedropper (#4), and then in your image click to sample in the strongest green/purple fringing. This will set the amount and the range of hues (colors) that are fixed – hues between the two circles will be affected.
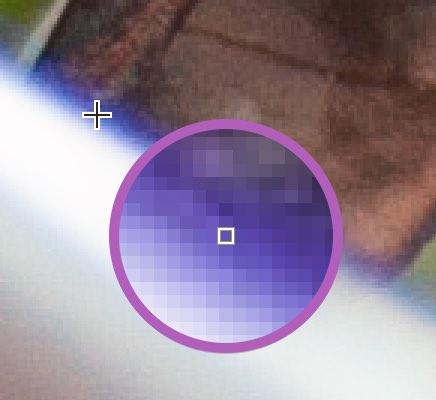
With the eyedropper, line up the square in the loupe with the strongest purple or green available.
- To fine tune Hue: make a mental note of where you are still seeing fringing, then hold down Alt/Opt as you click on one of the two Hue circles. If the area in need of fixing is not black then it is not within the hue range. Expand the range by sliding the left Hue circle to the left or the right one to the right.
- To fine tune Amount: Start at zero. Hold down Alt/Opt as you click on the circle – slide it just until you see the fringing disappear.
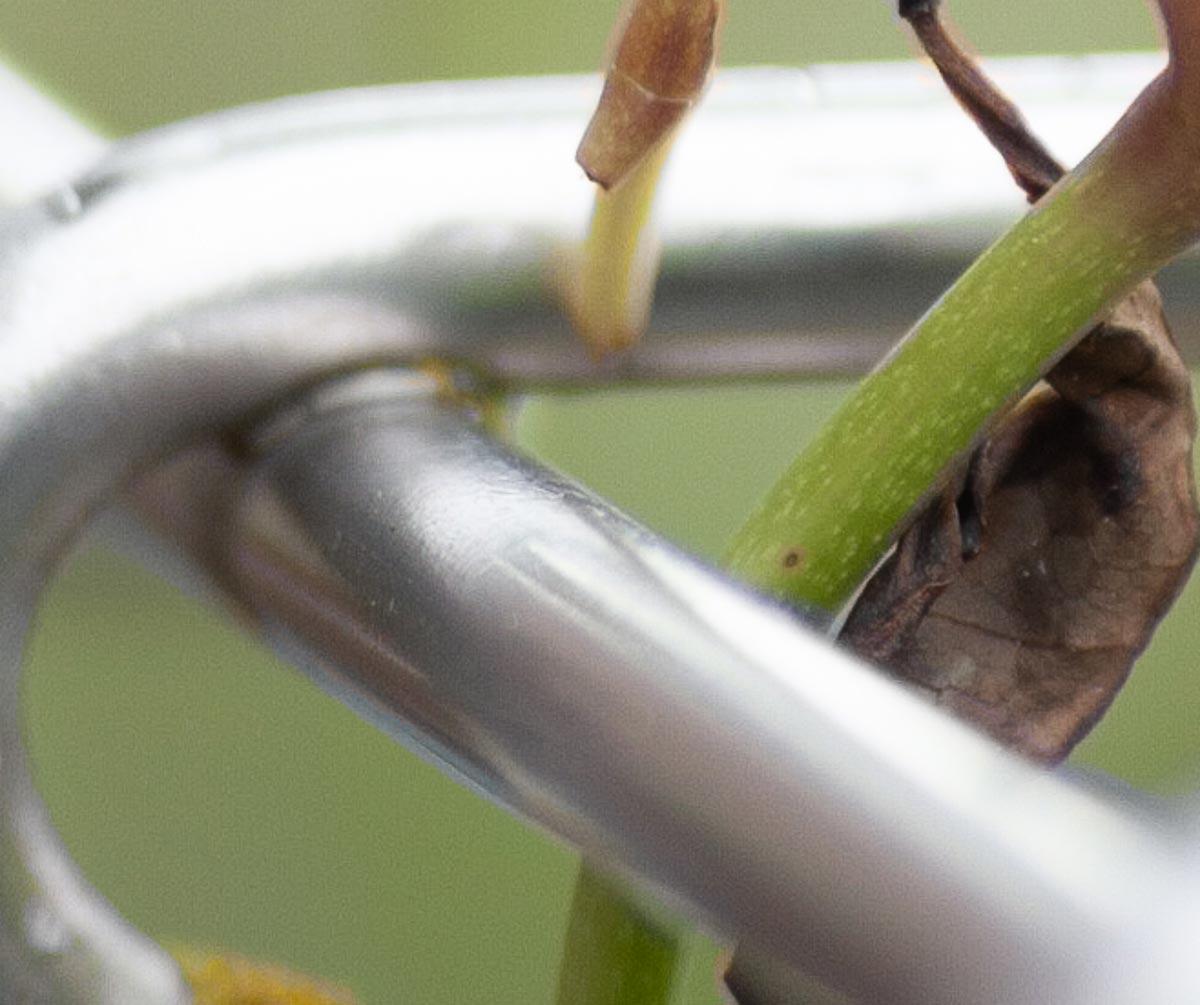
- Check edges throughout the image for areas that were affected but did not have fringing. In my example, the green background up against the edge of the brown leaf was affected. To remove the fix in these areas, as I did, use the brush, with Defringe set to -100.
With the addition of Defringe to the cloud-based Lightroom, the only direct editing tool this application is missing compared to Lightroom Classic is Range Mask in the brush, and linear and radial gradients. (It is also missing tools that assist one in editing, such as Reference View, Soft Proofing and others.)
Shared Albums: Email Invitations, Group Albums
Now in Lightroom Desktop, Mobile and Web, you have two choices for sharing albums with friends, family, clients and others:
- As before, share a link with those who you want to view your album (and possibly risk the link getting shared more widely than you intend)
- Now enter email addresses to just invite by email those people you want to view your albums (as opposed to everyone with acquires the shared link having access). For invitees, you can now also choose to allow them to add their own photos to your album, creating in essence a group album. Invitees must log in with an Adobe, Facebook or Google account to view and contribute to your album.
How to Invite People to View and Contribute to Your Lightroom Album
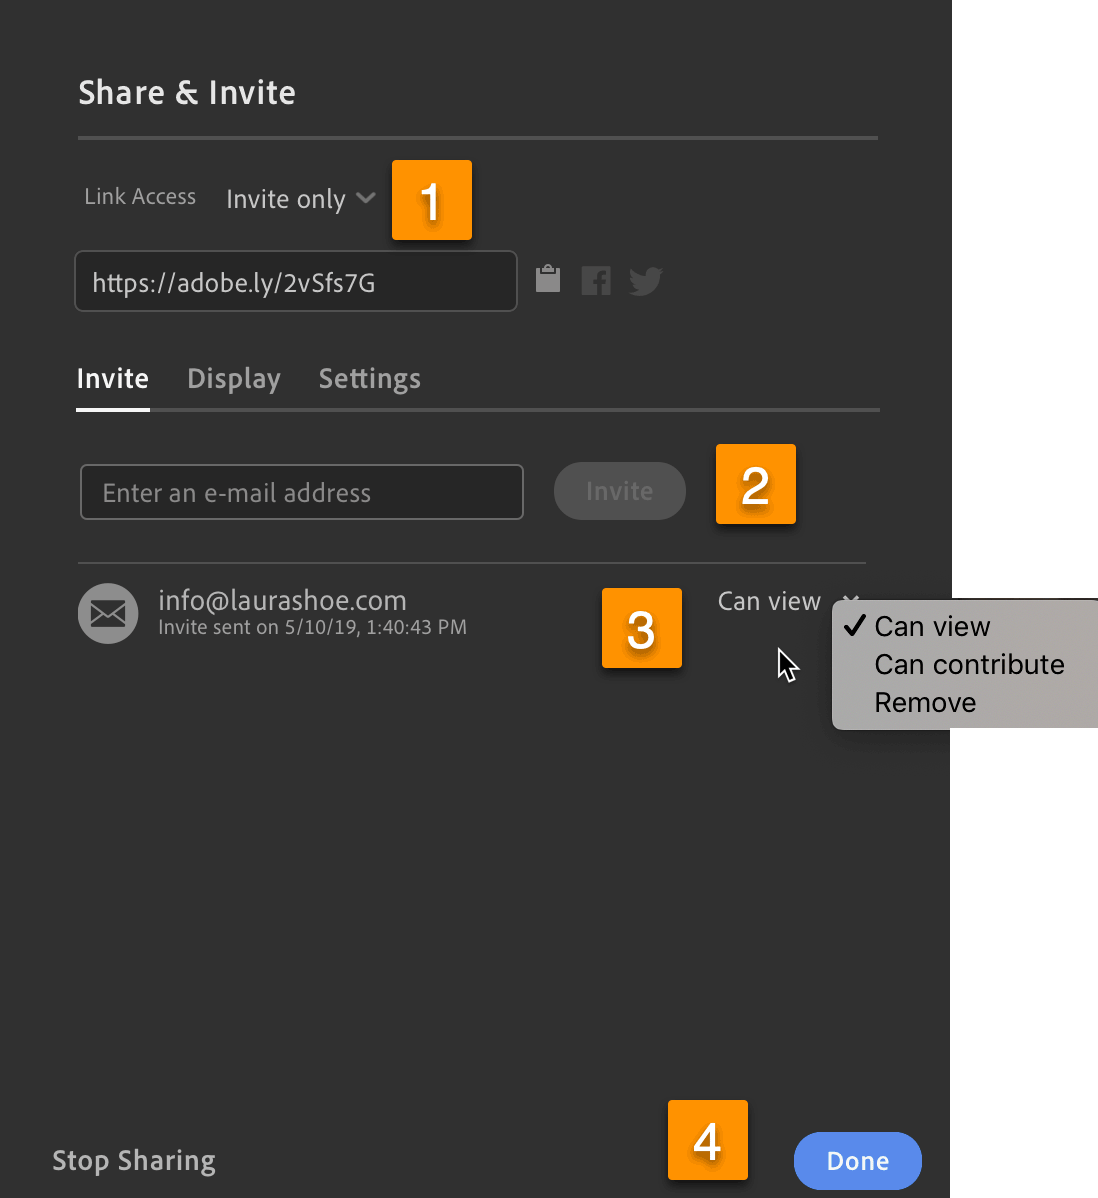
In Lightroom Desktop, to invite someone to view your album, right-click on the album, choose Share and Invite (renamed from Share to Web), then in the Share and Invite dialog choose Invite only (rather than Anyone can view, #1 in the screenshot below), enter their email address and click on Invite (#2). Invited users will show in the bottom half of the dialog. To allow an invited user to contribute, click on the dropdown to the right of their email address and choose Can contribute.
An invited user will get an email with the link for the album. After clicking on it and signing in, if you gave them permission to contribute, there will be an Add Photos button in the top right of the album window. Photos added by invitees get added to your album in Lightroom Desktop, Mobile and Web, and they count against your storage limit.
More Details:
- In Lightroom Desktop, to see who contributed a photo, select it and open up the Info (i) panel.
- To remove someone from the invitee list so that they can’t access the album anymore, choose Remove in the dropdown next to their email address in the Share and Invite dialog.
- If someone gets to the album page that does not have access, they can click on Request Access. This will generate an email to you with their request. To grant the request, in Lightroom Desktop, right-click on the album, Share & Invite, and you’ll see their request.
To invite people and manage invitees using Lightroom Mobile (iOS and Android), open an album, click on the … icon in the top right, choose Share & Invite, Enable Sharing (if the album isn’t already shared), and perform the steps outlined above using the Link Access and Invite People sections of the Share & Invite dialog.
To access Share and Invite in Lightroom Web, select an album, then click on the Share icon in the top right:
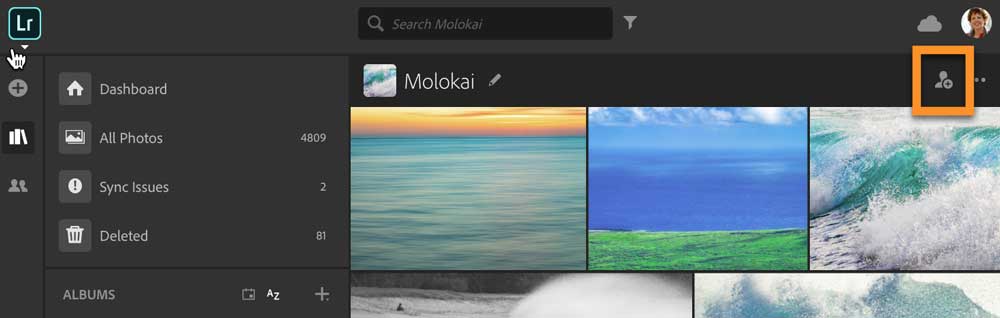
Access Share and Invite in Lightroom Web
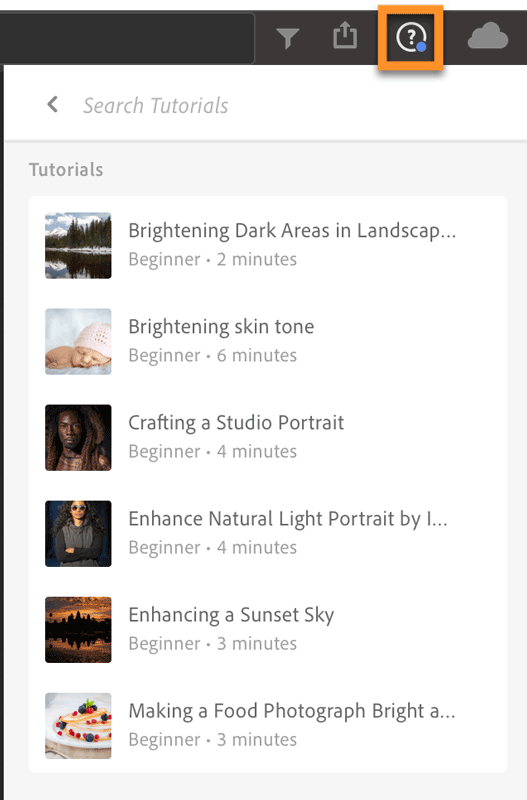
Interactive Tutorials
Now in Lightroom Desktop and Mobile, edit photos along with experts in new interactive tutorials.
In Lightroom Desktop, click on the Help icon (?) in the top right and then scroll down to the tutorials:
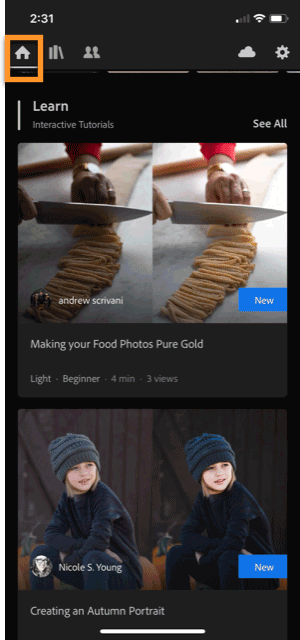
In Lightroom Mobile, tap on the Home icon to get to the new Home screen and the tutorials:
New Cameras Now Supported
The entire Lightroom ecosystem now supports the following new cameras:
- Canon EOS 250D (EOS Rebel SL3, EOS 200D II, EOS Kiss X10)
- Canon EOS RP
- Google Pixel 3 Front Standard Camera
- Google Pixel 3XL Front Standard Camera
- Google Pixel 3 Front Wide Camera
- Google Pixel 3 XL Front Wide Camera
- HMD Global Nokia 9 PureView
- LG V40 ThinQ
- Panasonic LUMIX DC-FZ1000M2 (DC-FZ10002)
- Panasonic LUMIX DC-S1
- Panasonic LUMIX DC-S1R
- Panasonic LUMIX DC-ZS80 (DC-TZ95, DC-TZ96, DC-TZ97)
- RICOH GR III
- RICOH THETA Z1
- Sony A6400 (ILCE-6400)
- Sony RX0 II (DSC-RX0M2)
New Lens Profiles
These new lens profiles are available throughout the Lightroom ecosystem:
Nikon Z6, Z7 Camera Profiles
Lightroom now includes 20 camera-matching profiles mimicking the new Nikon Creative Picture Controls color modes, available starting on the Z series cameras (Z6 and Z7). Camera-matching profiles are available for raw files in the Profile Browser, accessed at the top of the Basic panel in the Develop module.
Lightroom Desktop: Miscellaneous
- You can now migrate multiple times from a single Apple Photos catalog – so if you add new photos to Photos, you can then migrate them to Lightroom.
- New search facets focal length: and depth map: have been added. Type a search facet, which includes a colon (:) in Lightroom’s Search bar to bring up a list of values to choose from. The depth map: search facet returns photos that do have a depth map.
- Improvements have been made in grid scrolling performanceon Macs running Mojave.
Lightroom Android
Now copy edit settings from one photo and paste them to many, rather than just to one! In Edit view, tap on the three dot icon in the top right, choose Copy Settings, then choose which settings to copy. Go to Grid view, tap on the three dot icon in the top right, choose Select, then tap on thumbnails to select them, then choose Paste. Presumably this will come to iOS in the near future.