
 Adobe released Lightroom Classic (CC) version 8.3 today. In addition to bug fixes and new lens profiles, there are two new features – Texture for enhancing or smoothing out detail and Flat Field Correction for correcting for lens shading.
Updates for Lightroom (CC) Desktop, iOS and Android were also released – see my Lightroom CC article for details.
In This Article:
- How to Update
- New Cameras Now Supported
- New Tethered Capture Support
- New Lens Profiles
- Texture Editing Tool
- Change in Importing from Memory Cards
- Flat Field Correction
- Original Filename Preserved
- Related Content
(The above links to sections below may or may not work depending on what device and system you are using. If they don’t work, scroll down.)
How to Update
![]() Are you upgrading from Lightroom 6 or CC 2015? (Check your version by going to Help>System Info.) If so, watch my video tutorial on how to upgrade to Lightroom Classic CC.
Are you upgrading from Lightroom 6 or CC 2015? (Check your version by going to Help>System Info.) If so, watch my video tutorial on how to upgrade to Lightroom Classic CC.
Otherwise: if you previously were prompted to agree to automatic updates and if you agreed, then go to Help>System Info to verify that you are now using version 8.3. Otherwise to update, go to Help>Updates, and in the CC app that opens, on the App tab click on Update next to “Lightroom Classic” (NOT Lightroom or Lightroom CC 2015.) If the update is not listed in the CC app and if your operating system is supported by Classic CC 8, click on the three dots in the top right and choose Check for App Updates. If it’s still not there and it’s the day of release, then try later. Otherwise try signing out and signing in again.
Because the app name has changed to Lightroom Classic from Lightroom Classic CC, your Lr dock or desktop icon will most likely no longer work. Remove it from your dock or delete it from your desktop, then on Mac in Finder go into Applications, open the Lightroom Classic folder and drag the application to your dock. On PC, in File Explorer go into Program Files, open the Lightroom Classic folder, right-click on the application and choose Send to Desktop (and/or Taskbar).
I don’t have any indication that things won’t go smoothly with this update; that said, it can’t hurt to wait a week to see if others experience issues, unless you need the update urgently. If I hear of serious issues with this release I will post them here in this section – please check here rather than emailing me.
UPDATE May 31: Some Windows 10 users were getting an error when exporting or using publish services. This has now been fixed in the 8.3.1 update released May 29.
Click here to check bug reports and to report bugs or issues that you encounter.
Lightroom Application Name Changes
From now on, Lightroom Classic CC will be known as Lightroom Classic. Adobe is dropping “CC” from most application names, including the newer simplified cloud-based Lightroom CC application and service, which now becomes just Lightroom. When necessary to distinguish among the cloud-based Lightroom desktop application and mobile and web versions, the components of the cloud-based Lightroom will be known as:
- Lightroom Desktop or Lightroom (Mac/Win)
- Lightroom Mobile (Lightroom iOS, Lightroom Android)
- Lightroom Web
This will make it even harder than it is today for users of the cloud-based Lightroom and users of Lightroom Classic to find relevant resources on the web, since “Lightroom” for 10+ years has meant the application now known as Lightroom Classic. You’ll also need to be very clear with those you communicate with about exactly which version you are using. Read my article on the Lightroom name changes for suggestions on how to work through this.
New Cameras Now Supported
Lightroom Classic and the entire Lightroom ecosystem now support the following new cameras:
- Canon EOS 250D (EOS Rebel SL3, EOS 200D II, EOS Kiss X10)
- Canon EOS RP
- Google Pixel 3 Front Standard Camera
- Google Pixel 3XL Front Standard Camera
- Google Pixel 3 Front Wide Camera
- Google Pixel 3 XL Front Wide Camera
- HMD Global Nokia 9 PureView
- LG V40 ThinQ
- Panasonic LUMIX DC-FZ1000M2 (DC-FZ10002)
- Panasonic LUMIX DC-S1
- Panasonic LUMIX DC-S1R
- Panasonic LUMIX DC-ZS80 (DC-TZ95, DC-TZ96, DC-TZ97)
- RICOH GR III
- RICOH THETA Z1
- Sony A6400 (ILCE-6400)
- Sony RX0 II (DSC-RX0M2)
New Tethered Capture Support
Tethered capture is now supported for the Canon EOS R.
Click here to see a list of all cameras supported for tethered capture.
New Lens Profiles
These new lens profiles are available in Lightroom Classic and throughout the Lightroom ecosystem:
Texture Editing Tool
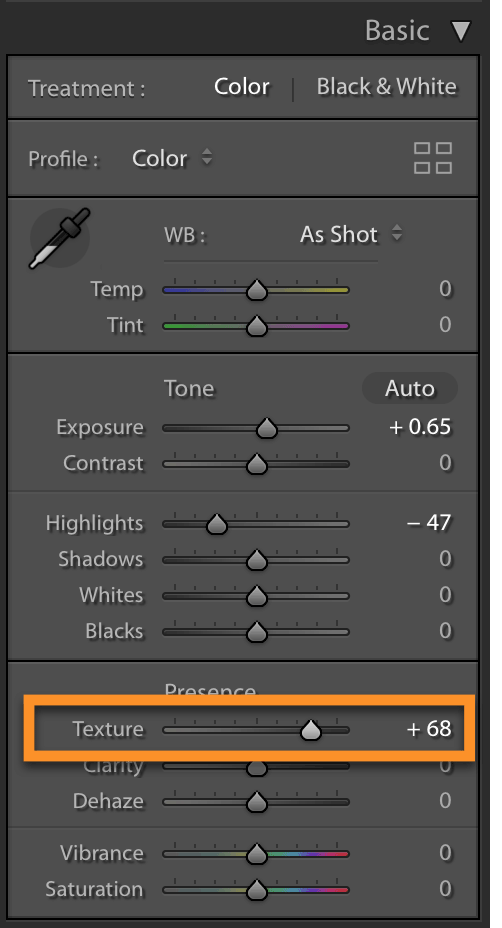
Now in Lightroom Classic (and throughout the Lightroom ecosystem) there is a new Texture slider in the presence section of the Basic panel and in the adjustment brush and graduated and radial filters. (It’s in the Effects panel in the cloud-based Lightroom Desktop app and in the Effects tab in Lightroom Mobile.) Texture adds or reduces contrast around medium-size details (rather than fine detail such as noise and pores), accentuating them or smoothing them out.
Positive values of texture increase presence – making elements in your scene look more real and less like remote two-dimensional representations. Texture for the most part leaves small details, like noise, alone so that they aren’t accentuated, and it leaves large elements – major edges and shapes – alone, so that they aren’t distorted. It’s similar to what competing products call structure.


Negative values of Texture smooth out and downplay medium size details. Usually negative Texture provides more appealing skin smoothing than the old standby, negative Clarity, since Texture is better at leaving edges and some fine detail alone and therefore doesn’t cause faces to glow.
Watch my video tutorial below for details on Texture and how it differs from Clarity and sharpening, or read on below the video for more information.
For best quality, after hitting Play click on the sprocket wheel in the bottom right and choose 720/HD.
More Examples and Details (Also Covered in the Video Above)
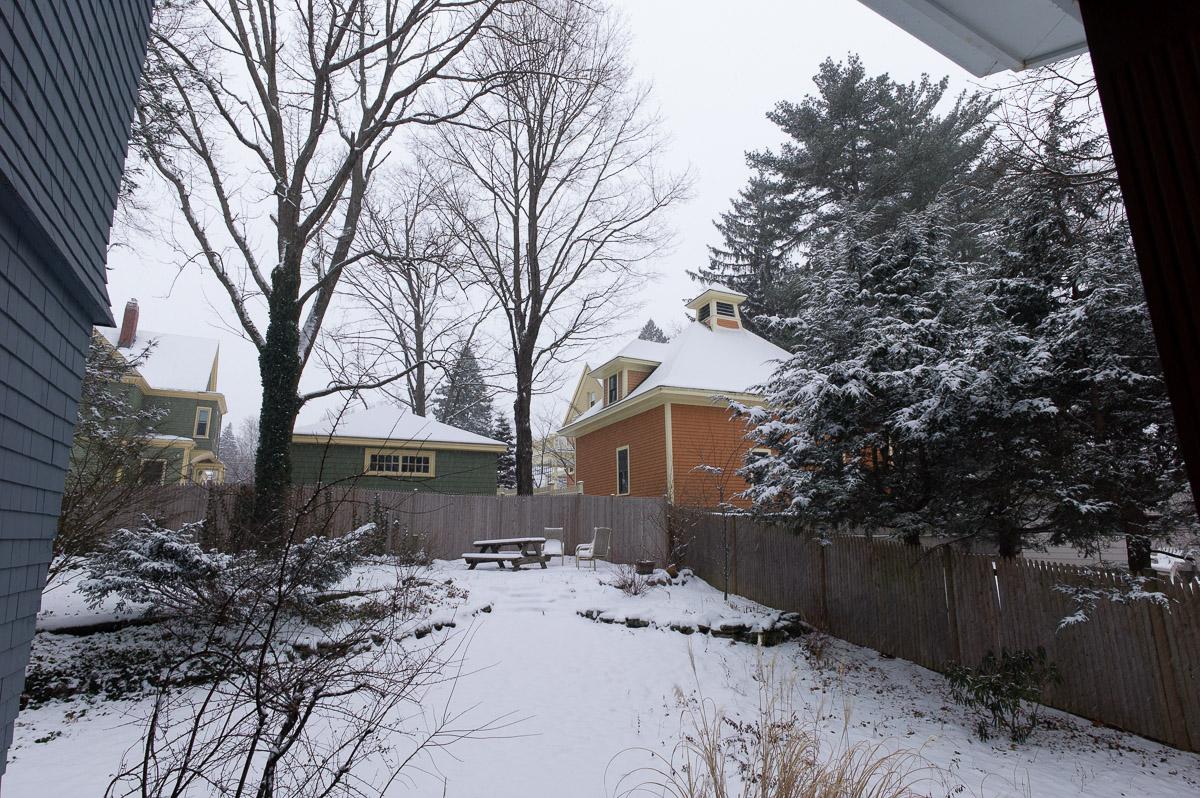
The next two image examples show, first, positive texture applied to accentuate ripples in the water, and then second, negative texture applied, to smooth the ripples. Notice with both that texture leaves the larger elements in the scene alone – it doesn’t distort major lines or shapes.


In the image below I applied -65 of texture on just the skin, using the brush. In the Brush tool (and linear and radial filters) there is a new Soften Skin (Lite) preset that uses both negative texture and clarity – so do experiment with texture alone and combining it with clarity.


Texture vs. Clarity and Sharpening
As you can see in my video tutorial above (which I recommend!), sharpening enhances edge contrast in a very narrow way, by default only one pixel out from an edge, with the purpose of making edges look crisper. Depending on sharpening settings, edges of all details are candidates for sharpening, including edges of noise and other artifacts. Texture focuses on medium size details, not fine detail, and contrast is increased/decreased further out from edges than sharpening. With this contrast enhancement Texture makes objects and your scene look more three dimensional and brings out texture (or reduces texture) in lower contrast surfaces. Clarity focuses on larger elements than texture, and enhances contrast much further out from edges than texture (depending on Clarity setting used), making it a rather blunt tool. I find myself using significantly less Clarity now that Texture is available. In terms of what order to use these tools in, I recommend Texture, then Clarity while doing your Basic panel work, and sharpening as the last step in your workflow.
Change in Importing from Memory Cards
When importing from memory cards, we have had two choices when making a selection in the Source panel (on the left) in the Import dialog: we could select the device (#1 in the screenshot below, with Untitled being the name of my memory card) or the DCIM folder in the Files section (#2). They accomplish the same thing in making all images on the memory card available for import.
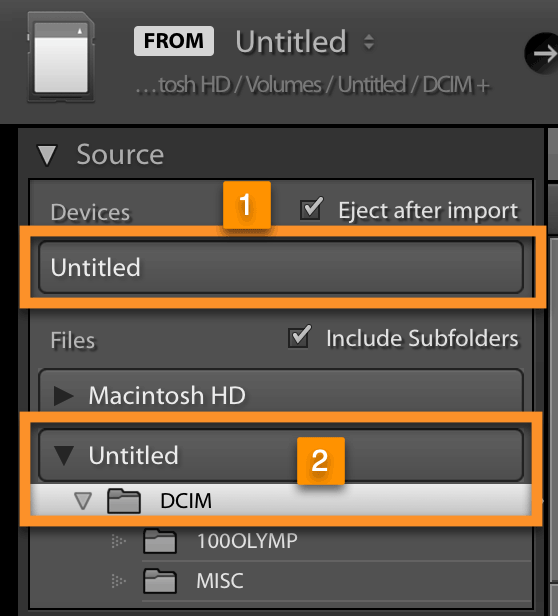
Choosing the memory card folder increases import performance.
However, it turns out that Lightroom Classic imports the images significantly faster – if I recall correctly, up to 20% faster – if you select the folder rather than the device. Therefore, with Classic 8.3, when you plug in a memory card, the DCIM folder will be selected by default.
Flat Field Correction
The new Flat Field Correction process is used to remove shading, also known as lens cast, from digital photos. Shading is a more general form of lens vignetting, and it often has a color cast and can be off-center. It’s more common with mirrorless cameras, where the sensor is closer to the lens and the incoming light hits the sensor at a flatter angle than would occur with a DSLR.
For quite some time there has been an Adobe flat-field plugin available to correct for shading. With Lightroom Classic 8.3, this functionality has been incorporated into Lightroom Classic itself, where it can be more effectively supported.


Calibration Image (All Flat Field Correction images courtesy of Eric Chan)
To correct for shading, when you’re out shooting, every time your optical setup changes (aperture, shutter speed, lens, focal length, focal distance, etc.), capture a calibration image, shooting through a plastic diffuser card or other flat, evenly illuminated reflective surface. Options for diffuser cards include Rosco diffusion filters and Expodisc white balance filters.
In Lightroom, select the calibration image and the scene image(s), then in the menu bar go to Library>Flat Field Correction. If you like the vignetting (darkening of corners) present in the image and want to correct just the color cast, check “Only correct color cast” (#1) in the screenshot below . By default the process will only correct raw files – uncheck “Only correct raw files” (#2) to also correct JPEGs and other file formats. (Correction of JPEGs may not be as accurate if you’ve chosen in-camera contrast and other edit settings, since these may affect the calibration image differently than the scene image(s) – that said, I wouldn’t hesitate to try correcting JPEGs with obvious shading.)
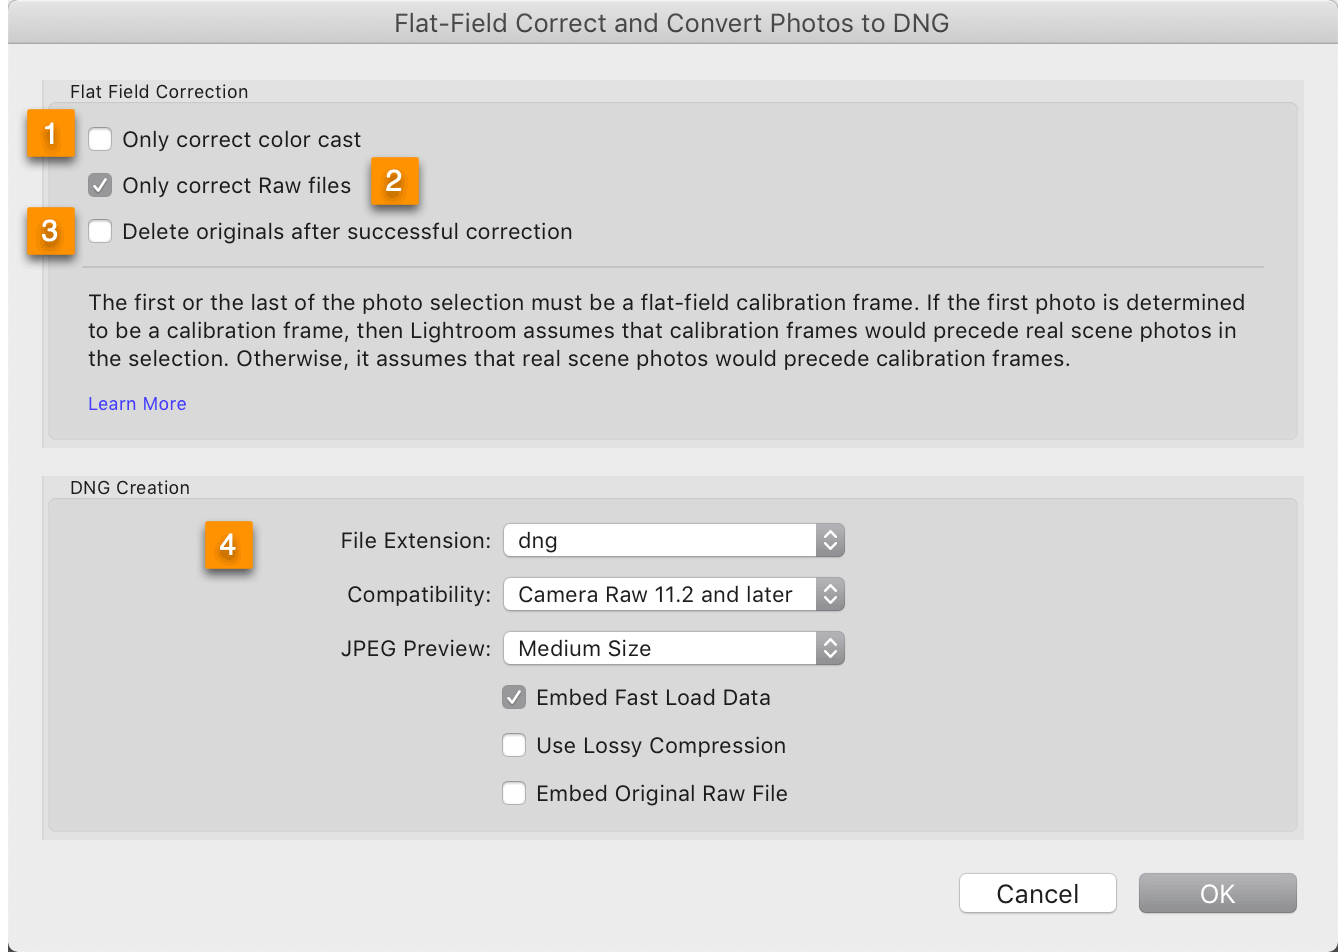
The flat field correction process will create a new DNG file with the correction applied – it will not apply the correction to your original image file. The DNG file will still have the benefits of being a raw file if your original is a raw file. By default, your original image is not deleted – it is instead removed from your Lightroom catalog and left in the folder on your hard drive along with the original. If you want the original deleted, check #3 in the screenshot above – though I wouldn’t recommend deleting the originals until you get comfortable that this Flat Field correction process does consistently produce good results for your images. The DNG file creation options (#4) are standard for DNG files – if you’re not familiar with these, the defaults are fine. Finally, click on OK to run the correction.
As you watch the images in the grid as the corrections process, it will seem like Lightroom is correcting the original images. Instead, the originals are removed from your Lightroom catalog and replaced with the new DNG files, with the file name “original image name.DNG”, or “original image name-2.DNG” if your original was a DNG file. (It’s therefore not possible to compare before and after in Lightroom Classic unless you then reimport the original images.)
Batch processing: You can select many sets of calibration and scene images and correct them all at once. Be sure that for all sets of images and calibration frames, that either the calibration frames precede the scene image(s) or follows them – you can not have a mix of calibration-image-first and calibration-image-last. If you captured them in a consistent order in the field, sorting the grid by capture time will be sufficient. If you didn’t, then manually rearrange the images – either in a folder with no subfolders or a regular collection, drag from within image thumbnails to move them. Then select all images, and go to Library>Flat Field Correction.
When to Use a Lens Profile and When to Use Flat Field Correction
Lightroom Classic usually applies built-in profiles to images from mirrorless cameras, so for these cameras generally lens profiles are not available for you to choose to apply in the Lens Corrections panel. If you still see vignetting / darkening of corners, you can go to the Manual tab of Lens Corrections and correct that with the vignetting sliders. These, however, assume that the vignetting is centered. If you see that the vignetting is off-center or that the sliders don’t adequately correct images from your camera and lens and/or you see a color cast in the vignetting, then turning to Flat Field Correction is warranted. (It’s certainly extra work, given that you have to shoot the calibration images and perform the FF corrections.)
If you’re shooting with a DSLR or other camera for which lens profiles are available, you could still use Flat Field Correction to correct the vignetting (and any color cast) – whether or not the vignetting is centered. You would at least theoretically get a more accurate solution since with lens profiles the correction for aperture is sometimes interpolated, whereas if you shoot calibration frames and perform FF, you get a precise answer for the exact aperture you use. It’s hard to say though when/if the extra work involved would be worth it. Keep in mind that Flat Field doesn’t correct for lens distortion, so if there is any present you’ll have to correct for this using the Distortion slider on the Manual tab of Lens Corrections.
Original Filename Preserved
It used to be that if you renamed your image files during import, Lightroom would not remember and display the original file name in the Metadata panel and it wasn’t available for use in a renaming template (to, for example, restore the original filenames). Now if you rename during import, the original file name is preserved and displayed in the Preserved File Name field in the Metadata panel. When renaming after import, the Preserved File Name has always displayed. Original and Preserved file names are available for use as tokens in the renaming editor.
There are now up to three file names displayed:
- Current file name
- Original file name: file name at the end of the import process if renaming done after import (otherwise blank because it’s the same as Current)
- Preserved file name: the file name before import (as captured in camera, if from a memory card)