 Adobe released Lightroom Classic 9.0 last night. In addition to support for new cameras, new lens profiles and bug fixes, there are several new features and enhancements.
Updates for Lightroom (CC) Desktop, iOS and Android were also released – see my Lightroom Desktop article and my Lightroom Mobile for iOS and Android article for details.
In This Lightroom Classic 9.0 Article:
- Operating System Requirements
- How and When to Update
- New Cameras Now Supported
- New Lens Profiles
- Panorama Content-Aware Fill Edges
- Batch Export Using Multiple Presets
- Filter Folders and Collections by Color Label
- Miscellaneous New Features
- Related Content
(The above links to sections below may or may not work depending on what device and system you are using. If they don’t work, scroll down.)
System Requirements
MacOS Sierra and Windows 10 versions 1703 and 1709 are no longer supported – if you’re using one of these, you’ll have to update your operating system before the Lightroom Classic 9.0 update will be available to you to install.
Supported Operating Systems:
Mac OS: High Sierra (10.13), Mojave (10.14), Catalina (10.15)
Windows 10: Version 1607 or version 1803 and later
Window 7: Service Pack 1 (GPU acceleration performance features won’t work with this.)
Note that for the GPU acceleration performance-improvement feature, support for OpenGL has been dropped – on Windows you’ll need a graphics card with DirectX 12 support, or a Mac computer with Metal support, along with at least 2 GB of VRAM on your graphics card. That said, these are not requirements for Lightroom Classic itself, just for the GPU acceleration feature.
How and When to Update
 How to Update:
To update, go to Help>Updates, and in the Creative Cloud app that opens, click on Update next to Lightroom Classic. If the update is not listed in the CC app and if your operating system is supported by Classic 9.0, then click on the three dots in the top right and choose Check for App Updates. If it’s still not there and it’s the day of release, then try later. Otherwise try signing out and signing in again.
Once Lightroom Classic 9.0 downloads and installs, it will prompt you for approval to upgrade your Lightroom catalog. This upgrade will copy your old catalog and upgrade the copy, most likely appending “-2” (or a later number) to your catalog file name. After the upgrade is complete, you can close Lightroom and rename the catalog and related files if you wish to – watch my video tutorial on how to safely rename your Lightroom catalog. (For more details on updating to Classic 9.0, read my article on this topic.)
If you have not updated since before Classic 8.3: Because the app name changed to Lightroom Classic from Lightroom Classic CC, your Lr dock or desktop icon will most likely no longer work. Remove it from your dock or delete it from your desktop, then on Mac in Finder go into Applications, open the Lightroom Classic folder and drag the application to your dock. On PC, in File Explorer go into Program Files, open the Lightroom Classic folder, right-click on the application and choose Send to Desktop (and/or Taskbar).
When to Update:
I don’t have any indication that things won’t go smoothly with this update; that said, it can’t hurt to wait a week to see if others experience issues, unless you need the update urgently. If I hear of serious issues with this release I will post them here in this section – please check here rather than emailing me.
Click here to check for bug reports and to report bugs or issues that you encounter.
New Cameras Now Supported
Lightroom Classic and the entire Lightroom ecosystem now support the following new cameras:
- Apple iPhone 11
- Apple iPhone 11 Pro
- Apple iPhone 11 Pro Max
- Fuji X-A7
- HUAWEI Honor 20 Pro Rear Main Camera
- HUAWEI Honor 20 Pro Rear Telephoto Camera
- HUAWEI Honor 20 Pro Rear Wide Camera
- HUAWEI P30 Rear Main Camera
- HUAWEI P30 Rear Telephoto Camera
- HUAWEI P30 Rear Wide Camera
- HUAWEI P30 Pro Rear Main Camera
- HUAWEI P30 Pro Rear Telephoto Camera
- HUAWEI P30 Pro Rear Wide Camera
- Nikon Z 50 (preliminary support)
- Panasonic DC-S1H
- Sony A6100 (ILCE-6100)
- Sony A6600 (ILCE-6600)
- Sony A7R IV (ILCE-7RM4)
- Sony RX100VII (DSC-RX100M7)
Click here for a list of all cameras supported by each version of Lightroom (and Camera Raw).
Tethered Capture Support
With this release no additional cameras have been added to those that support tethered capture.
Click here to see a list of all cameras supported for tethered capture.
Tethered capture involves shooting with your camera plugged into your computer, with Lightroom automatically and instantly importing the images. Watch my video tutorial on shooting tethered with Lightroom for more details.
New Lens Profiles
These new lens profiles are available in Lightroom Classic and throughout the Lightroom ecosystem:
Panoramas: Content Aware Fill Edges
When stitching together images into a panorama, Lightroom has to warp the individual source files so that they fit together seamlessly. This leaves transparent (white) areas around the edges. Previously we have had the Boundary Warp feature, which further warps the files to eliminate the transparent areas. New in Classic 9.0, there is a new Fill Edges option that uses content-aware fill technology, long available in Photoshop, to intelligently fill in those areas without further warping.
To use Fill Edges, select your panorama images, right-click in one, go to Photomerge>Panorama, and check the Fill Edges box:

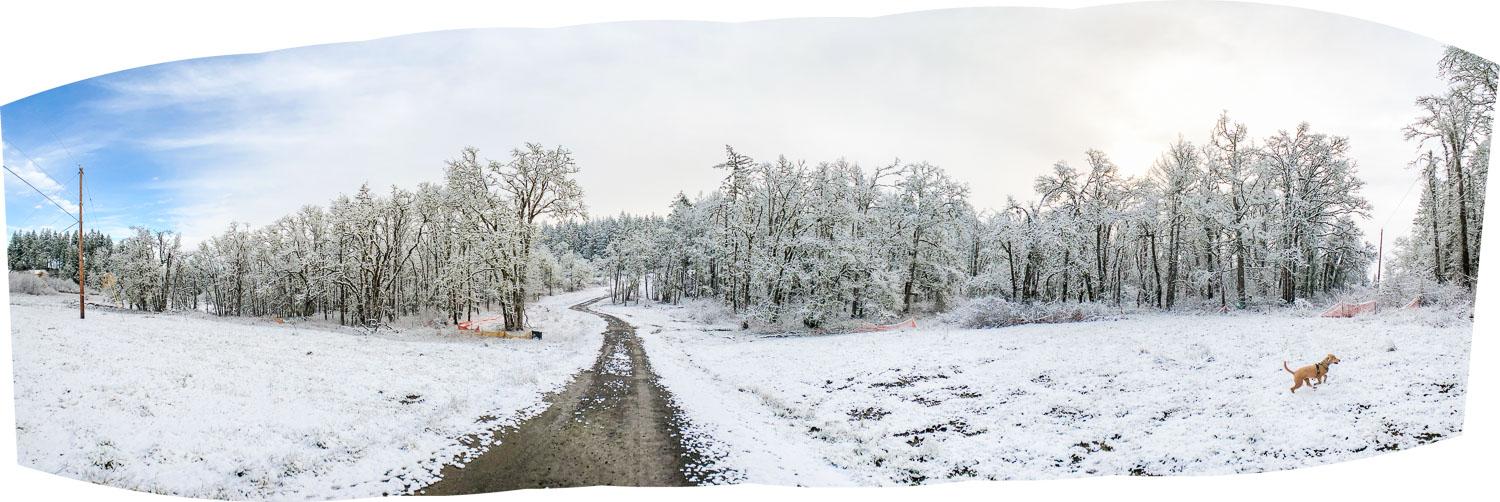
Panorama without transparent edges filled in

Transparent areas filled with Boundary Warp – notice the warped telephone pole on the left.
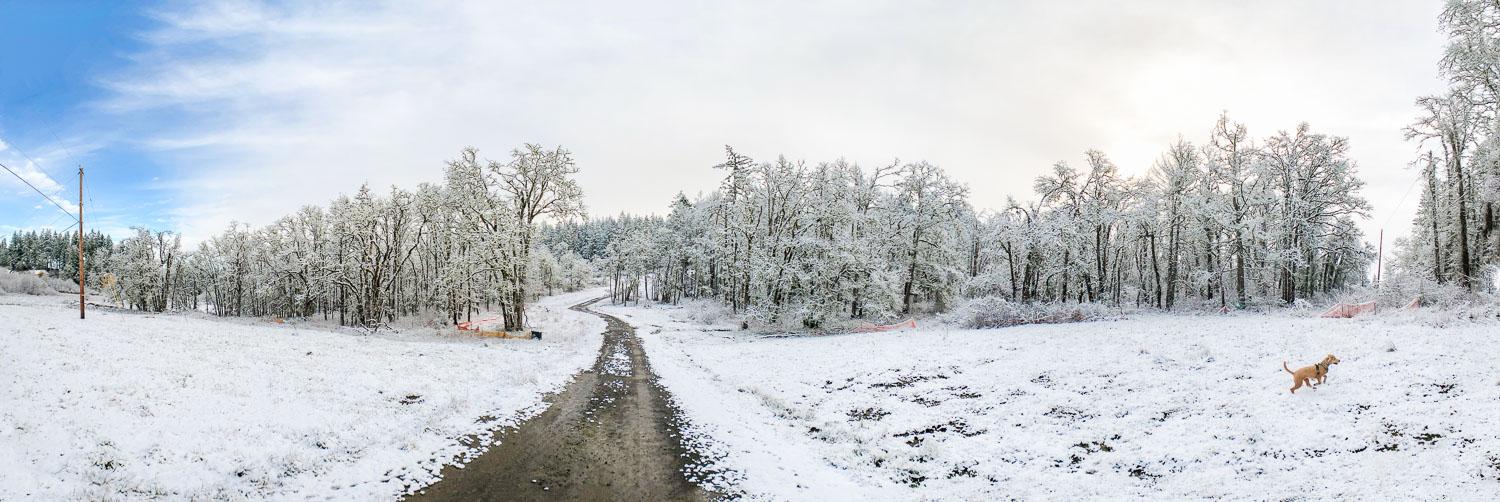
Transparent areas filled in with content-aware Fill Edges
As with content aware features in Photoshop, Fill Edges in Lightroom Classic sometimes produces impressive results and sometimes it doesn’t, depending on how complicated an area is to fill in. The small version of the example above looks good, but Fill Edges does fail in places:
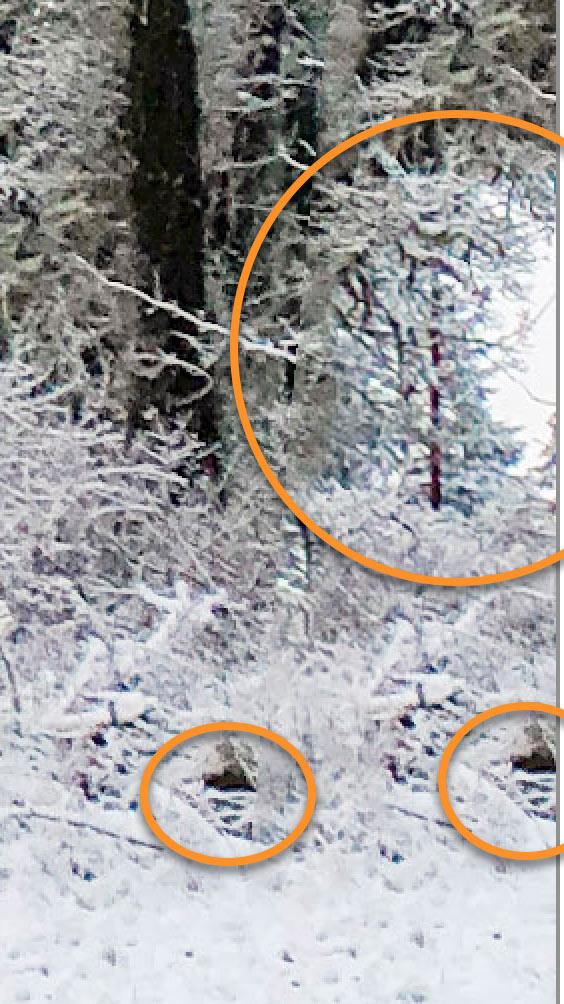
Issues: white sky put in filled area on the ground, obvious repetition of objects
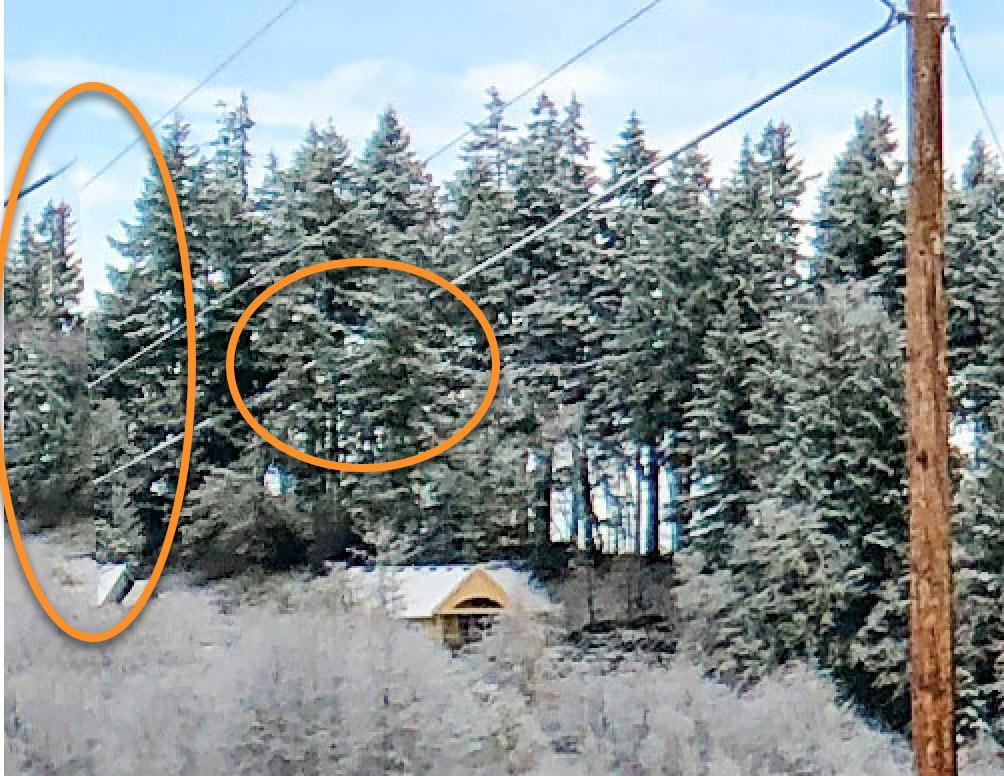
Issue: power lines not continuous
How I Use These Tools
While in the Panorama preview dialog I evaluate Fill Edges vs. Boundary Warp vs. Auto Crop (which crops off the transparent areas). If Fill Edges clearly shows clear advantages over the others, I choose it, and then after the panorama is merged I zoom in and look around the image for issues. (The larger your output will be the further you should zoom in and the more carefully you should check.) Some issues may be easily fixed with Lightroom’s spot removal tool (or Photoshop if I think it’s worth the time) – if not, I’ll delete the panorama and redo it with another option.
Batch Export Using Multiple Presets
Now export different sizes and/or formats of your image(s) all at once. As an example, for a group of images selected, export both a small social-media-sized JPEG and a full size TIFF (or JPEG) file for print, putting the exported files in two different folders or in a single folder. You’ll first create export presets for these two (or how ever many) different file types needed, and then in the Export dialog you’ll click in the new preset check-boxes to select them.

Multiple Export Versions – Preset Workflow:
1. Once you put a check mark next to a preset to use it, all the settings become locked, so before checking any preset check boxes:
- If you haven’t already, create an export preset with desired settings (Choose settings you desire, then click on Add in the bottom right and name your preset).
- If you need to change any of the settings for the specific export you’re doing, click on the preset (not the checkbox!), change settings, then right-click on the preset and choose Update with Current Settings – don’t forget this last step!
- In the Export Location section at the top, either choose the specific location you’d like exports from this preset to go (click on the dropdown, choose Specific Location, then click on the Choose… button to the right), or from the dropdown select Choose Folder Later.
- Create or edit any additional presets needed.
2. Check the boxes next to the presets you’d like to export files using
- You won’t be able to choose any presets that export to CD/DVD or to Email – only those that export to hard drive.
- This will gray out / change to read-only the export preset settings sections. The Post Processing and Plugins sections will become hidden – but your selections will still be respected.
3. Click on Export
4. If you had selected Choose Folder Later for one or more of the presets you’ve chosen, you’ll receive a prompt to choose the location for those presets. Click on Choose to choose the location(s). If the preset name and folder path have too many characters and are therefore truncated, hover over them to see the full information. (The dialog box can be enlarged vertically but not horizontally.) Once you’ve chosen all required locations, click on Done and the export(s) will begin.
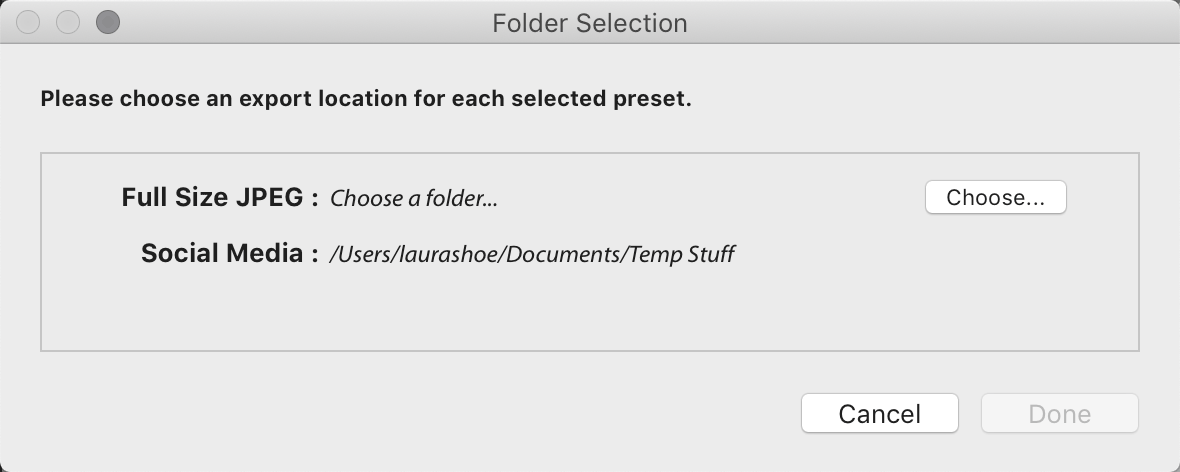
In my Full Size JPEG preset for the file location I chose “Choose Folder Later”, so I’m now prompted to choose that location. In my Social Media preset, I chose a specific folder (Temp Stuff) in the preset, so I’m not now prompted to specify a location for this one.
The exports will then be performed and you’ll find the exported files in the location(s) you specified. If there were any file name conflicts (i.e. there were already files with those names in the folder(s)), preset names will be added to the file names.
EVERYONE READ THIS: Cutting through the Confusion to Come
Here are some tips for working with Export presets now that this additional functionality complicates things:
- If you generally start your export by selecting a preset, modifying some settings, and then exporting, be sure to click on the preset name to select it rather than checking the box next to it. Only check the box if you want to export with multiple presets and when you have finished editing and saving those presets.
- If you wish to right-click on your preset to update with current settings, rename, delete, etc, be sure you haven’t checked the box – right-clicking on a checked preset only reveals an import option.
Filter Folders & Collections by Color Label
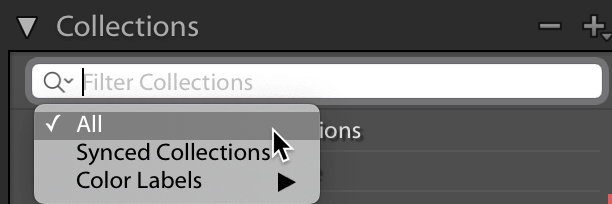
In previous versions of Lightroom Classic we got the ability to add color labels to collections and folders – right-click on your collection or folder and choose Add Color Label > color. We also have had the ability to filter collections and folders based on whether they have any color label or not. Now we can filter based on a specific color. To do so, click on the magnifier dropdown (circled in orange in the screenshot below) and choose Color Label > color. Color Label > Any will show only folders that have a color label (of any color); Color Label >None will show folders with no color label.

To cancel the filter, click on the magnifier dropdown and choose All.
Miscellaneous New Features
- Remove/delete photos: in Loupe view in Library and Develop, now use Shift-Delete to remove/delete all selected photos. (Using just Delete removes/deletes just the one photo displayed in Loupe view.)
- Filter Images for Depth Map: Using the Library Filter bar or a smart collection, now filter for whether or not images have a depth map embedded. Use a Metadata filter with the Depth criterion. (Click here to go to my video tutorial on how to use depth maps in Lightroom.)
- Now export Develop presets and preset groups: right-click on a preset or group, choose Export and specify a location to save it to. Useful for sharing or backing up your presets.
- Crop enhancement: if you have applied a post-crop vignette using the Effects panel, the vignette will now show as you crop your image, provided you have GPU acceleration turned on in Preferences (check the Use Graphics Processor box).
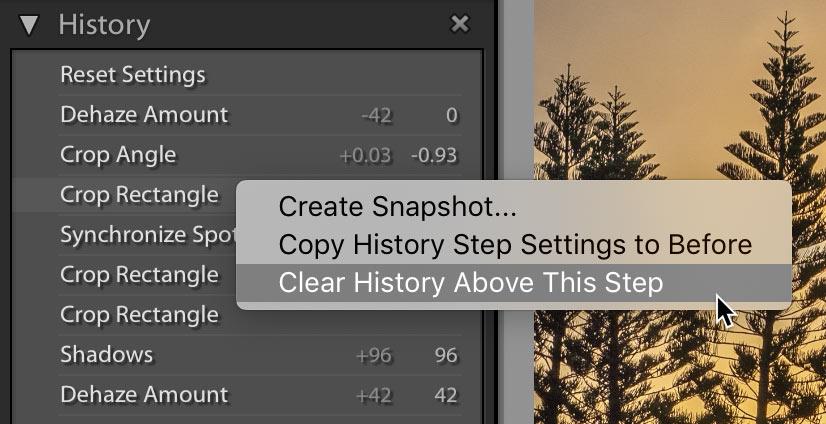
- Clear History Above Selected Step: now right-click on the the last step in Develop History that you want to retain and choose this option to delete all steps above it. (This accomplishes the same thing as left-clicking on a step to select it and then just continuing to edit the photo – steps above that one automatically get cleared – but not until you do another edit.)
- Process version: as you edit an image that is in old process versions 3 and 4, your image will automatically be updated to the current process version 5.
- Keywording performance improvement: when you select multiple images, their keywords will appear faster in the Keywording panel than before.
