 In conjunction with Adobe’s annual MAX conference being held this week, cloud-based Lightroom Desktop 3.0 has been released with lots of great new features, support for new cameras, and more. New features include greatly expanded Export (Save To) options, interactive editing tutorials, content-aware Fill Edges for panoramas and more.
Updates were also released for Lightroom Mobile iOS and Android, and for Lightroom Classic – read my separate articles on these.
In This Article:
- Operating System Requirements
- When and How to Update
- New Home Screen
- Support for New Cameras
- New Lens Profiles
- Expanded Export (Save To) Options
- Interactive Editing Tutorials
- Panorama Content-Aware Fill Edges
- Album Custom Sort Order
- Blurb Photo Book and WHCC Printing Connections
- Search Starting Point
- Migration from Photoshop Elements
- GPU Performance Improvement Feature
- Miscellaneous New Features
(These links above to sections below may or may not work depending on what device and system you are using. If they don’t, then scroll down.)
Operating System Requirements
Support for macOS Sierra and Windows 10 v. 1703 and 1709 has been dropped. Operating systems supported include:
- macOS High Sierra (10.13), Mojave (10.14), Catalina (10.15)
- Windows 10 v. 1809 and later
The Lightroom Desktop 3.0 update will not appear in the Creative Cloud app if your operating system is not supported.
How and When to Update
If you previously were prompted to agree to auto-update Lightroom and if you agreed, then when you open Lightroom for the first time after the update is available, you’ll be notified that “Lightroom Needs to Do Some Updating” and then you’ll be using the new Lightroom 3.0.
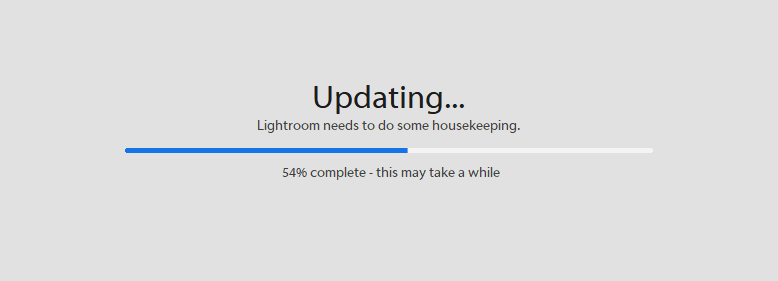
If you don’t see this, go to Help>System Info to verify that you are now using version 3.0. Otherwise to update to 3.0, go to Help>Updates, and in the Creative Cloud app, on the Updates tab click on Update next to Lightroom (cloud-based photo service; not Lightroom Classic or Lightroom CC 2015.)
The Creative Cloud app has been redesigned – click on Updates on the left or Photography to isolate these apps and find Lightroom Desktop (the cloud-based photo service).
When to Update (if Lightroom didn’t auto-update):
When you update to 3.0, Lightroom upgrades the catalog to a newer version – that’s what the “Lightroom Needs to Do Some Updating” message indicates. Note that after this happens, it takes a few steps to revert to 2.4. Because of this, while I don’t expect any issues with Lightroom 3.0 and updates of this app usually go smoothly, it can’t hurt to wait a week or so to make sure that others aren’t experiencing major bugs with it.
If I hear of serious issues with this release I will post them here in this section – please check here rather than emailing me.
Click here to check for bug reports and to report bugs or issues that you encounter.
New Home Screen
When you open Lightroom Desktop 3.0 you’ll land on the new Home screen, where you’ll have access to photos and albums you’ve worked with recently as well as Learn guided tutorials and Discover photos:

Read more about Learn guided tutorials and Discover photos later in this article. To get to all your photos (the view Lightroom used to open to), click on the All Photos (book) icon below the Home icon.
New Cameras Now Supported
The entire Lightroom ecosystem now supports the following new cameras:
- Apple iPhone 11
- Apple iPhone 11 Pro
- Apple iPhone 11 Pro Max
- Fuji X-A7
- HUAWEI Honor 20 Pro Rear Main Camera
- HUAWEI Honor 20 Pro Rear Telephoto Camera
- HUAWEI Honor 20 Pro Rear Wide Camera
- HUAWEI P30 Rear Main Camera
- HUAWEI P30 Rear Telephoto Camera
- HUAWEI P30 Rear Wide Camera
- HUAWEI P30 Pro Rear Main Camera
- HUAWEI P30 Pro Rear Telephoto Camera
- HUAWEI P30 Pro Rear Wide Camera
- Nikon Z 50 (preliminary support)
- Panasonic DC-S1H
- Sony A6100 (ILCE-6100)
- Sony A6600 (ILCE-6600)
- Sony A7R IV (ILCE-7RM4)
- Sony RX100VII (DSC-RX100M7)
Click here for a list of all cameras supported by each version of Lightroom (and Camera Raw).
New Lens Profiles
These new lens profiles are available throughout the Lightroom ecosystem:
Expanded Export (Save To) Options
Saving copies of your files to share them with the outside world has been renamed from Save To to Export. Up until now, one of the downsides of using the cloud-based Lightroom was that export options were very limited – this has substantially been addressed in 3.0.
When you select one or more photos and click on the Share icon, you’ll now see:

To quickly export a small or full size JPEG or a file that’s the same format as the original, click on one of the three presets (#1 in the screenshot above) and specify a location to save the exported file.
To access the new more extensive Export dialog, click on Export … (#2 in the screenshot above) and you’ll see:
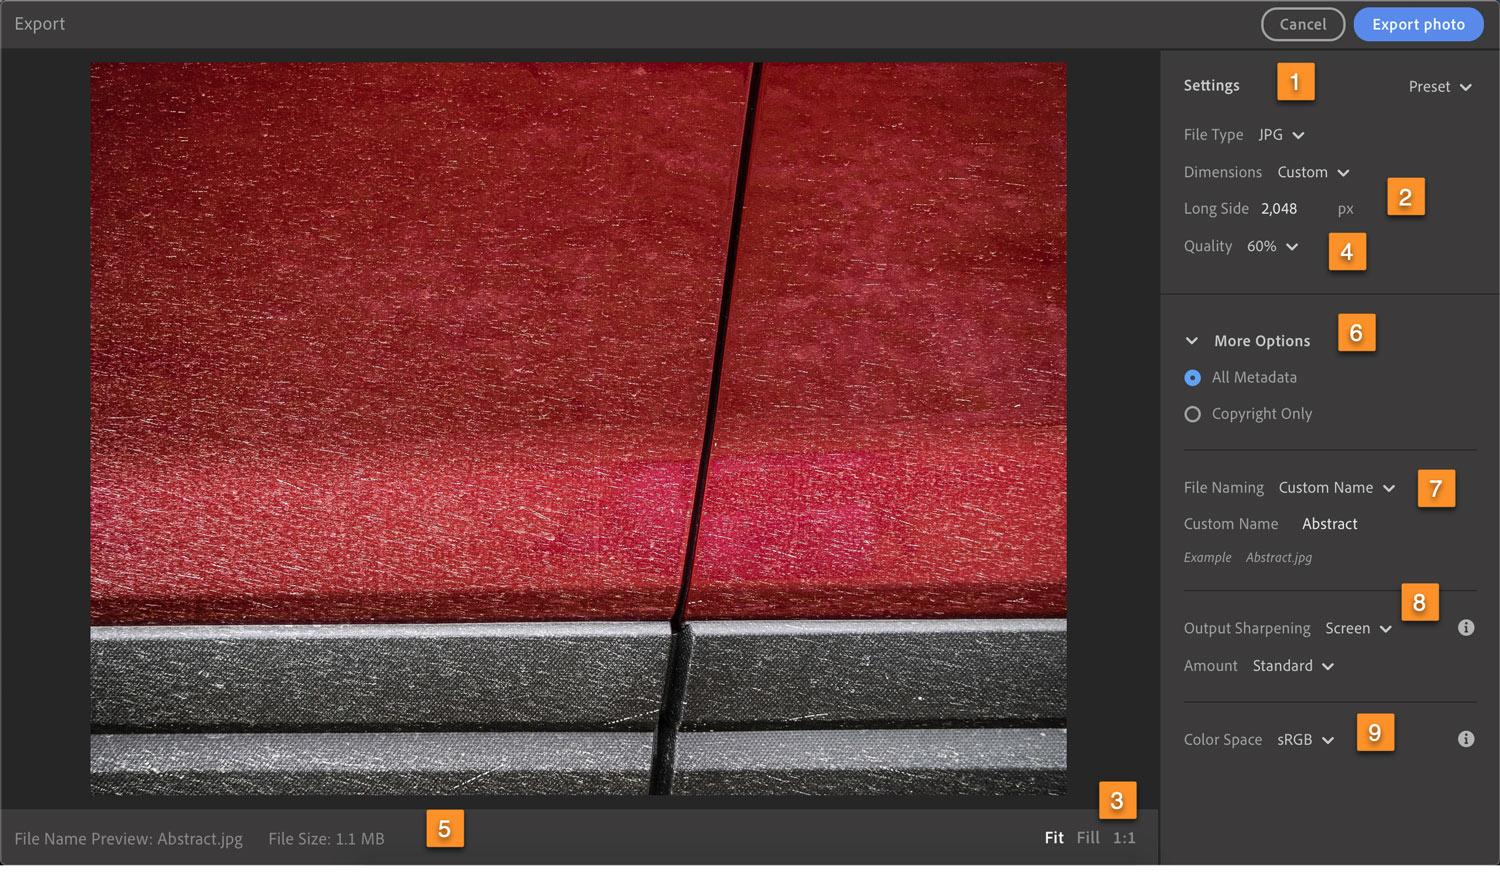
In the Setting section, specify desired file settings, just like in Lightroom 2.4. New in 3.0 file type options include TIFF files (with bit depth and compression options), plus we finally get the JPEG Quality setting (#4 in above screenshot), which allows you to achieve smaller files by controlling the JPEG compression level. Read all about the Quality setting in my JPEG Compression and the Lightroom JPEG Quality Setting article. Note that file size is previewed below the image (#5) – this is very handy when deciding on what Quality setting to use.
For metadata, file renaming, output sharpening and color space options, click on the More Options dropdown (#6).
Metadata: Copyright Only gives you exactly this – camera information, capture date, keywords and all other metadata are stripped out.
File Naming: to rename, choose from Custom Name or Date-Filename. With Custom Name, don’t forget to type in the custom name, or all your files will be renamed “Untitled”! If you are exporting more than one photo, filenames will have -1, -2, etc. appended. If the filename(s) you are exporting already exist at the location you’re exporting to, numbers will also be appended to eliminate the conflicts.
Output Sharpening: this is designed to restore sharpening lost in the output process (resizing and/or printing). Read all about this in my Sharpening in Lightroom Part Three: Output Sharpening article.
Color Space: choose sRGB for general sharing, Digital P3 for Apple mobile devices, Adobe RGB for printing services that accept it, and ProPhoto if you plan to edit the file further in Photoshop.
Previewing Your Export Decisions
I love that we have a photo preview within the Export dialog to fully understand export choices – size, Quality and sharpening. Unfortunately the preview by default doesn’t show size, since the view (#3 in above screenshot) defaults to FIT, which enlarges or shrinks the photo to take up the full preview window. If you’ve chosen a small file size – 600 px, for example, the preview looks blurry because Lightroom is enlarging it to fit the window. To fix this, change the view to 1:1, which is actual size.
Interactive Editing Tutorials
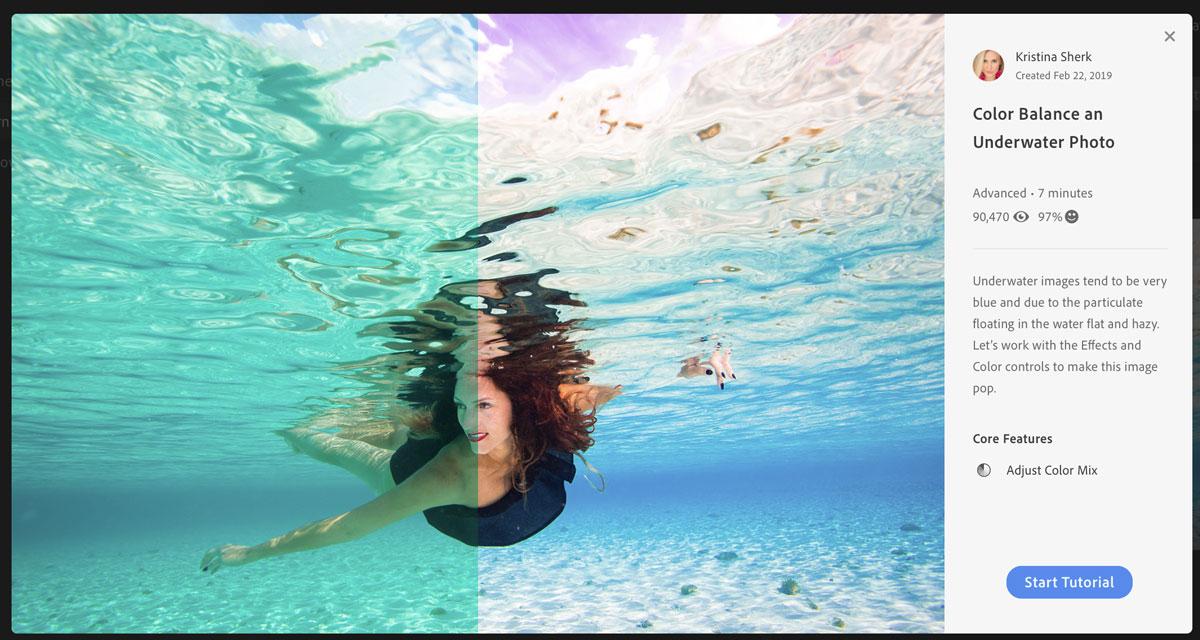
While I’m very happy to see the expanded export options and other new features I write about in this article, my favorite additions to Lightroom Desktop are the new Learn guided tutorials and Discover edited photos. These have been available in Lightroom Mobile for some time, but for me they are much easier to enjoy and learn from in Lightroom Desktop on my computer than they are in Lightroom Mobile on my phone. (Of course if you have a large tablet you may already be enjoying them.) In Learn guided tutorials, work along with professionals to edit their images, or in Discover photos, simply review what edits professionals have done to images. Not only can these teach you to use editing tools appropriately, but they will encourage you to take images in directions that you wouldn’t have thought of on your own – as they have encouraged me to do. There are tutorials for all levels, so there is plenty here for everyone, and new tutorials are being added all the time. (In full disclosure, I’ve just signed on with Adobe to produce some Learn tutorials and Discover files over the next few months – I’ll let you know when they are available – but I would be excited about this feature even without being involved myself.)
To access these, click on the Home icon:
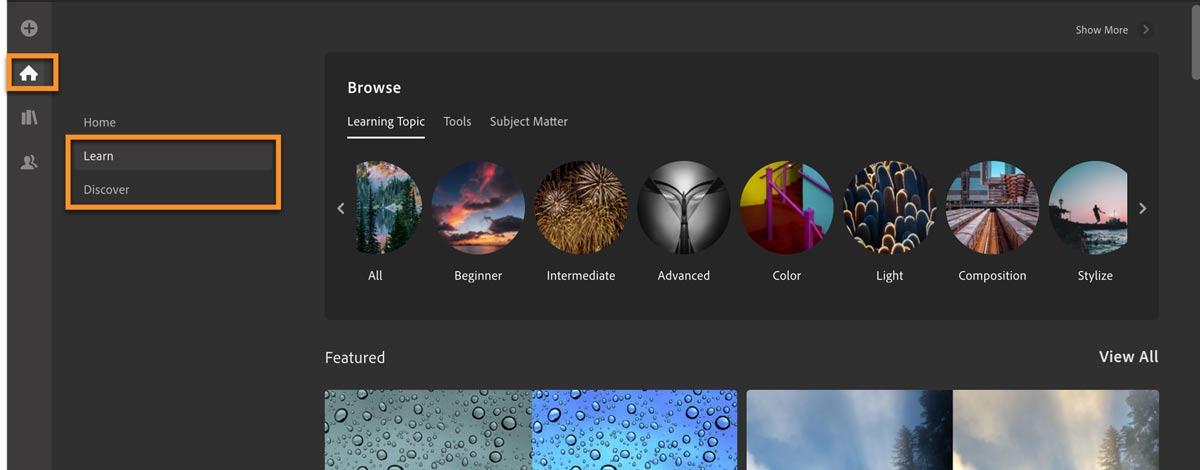
For guided tutorials, click on Learn, choose a tutorial, click on Start the Tutorial, and hands-on, make the edits that the author recommends.
Discover Photos:
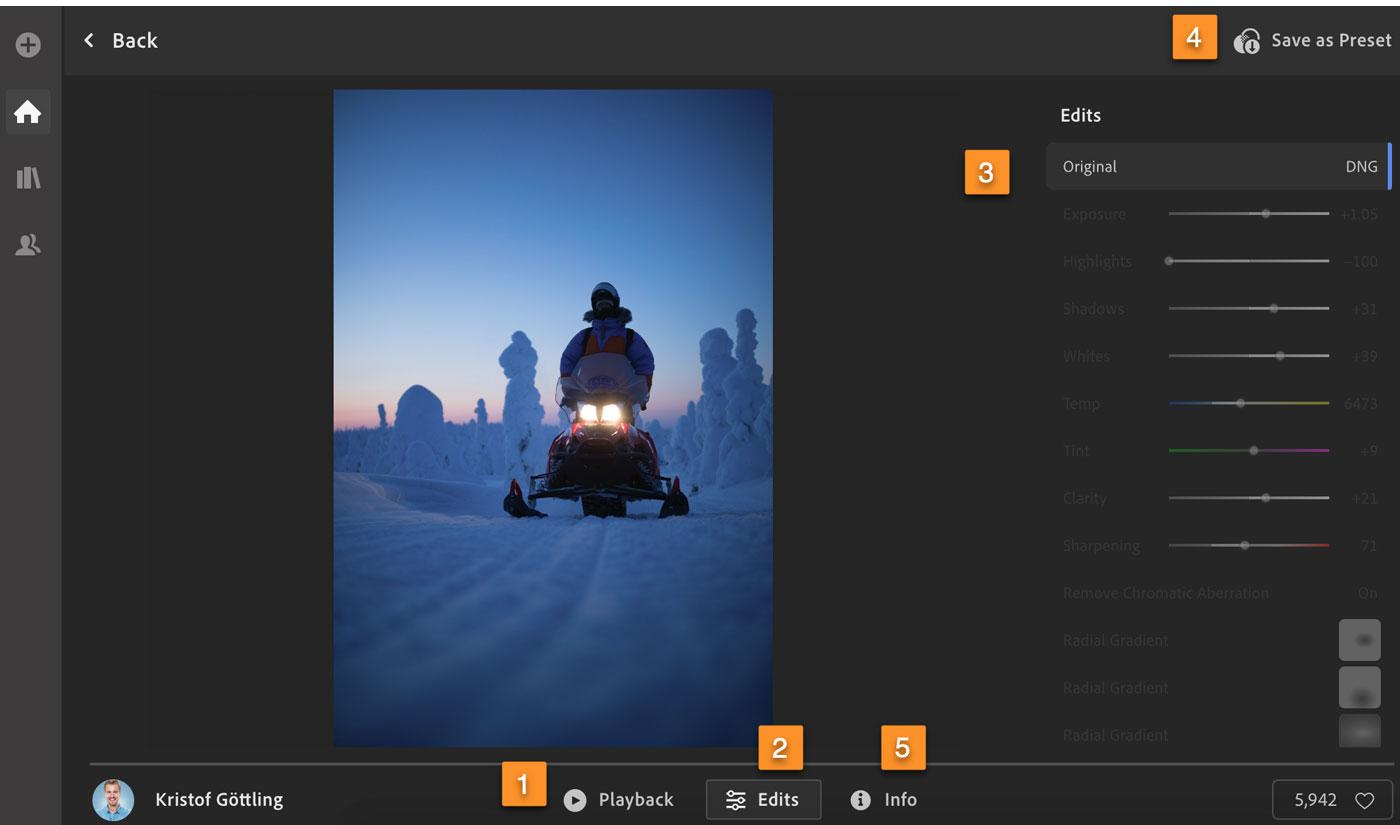
Click on Discover and choose an image. Click on Playback (#1 in the screenshot below) to see a quick video of the editing or on the right side, or click on Edits (#2 below) and click through the edits one at a time (#3) to learn what the photographer did. To try the photographer’s edits on your own photos, click on Save Preset (#4) and then apply that preset to your own images. Review what camera, exposure and other settings were used (#5).
Panorama Content-Aware Fill Edges
When stitching together images into a panorama, Lightroom has to warp the individual source files so that they fit together seamlessly. This leaves transparent (white) areas around the edges. Previously we have had the Boundary Warp feature, which further warps the files to eliminate the transparent areas. New in Lightroom Desktop 3.0, there is a new Fill Edges option that uses content-aware fill technology, long available in Photoshop, to intelligently fill in those areas without further warping.
To use Fill Edges, select your panorama images, right-click in one, go to Photomerge>Panorama, and check the Fill Edges box:

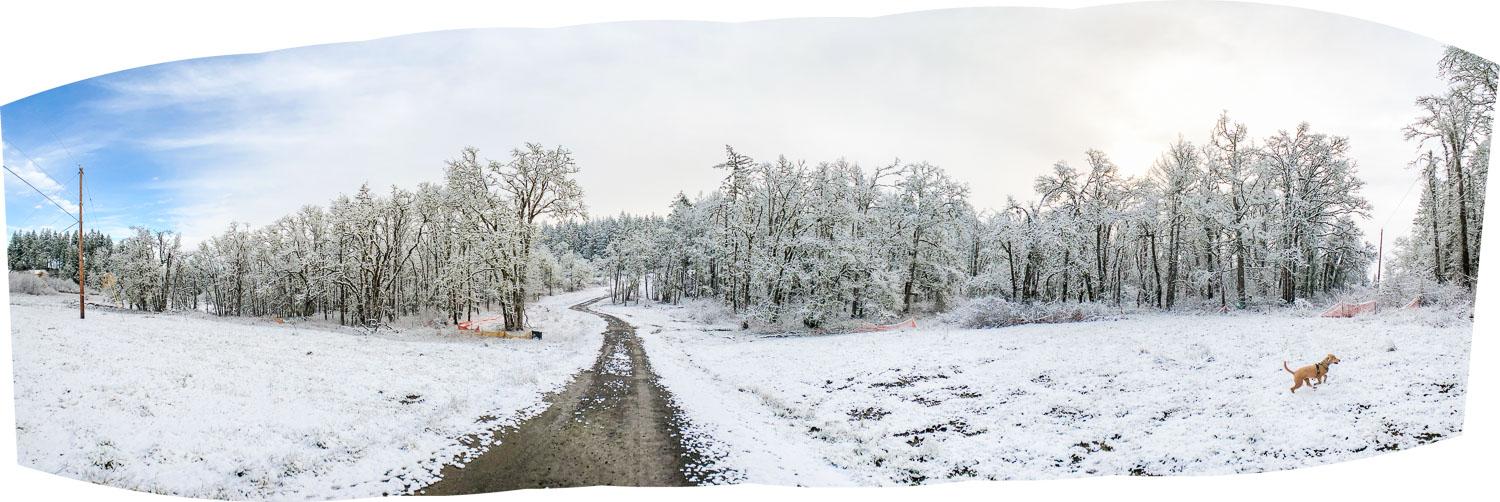
Panorama without transparent edges filled in

Transparent areas filled with Boundary Warp – notice the warped telephone pole on the left.

Transparent areas filled in with content-aware Fill Edges
As with content aware features in Photoshop, Fill Edges in Lightroom sometimes produces impressive results and sometimes it doesn’t, depending on how complicated an area is to fill in. The small version of the example above looks good, but Fill Edges does fail in places:
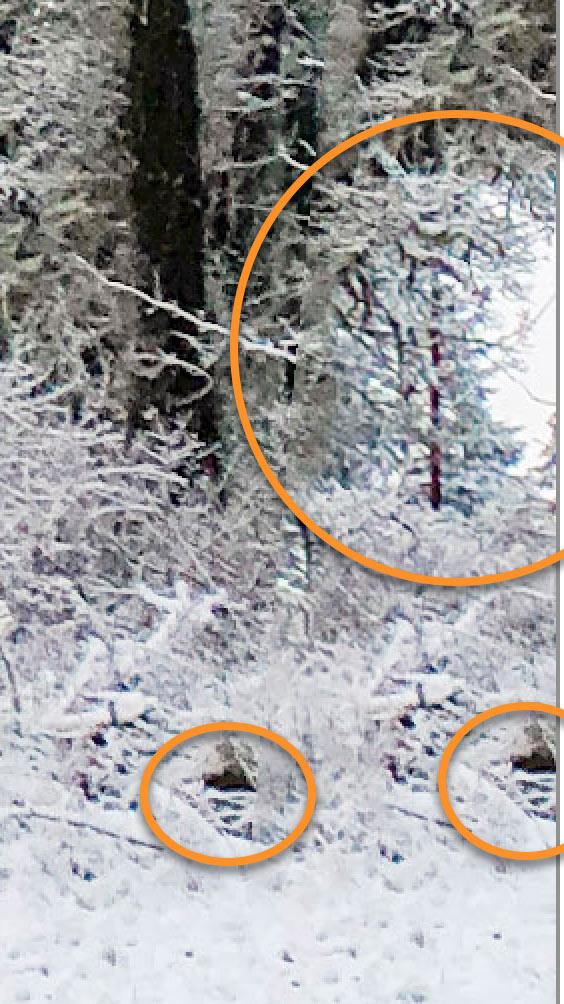
Issues: white sky put in filled area on the ground, obvious repetition of objects
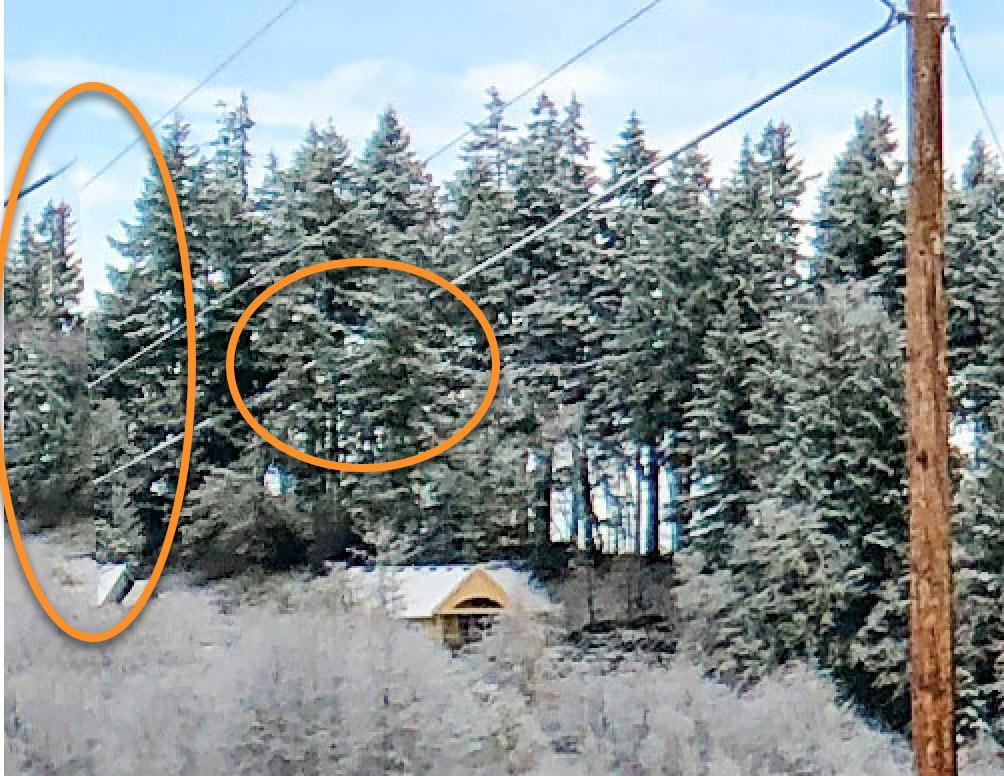
Issue: power lines not continuous
How I Use These Tools
While in the Panorama preview dialog I evaluate Fill Edges vs. Boundary Warp vs. Auto Crop (which crops off the transparent areas). If Fill Edges clearly shows clear advantages over the others, I choose it, and then after the panorama is merged I zoom in and look around the image for issues. (The larger your output will be the further you should zoom in and the more carefully you should check.) Some issues may be easily fixed with Lightroom’s healing tool (or Photoshop if I think it’s worth the time) – if not, I’ll delete the panorama and redo it with another option.
Album Custom Sort Order
I’m happy to report that we now in albums in grid view (G) we can drag and drop images to reorder them. There’s no need to set the sort order before beginning – when you drag and drop it will automatically change to Custom. The order will carry over automatically to Lightroom Mobile and Web.

Custom ordering is only supported in albums – not in album folders, dates, or All Photos.
Photo Book and Printing Connections
Last year Lightroom received a “connection” for uploading images from Lightroom to Adobe Portfolio, where you can create a website for free. Now in Lightroom 3.0 connectors are available for Blurb, for making photo books, and for White House Custom Color (WHCC), for printing. There’s a lot of potential for these, but as I’ll discuss, their value right now is limited.
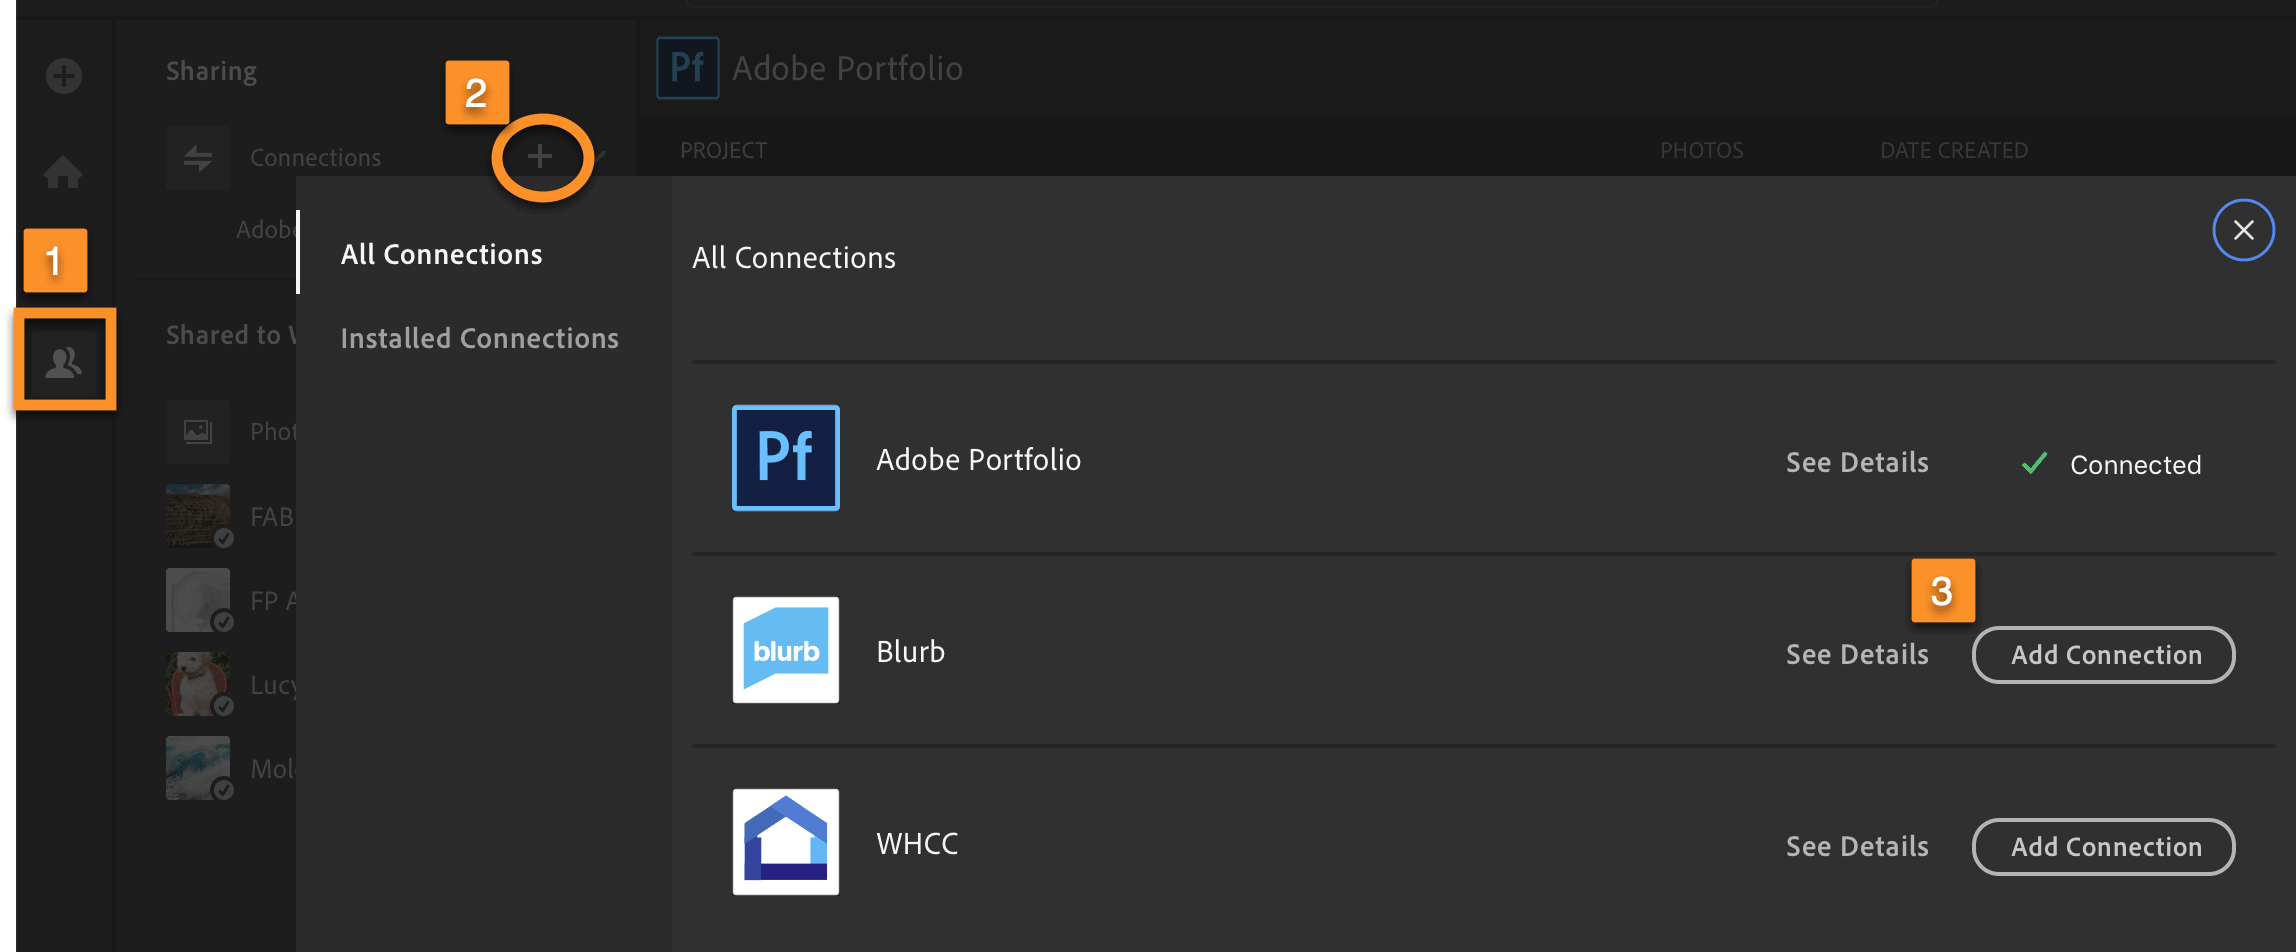
On the Sharing tab (#1 in the screenshot below), click on the + to the right of Connections (#2), and then click on Add Connection (#3) next to the one you want:
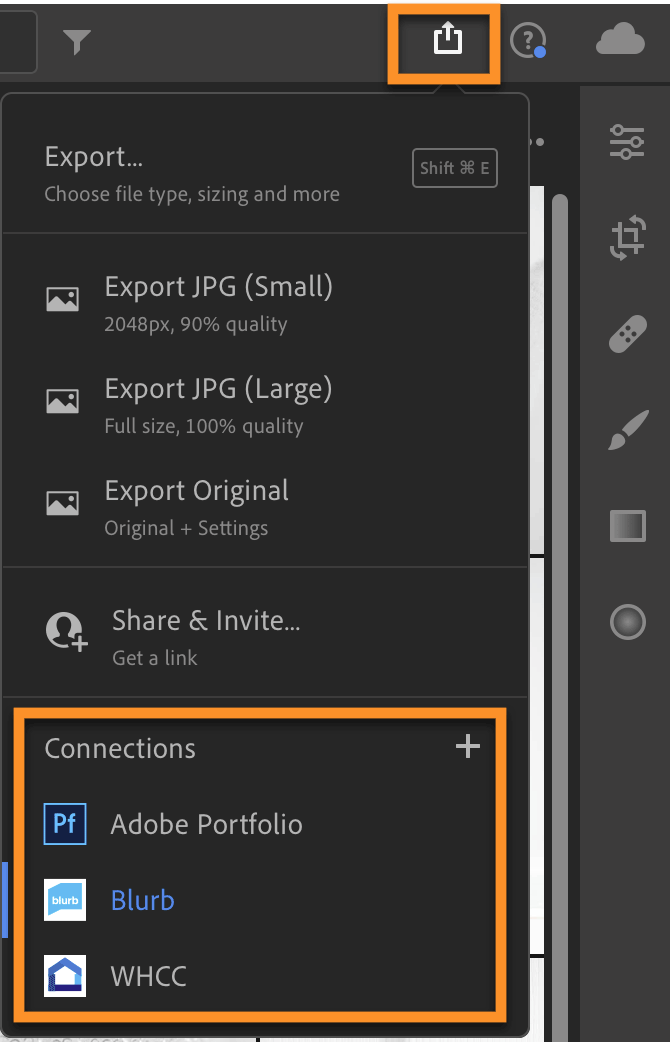
Once the connections are active, you can share photos to them by clicking on the Share icon in the top right and choosing Blurb, WHCC (or Adobe Portfolio). (Note that smart previews (synced from Lightroom Classic) can’t be used with these connections – only originals.)
Blurb
Blurb is a photo book publishing company that Adobe has partnered with in this (and in the Lightroom Classic Book module). Unlike with Lightroom Classic, with the cloud-based Lightroom Desktop you don’t build your book in Lightroom, you build it with Blurb’s Bookwright software. The new connection to Blurb is intended to make it easy for you to get your photos from Lightroom to Bookwright. In a nutshell, here’s how it works, though at the end I’ll tell you that you really don’t need this Blurb connection at this point:
- Download and install the Bookwright software
- Add the connection in Lightroom
- Select images for your book in Lightroom, click on the Share icon, choose Blurb and give your book project a name.
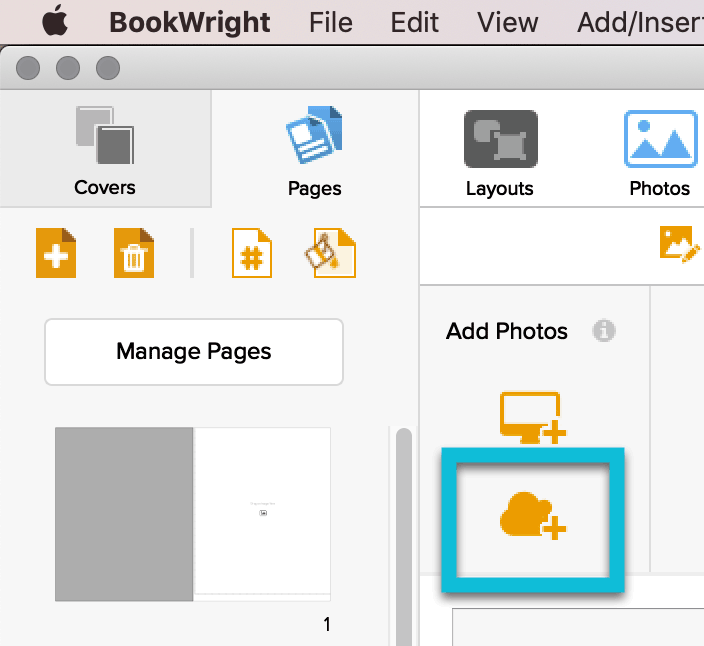
- Ignore the webpage that launches (unless you haven’t downloaded the Bookwright software.) Open Bookwright, click on the Add Photos cloud icon, and then choose Lightroom and click on Connect. This process grants Bookwright access to your Lightroom photos in the cloud.
- In the Photo Manager webpage that opens, you’ll see your connected album(s) at the top. Click on it to open it, then select the photos you want to add to your book project. Here’s a big caveat: Back on the Photo Manager page, note that if you scroll down you’ll see ALL of your Lightroom albums – so you really don’t need to use Lightroom’s Blurb connection to easily get your Lightroom photos into Bookwright.
- Images sent to Bookwright are JPEGs saved at 90% quality in the Display P3 color space.
- Things get more complicated if you add an image to the connection and then decide to edit it further. To get the connected album to see the updated image, in Lightroom you’ll need to go to the connected album (Sharing>Connections>Blurb, click on the album), remove the image, back out of the album and click on Resend, then share the image to the connection again.
If this process is as confusing for you as it is for me at this point, I’d give the Lightroom and Blurb teams more time to refine it. In the meantime you can just use the Bookwright software – either access your Lightroom cloud catalog through it, or export full-size JPEGs from Lightroom and import them directly into Bookwright.
White House Custom Color
White House Custom Color (WHCC) is a high-quality printing service. Using the Lightroom connection to WHCC is simple, but unfortunately at the time this article is being published you can’t order a simple print – you can only order the print in a complete wall display (framed, gallery wrap, image block, etc.) To use the connection:
- Set up the connection and then share one or more images to it (as explained at the top of this section).
- Upon sharing images to the connection you’ll be taken into the WHCC ordering process. The starting point is deciding what wall display you’d like to order. (Try it though – perhaps this has changed between the time I wrote this article and when you’re reading it.)
- Images uploaded to WHCC are JPEGs saved at 90% quality in the Display P3 color space.
Search Starting Point
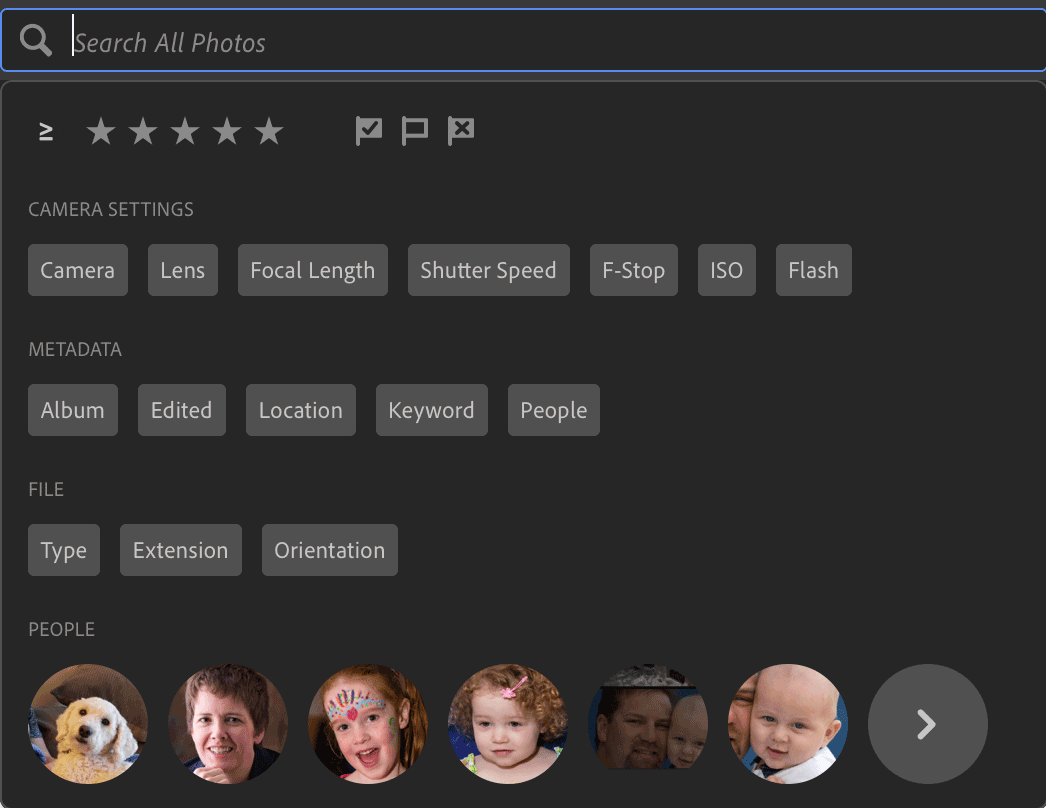
Now when you first click in the Search box above the grid, you’ll be offered some handy starting points. Choose one of these or just type as you would have before. (The Camera Settings, Metadata and File options are facets – once you choose one you’ll be offered a dropdown of values that are available in the search location you’ve started with. These are also available by typing the name of the facet, followed by “:”, for example, “camera:”.)
Migrate from Photoshop Elements
Migrate your 2019 and 2020 Photoshop Elements catalogs to Lightroom by going to File > Migrate from > Photoshop Elements Catalog…:
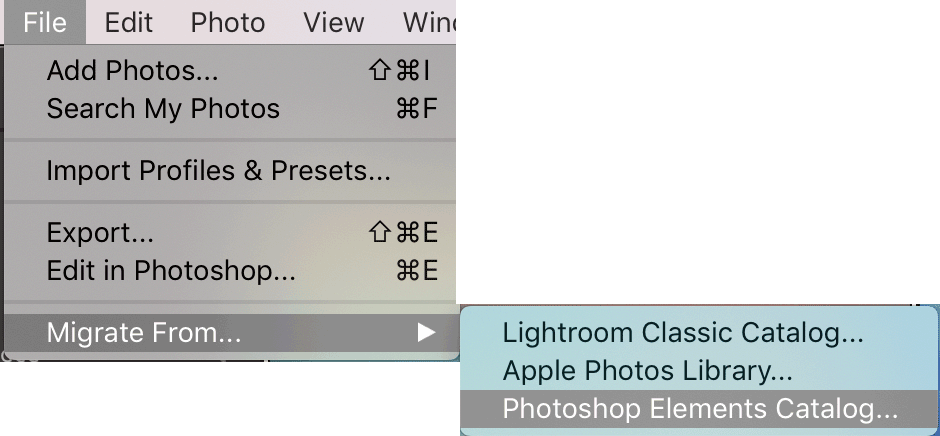
The following will not be migrated: events, mobile albums, hidden images, audio-only files (such as MP3s), and special Elements creations such as books, calendars, etc..
GPU Performance Improvement Feature
Previously available only in Lightroom Classic, Lightroom Desktop 3.0 now can potentially leverage the graphics processor unit (GPU) on your computer’s video card to do intensive processing. Whether this is available and what level is available depends on whether and to what extent your graphics card is supported.
To access this feature, go into Preferences (from Adobe Lightroom on Mac or Edit on PC) and click on Performance:
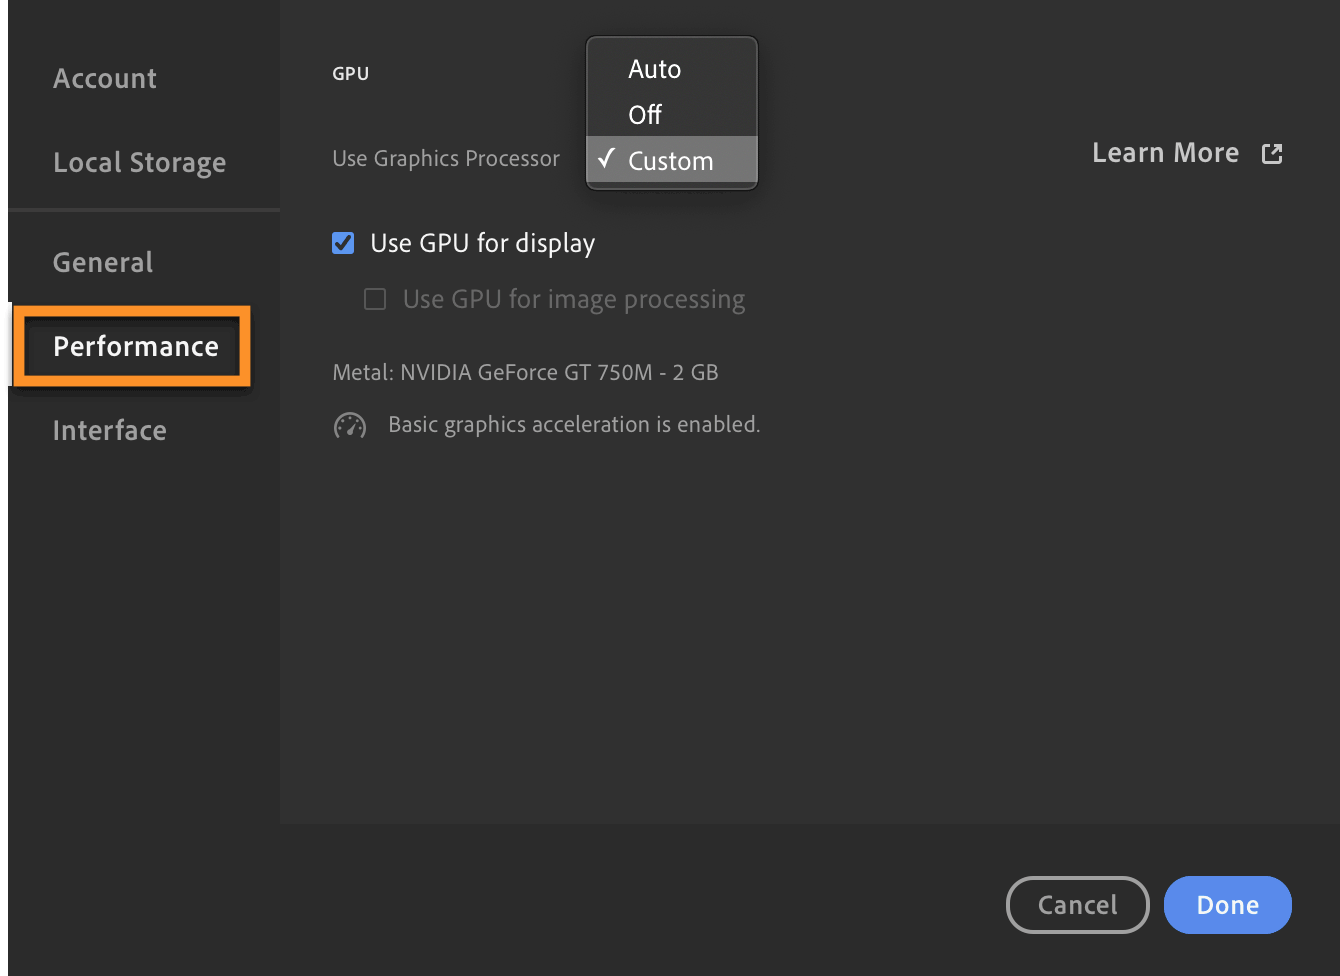
There are two levels of GPU acceleration – (1) using the GPU to improve the speed at which your images are displayed, and (2) using the GPU to improve the speed at which editing calculations are performed (image processing). By default, Use Graphics Processor is set to Auto, which will detect your graphics card and set it at the level that will most likely perform best. To change this, click on the dropdown and choose Custom and then select the desired level. Note that one or both levels may be disabled (as image processing is in my screenshot) if your video card doesn’t support them.
This feature can sometimes cause odd display issues and performance issues. If you experience these, try turning off Use Graphics Processor.
Miscellaneous New Features
- Auto Advance: Hold down the Shift key while assigning stars or flags with a keyboard shortcut (0-5 for stars, Z=Pick, X=Reject, U=Unflag and Lightroom will then automatically advance to the next photo.
- Drag and drop images from Windows File Explorer or Mac Finder into the Lightroom grid (G) to launch the Add Photos (import) dialog with those photos selected.
