 Adobe released Lightroom Classic 9.3 last night. This relatively large update contains new features, improvements to existing features, support for new cameras, tether support, new lens profiles and bug fixes.
Updates for the cloud-based Lightroom desktop app and iOS and Android apps were also released, with new features – see my Cloud-Based Lightroom Desktop and Mobile article for details.
 Owners of my latest Lightroom 5, 6 and Classic CC: The Fundamentals & Beyond video series (within your initial period of free updates or having renewed): I have emailed you instructions on how to receive your free updates – there are three new videos and changes to 17! If you didn’t receive my email, contact us and we’ll figure out what happened. (Do check your spam folder, and if you have Gmail, the Promotions inbox.)
In This Lightroom Classic 9.3 Article:
- New Logos
- How and When to Update
- New Cameras Now Supported
- New Tether Support
- New Lens Profiles
- Performance Improvements
- Local Hue
- Raw File Defaults Improvements
- Batch Export Enhancements
- Tone Curve Changes
- New Sync Information Tab
- HEVC and AVI Video Support
- Miscellaneous
- Camera Raw Redesign and Implications for Lightroom
- Related Content
(The above links to sections below may or may not work depending on what device and system you are using. If they don’t work, scroll down.)
New Logos
As part of a larger rollout to update its brand identity, Adobe has introduced new logos for Lightroom Classic and the cloud-based Lightroom:

Lightroom Classic Old and New Logos

Cloud-Based Lightroom Old and New Logos
The Creative Cloud logo has also been updated:

Old and New Creative Cloud Logos
When and How to Update
When to Update:
I don’t have any indication that things won’t go smoothly with this update. That said, particularly since this update includes a lot of changes, possibly increasing the likelihood of bugs inadvertently being introduced, it couldn’t hurt to wait a week or two to see if others experience issues. If you install it and then encounter bugs that you can’t live with, you can use the Creative Cloud app to revert to 9.2.
If I hear of serious issues with this release I will post them here in this section – please check here rather than emailing me.
Click here to check for bug reports and to report bugs or issues that you encounter.
After installing the 9.3 update, it might take an hour or two for your system to update the Lightroom Classic logo in your dock or taskbar (if it doesn’t do so right away.)
New Cameras Now Supported
Lightroom Classic and the entire Lightroom ecosystem now support the following new cameras:
- Apple iPad Pro (11-inch) (2nd generation)
- Apple iPad Pro (12.9-inch) (4th generation)
- Apple iPhone SE (2020 version)
Click here for a list of all cameras supported by each version of Lightroom (and Camera Raw).
New Tether Support
Lightroom Classic now supports tethering for the Canon EOS-1D X Mark III.
Click here to see a list of all cameras supported for tethered capture.
Tethered capture involves shooting with your camera plugged into your computer, with Lightroom automatically and instantly importing the images. Watch my video tutorial on shooting tethered with Lightroom for more details.
New Lens Profiles
These new lens profiles are available in Lightroom Classic and throughout the Lightroom ecosystem:
Performance Improvements
Adobe continues to work on improving Lightroom Classic performance. In this update they have worked on:
- Faster Grid scrolling when using the arrow keys, mouse/trackpad and/or touch
- Faster collection searches using the filter at the top of the Collections panel. This will be most apparent to users with very large numbers of collections.
- Better performance when scrubbing (sliding) Develop module sliders. During scrubbing, the Navigator view, Detail panel thumbnail and Filmstrip thumbnail will no longer be updated until you finish sliding the slider. There’s one exception to this – if you’re scrubbing Detail panel sliders, the Detail panel thumbnail will update continuously. The performance improvement will vary depending on your system configuration.
Change Local Colors with Hue Slider
Now change colors within a local area in your image with the new Hue slider, available in the adjustment brush, graduated filter and radial filter:

Paint a local area with the adjustment brush or one of the local filters. Then drag from the triangle on the Hue slider to shift all colors within the area you’ve defined. The bottom hue bar represents Before, and the top, After. In the screenshot above, pink is shifted to blue, green to yellow, and blue to green.

Local hue change in the area of the doll, limited by color range mask to the pinks
Combine with local Exposure and Saturation to affect hue, saturation and luminance of of colors. Combine with auto mask or range mask to limit changes to one specific color. (This is where local Hue is at its most powerful!)
 Watch my new Local HSL (Hue, Saturation, Luminance) video in the Advanced Photo Editing section of my Lightroom 5, 6 and Classic CC: The Fundamentals & Beyond V. 8 video series for complete instruction on using these features together. This series is now completely up-to-date through Classic 9.3.
Raw Develop Default Improvements
In the last major update to Lightroom Classic, the method for setting new Develop default settings for images was changed – it’s now specified in Preferences, and defaults can be defined by presets.
In this Lightroom Classic 9.3 update, the following has been added or changed:
- There is a new set of Defaults presets in the Presets panel:

Use these presets to reset images to specific defaults, or use the presets to define new defaults. Camera Settings applies the camera-matching profile (and any other camera settings that Lightroom can read); profile + Lens applies a profile plus removes chromatic aberration and applies a lens profile; profile + lens + NR also applies noise reduction varying by ISO.
- Now when you delete a preset that is used in raw defaults preferences, you’ll get a warning that it is used in defaults. If you delete the preset, defaults will now be reset to Adobe defaults.
- A new method for setting defaults that vary by ISO has been implemented (hooray – no need to edit XMP files!) Select two or more images at different ISOs that you have edited with settings you want to include in defaults (including settings that vary by ISO), then create a new preset, and check the ISO adaptive preset box:

After creating your preset, in Preferences set the preset as your default. (If you’re varying noise reduction and other settings by ISO and you have multiple cameras, you’ll probably want to set different defaults for each camera you use). If you want to update your preset at some point, remember to select all the images again, then right-click on the preset and choose Update with Current Settings.
 Learn all the details about setting new Develop defaults and varying them by ISO in my Setting New Develop Defaults for Raw Files, my Varying Presets and Raw File Defaults by ISO, and my Varying Presets and Raw File Defaults by ISO – Coding Method videos in the Advanced Photo Editing section of my Lightroom 5, 6 and Classic: The Fundamentals & Beyond video series – it’s completely up-to-date for Classic 9.3.
Batch Export Updates
In an earlier major Lightroom Classic update, we got the capability to export, for any number of selected images, multiple file types – for example, a full-size JPEG for printing and a smaller JPEG for social media use. In this Lightroom Classic 9.3 update, the following changes have been made:
- When multiple presets are selected in the Export dialog, the Export button changes to Batch Export…
- Clicking on Batch Export… brings up a more expansive dialog than before, allowing you to specify locations for each set of files, and change the Custom Text if you’re renaming files using a renaming template with Custom Text in it:

The Choose Parent checkbox allows you to put all your exported files into one master folder, with our without subfolders for files from each preset:


For all details on how to do batch exports in Lightroom Classic, watch the Batch Exports video in the Exporting and Sharing section of my Lightroom 5, 6 and Classic: The Fundamentals & Beyond series – it’s up-to-date with all Lightroom Classic 9.3 changes.
Tone Curve Enhancements
The Tone Curve UI has been refreshed a bit, with new icons along the top to easily get to parametric (slider view), and RGB, R, G, and B point curves:

In addition, new options are available when you right-click on a point on a point curve:

Copy and Paste Channel Settings allow you to easily replicate a curve from one channel to another. With Snap to Grid once you finish dragging a point and let go, Lightroom will snap that point to the nearest gridline.
When you’re using the point curves, you’ll see input and output values below the curve. These range from 0 (pure black) to 255 (pure white). Input is before, Output is after.
 Watch the Tone Curve video in the Advanced Photo Editing section of my Lightroom 5, 6 and Classic: The Fundamentals & Beyond video series for complete instruction in how the tone curve works and how to use it.
New Sync Tab
To make sync information more prominent, a new Sync tab has been added at the right side of the module picker:
![]()
Clicking on the gear/settings icon will take you to the Lightroom Sync tab in Preferences.
Sync information has been removed from the Identity Plate area (Activity Center) in the top left of Lightroom.
The Sync tab cloud icon will change depending on sync status:
![]()
 For more information on syncing collections of Lightroom Classic photos to Lightroom Mobile and Web, and syncing Mobile and Web photos to Lightroom Classic, watch my video on using Lightroom Mobile and Web with Lightroom Classic, in my Lightroom Fundamentals & Beyond video series.
HEVC and AVI Video Support
HEVC-format movies from Apple iPhones and iPads can now be imported into Lightroom Classic on Windows computers (and on Macs).
AVI-format videos can now be imported on Macs (and on Windows computers). AVI is a Windows format.
Read more from Adobe about Lightroom Classic supported video formats.
 Watch my Manage, Export and Edit Videos video in my Lightroom 5, 6 and Classic: The Fundamentals & Beyond series for full instruction in these topics – it’s up-to-date for all Lightroom Classic 9.3 changes.
Miscellaneous Enhancements
The following new features are also available:
- The Color portion of the HSL/Color panel UI has been updated:

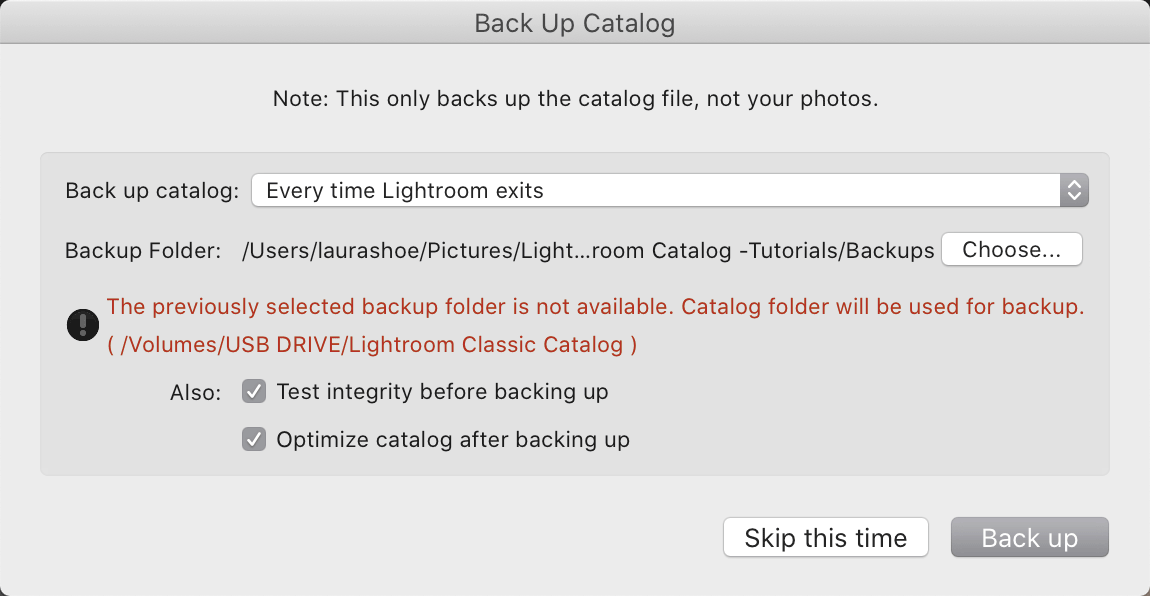
- Catalog Backups: If you normally back your catalog up to an external hard drive, but that drive isn’t available when you back up, you’ll now see a warning that Lightroom has changed the location to a currently available drive. When the external drive is next available, the location will change back to that drive.
- A new Three Dimensional Projection section in the Metadata panel in the Library module, allowing you to view or edit this metadata information for 360 images (shot with 360-ready cameras):

This is just a metadata tag – changing the Projection value does not change the image. Here’s an article from Facebook on this metadata.
- Import: on MacOS, the issue of receiving a “No Photos Found” message when importing from phones, cameras and other devices, when there are photos, has been fixed (hooray!)
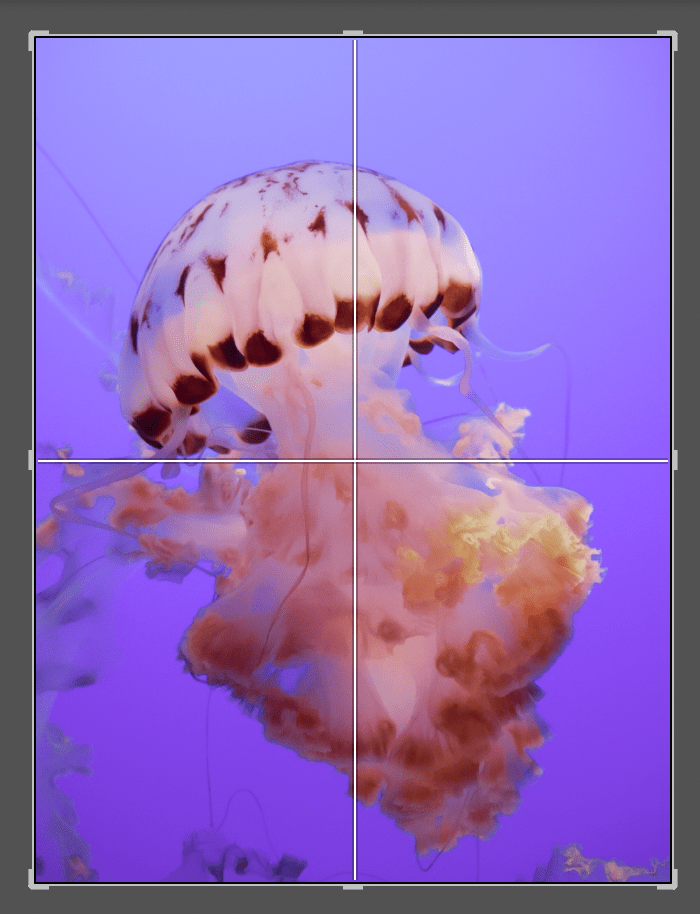
- Crop: There is now a center overlay. (Type O to cycle through the overlays.)
- Facebook publish service: Since this publish service was discontinued a long time ago, if you have any Facebook publish service collections you will be promoted to allow Lightroom to move them to a Facebook Collections set in the Collections panel. (Adobe recommends backing up your catalog before moving them.)
- In Survey view (multi-photo view; N), so that they are easier to see against all background colors (black, white, various shades of grey), the star and flag icons now change to different shades of gray depending on the background.
- Edit in Photoshop TIFF files: there was an issue where the selected TIFF compression (Zip / None) was not being respected – this has been fixed.
Camera Raw Redesign and Implications for Lightroom Users
Adobe Camera Raw, which some photographers use along with Photoshop instead of Lightroom, has received a major interface update, making it look more like Lightroom (its appearance looks like a combination of the Lightroom Classic Develop module and cloud-based Lightroom Edit:
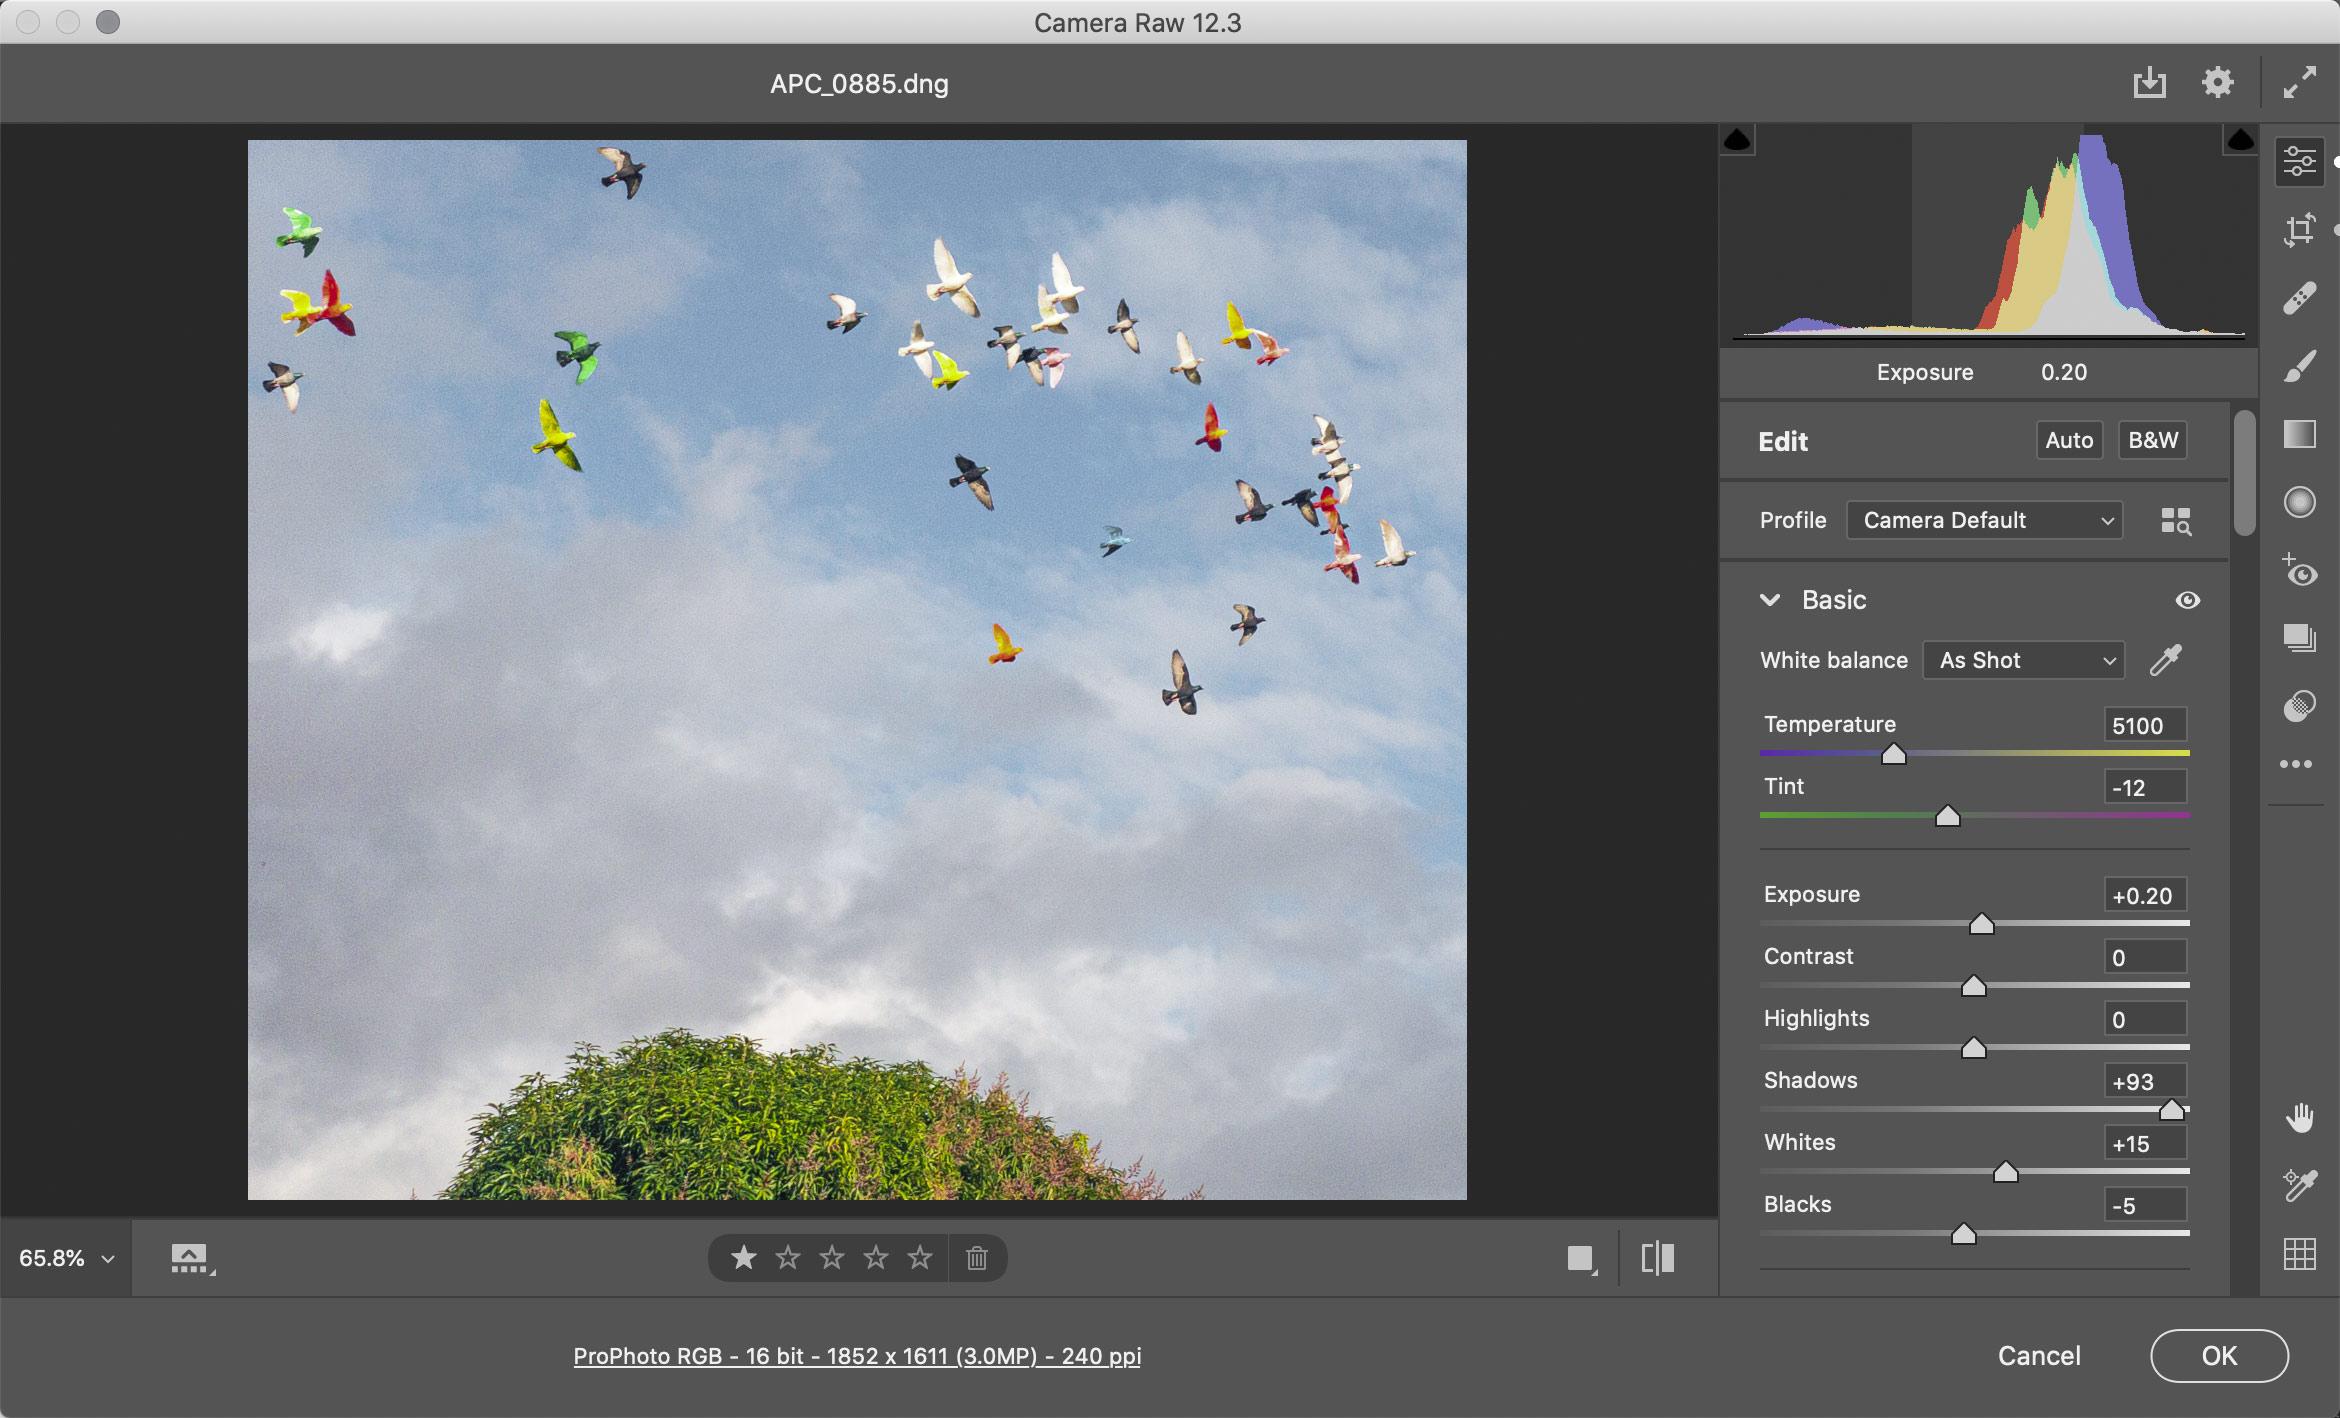
For most purposes I don’t recommend that Lightroom Classic users use Adobe Camera Raw, since Lightroom has the same editing capabilities and many more image management and output capabilities. That said, there’s one situation where it can come in handy if you also use Photoshop: if you open your images from Lightroom to Photoshop as smart objects (Edit In > Open as Smart Object), then rather than having your Lightroom work baked into your Photoshop file, your raw file (or other original file) is embedded into your Photoshop file with your Lightroom work, and it remains non-destructive. Double-click on it in the Photoshop Layers panel and it will open into Camera Raw, where you can see all of your Lightroom work and you can undo it or change it as needed.
This smart object capability has been available in Lightroom for years – but Camera Raw didn’t used to look like Lightroom, so you really had to devote time to learning it. Now that Camera Raw looks more like Lightroom, I think it will be easier for your to use it.
 Watch my new video, Opening Lightroom Photos into Photoshop as Smart Objects, in the Working with Photoshop and Other External Editors section of my Lightroom 5, 6 and Classic: The Fundamentals & Beyond video series for all the details on how to do this.

