
 Adobe released Lightroom Classic (CC) version 8.4 last night. In addition to support for new cameras, new lens profiles and bug fixes, there are several new features and enhancements.
Updates for Lightroom (CC) Desktop, iOS and Android were also released – see my Lightroom CC article for details.
In This Lightroom Classic 8.4 Article:
- How and When to Update
- New Cameras Now Supported
- New Lens Profiles
- Photomerge Batch Processing
- Performance Improvements
- Expanded Color Label Options
- Export PNG Files
- Book Module Improvements
- Filmstrip Index Numbers
- Related Content
(The above links to sections below may or may not work depending on what device and system you are using. If they don’t work, scroll down.)
How and When to Update
![]() How to Update:
How to Update:
Are you upgrading from Lightroom 6 or CC 2015? (Check your version by going to Help>System Info.) If so, watch my video tutorial on how to upgrade to Lightroom Classic (AKA Classic CC).
Otherwise: if you previously were prompted to agree to automatic updates and if you agreed, then go to Help>System Info to verify that you are now using version 8.4. Otherwise to update, go to Help>Updates, and in the CC app that opens, on the App tab click on Update next to “Lightroom Classic” – NOT Lightroom cloud-photo based service or Lightroom CC 2015. If the update is not listed in the CC app and if your operating system is supported by Classic CC 8, then click on the three dots in the top right and choose Check for App Updates. If it’s still not there and it’s the day of release, then try later. Otherwise try signing out and signing in again.
If you skipped the last (8.3) update: Because the app name has changed to Lightroom Classic from Lightroom Classic CC, your Lr dock or desktop icon will most likely no longer work. Remove it from your dock or delete it from your desktop, then on Mac in Finder go into Applications, open the Lightroom Classic folder and drag the application to your dock. On PC, in File Explorer go into Program Files, open the Lightroom Classic folder, right-click on the application and choose Send to Desktop (and/or Taskbar).
When to Update:
I don’t have any indication that things won’t go smoothly with this update; that said, it can’t hurt to wait a week to see if others experience issues, unless you need the update urgently. If I hear of serious issues with this release I will post them here in this section – please check here rather than emailing me.
Update 8/17/19: Some users of Mac OS 10.14.6 (the latest update to Mojave) are reporting that Lightroom hangs/freezes upon launch. If this affects you, I recommend reverting to Lightroom Classic 8.3.1 – in the Creative Cloud app, next to Lightroom Classic, click on the dropdown to the right of Open, choose Manage > Other Versions, then click on Install next to 8.3.1. To assist Adobe in tracking down this bug, please also visit the link above to report your experience. To see what operating system version you’re using, click on the Apple in the top right of your screen, then About This Mac.
Click here to check for bug reports and to report bugs or issues that you encounter.
New Cameras Now Supported
Lightroom Classic and the entire Lightroom ecosystem now support the following new cameras:
- Canon PowerShot G5 X Mark II
- Canon PowerShot G7 X Mark III
- Hasselblad X1D II 50C
- Leica V-Lux 5
- Panasonic LUMIX DC-GX880
Click here for a list of all cameras supported by each version of Lightroom (and Camera Raw).
Tethered Capture Support
With this release no additional cameras have been added to those that support tethered capture.
Click here to see a list of all cameras supported for tethered capture.
Tethered capture involves shooting with your camera plugged into your computer, with Lightroom automatically and instantly importing the images. Watch my video tutorial on shooting tethered with Lightroom for more details.
New Lens Profiles
These new lens profiles are available in Lightroom Classic and throughout the Lightroom ecosystem:
Photomerge Batch Processing
You can now tell Lightroom to process multiple panoramas, HDR merges or HDR panoramas, rather than running them one at a time. Here’s how:
- For each panorama, HDR merge or HDR panorama merge, stack together the source files – select them, then right-click in one and choose Stacking>Group into Stack. If you’re creating 10 panoramas, for example, you should have 10 stacks of source files.
- Select all the stacks, then right-click in one and choose Photomerge, then Panorama, HDR, or HDR Panorama. Lightroom will then process all of the stacks – the jobs will be added to the queue, and their status will show in the Activity Center (the logo area in the top left).
Select stacks of source files.
Caveats:
- The same merge operation will be performed on all selected stacks – don’t select a mix of panorama and HDR stacks.
- If more than one stack is selected, you will not see a merge dialog and will not be able to select merge options/settings. Instead, the options you last used will be used again. (This is called headless mode.) If you want to use the same options on 10 stacks of panorama source files, first choose just one stack, perform the merge, selecting your desired settings, then select the other 9 and process those together. If you want to be able to choose different merge options for each one, then you’ll need to do each merge separately (in which case you don’t need to stack the source files together ahead of time).
- If the Create Stack option has been chosen in the Photomerge dialog, the merged DNG file will be added to the top of the existing stack of source files.
- If unstacked images are selected along with stacks, the unstacked images will be ignored.
To learn everything about stitching panoramas and merging multiple exposures (HDR) in Lightroom, watch my free video tutorials on Photomerge Panorama and on Photomerge HDR on YouTube, or for more up-to-date videos, get my Lightroom 5, 6 and Classic CC: The Fundamentals & Beyond V. 8 video series – 24 hours of training on Lightroom’s Library, Develop and Map modules on over 110 videos!
Performance Improvements
Folder Enumeration
A significant (and welcome!) improvement has been made to the speed at which folder counts populate in the Folders panel when you launch Lightroom and when you perform various Folder panel operations, such as Show Parent Folder.
Image Editing GPU Acceleration
If you’re experiencing lags in the Develop module between the time you make an edit and when it appears in your image, particularly if you’re using a 4k or 5k monitor, then Adobe’s latest GPU work might significantly improve this.
Up until Classic 8.4, GPU acceleration, an option enabled on the Performance tab in Preferences, has been used to improve speed at which your image is displayed in the Develop module. This has been accomplished by having this display work performed on your system’s video card processing unit (graphics processing unit, GPU) rather than on the central processing unit (CPU), which Lightroom is already making use of. With Classic 8.4 Lightroom can now perform many of its editing calculations on the GPU, improving the speed at which your edits are calculated and displayed – that is, improving response time of the edit sliders and to some extent, brush and other local adjustment edits.
System specs to leverage image editing GPU acceleration:
- MacOS 10.14 or later (10.14.5 or later is best), a graphics card with Metal support and at least 2 GB of VRAM
- Windows 10; graphics card with DirectX 12 support, at least 2 GB of VRAM, and an up-to-date driver
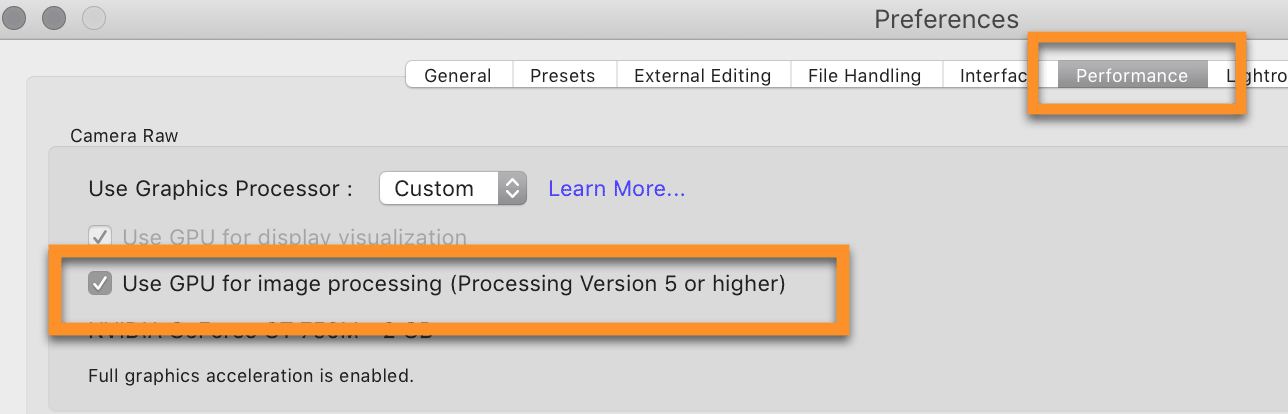
If your video card is whitelisted, i.e. if Adobe is confident that it, together with your OS version and driver update status, will have no issues, then in Preferences, on the Performance tab, the Use Graphics Processor for image editing option will automatically be turned on – the dropdown will be set to Auto and you’ll see a note that full graphics acceleration is enabled, rather than just basic.

This NVDIA card is blacklisted, so with Auto, only basic (display) acceleration is available, rather than full (display+image editing).
If the card is not whitelisted, then to use the GPU for image editing, set the dropdown to Custom, and check Use Graphics Processing for Image Editing.
If the option is not available to you, and if your video/graphics card does not appear in the unsupported list at this link, then check to be sure your video card driver is up-to-date. On Macs, the option will also not be available if your operating system is not up-to-date.
Like many performance improvements, this one is system dependent, so you may or may not see improvements.
If you have an eGPU, it’s most likely to work if your eGPU and OS work well together. Adobe has seen the best results with eGPUs when the display you are using is connected directly to the GPU–a “headless” eGPU does not appear to provide the same benefit.
GPU Usage Indicators
You’ll now see indicators in the top right of the main image window in Develop if GPU acceleration is in use for your image. The icon with four colored squares indicates that basic display acceleration is in use. The icon that also has a white square in the middle indicates that full acceleration, with image editing, is in use.

Indicators that GPU acceleration is used with this image. #1: basic display acceleration; #2: full display+image editing acceleration.
Process Version Requirements
Image editing acceleration will only be used on images using process version 5 (or later ones as they are released). If you see a lightning bolt below the histogram, your image is using an older process version. Click on the lightning bolt to update it.

Despite the image-editing setting being turned on in Preferences, this image is using only basic display acceleration because it is in an old process version, as indicated by the lightning bolt. Click on the lightning bolt to update the process version.
Expanded Color Labeling Options
Collection and Collection Set Color Labels
As we can already do with images and folders, now add color labels to regular collections, smart collections, publish services collections and collection sets. To add a color, right-click on a collection or collection set, choose Add Color Label to Collection and choose the color. To remove a color choose Add Color Label to Collection > None. To assign the same color to or remove all colors from multiple collections or sets, if contiguous select them all by clicking on the first, then shift-clicking on the last or if non-contiguous clicking on the first, then Ctl/Cmd-clicking on each additional one, then right-click in one and add the color label.
When you right-click on a collection set, the option says Add Color Label to Collection, but it will really add it to the set. Adding a color to a collection set does not add the color to the collections within a set.
To show just collections and sets with color labels, click on the dropdown next to the magnifying glass and choose Labeled Collections. (There is no option at this point to filter on just a particular label color.)
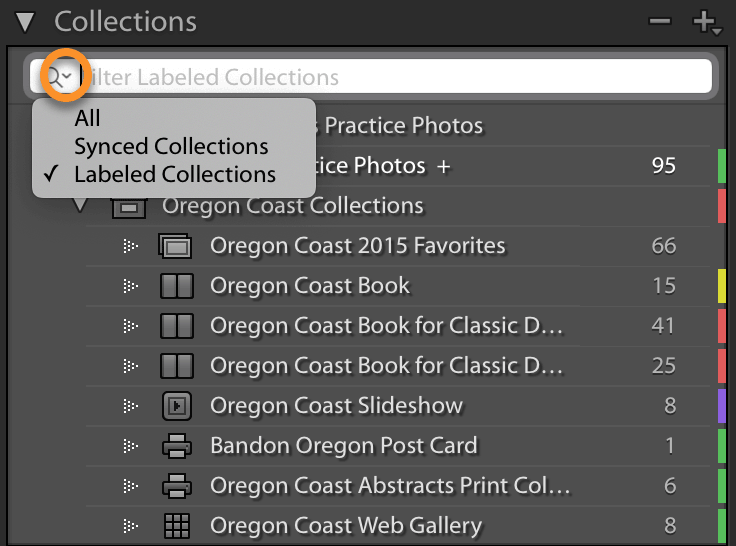
Add color labels and also filter to just show collections and sets with color labels
Note that if a collection set has a label, the Labeled Collections filter will display collections within the collection set regardless of whether they have a color label – that’s why my “Oregon Coast 2015 Favorites” collection shows in the screenshot above.
To cancel the Labeled Collections filter and return to seeing all collections, click on the magnifying-glass dropdown again and choose All.
Assign Text to Collection, Folder (and Image) Color Labels
If you color code an image red, for example, and look in the Metadata panel under the default view, you’ll see in the Label field that the text “Red” has been assigned to the image. It’s been possible for a long time to change what text is associated with each image color label, so that, for example, the stage of your workflow that you associate each color with is recorded – e.g. “Need to Keyword” for yellow.
Now with Lightroom Classic 8.4 you can set text to be associated with each folder and each collection/collection set color. These text labels won’t show up in image metadata, but they can serve to remind you of what you decided to use each color for. The folder text for each color can be different from the image text and collection text, so you can use image/folder/collection color labels for different purposes.
- To access color label text assignment, go to Metadata>Color Label Set. Choose one of the defaults or choose Edit… to create or modify your own (or to view what the Lightroom, Bridge and Reviews defaults are).

- Choose one of the Image, Folder or Collection tabs (#1 in the screenshot below):

- Choose one of the defaults from the Presets dropdown (#2 in screenshot above) or type in your own (#3).
- To save, click back on the Presets dropdown (#2) and choose Save Current Settings as New Preset and assign it a name.
- Click on Change (#4) to apply your changes. CAUTION: for image color labels, if you change to a different default or to a solution you have created, for all of your images that already have color labels the color will be changed to white and the Label text to Unknown.
Anytime you then need a reminder of what you are using folder, collection/set or image color labels for, return to Metadata>Color Label Set and choose Edit. The existing solution will automatically populate in the dialog (you won’t have to choose it from the Presets dropdown.)
Export PNG Files
We can now export files in the PNG format. PNG files, unlike JPEGs, are uncompressed and will preserve any transparent areas in your images, rather than converting them to white pixels as JPEGs would.


Exported PNG file opened into Photoshop: transparent areas are represented by the checkerboard pattern.
This PNG export option can come in handy when your editing with the Transform panel or stitching of panoramas creates transparent areas (displayed there as white) and you want these preserved upon export, and also when you have imported and edited a PNG file that already had transparency, and you want to be able to export a copy with your Lightroom editing without losing the transparency.
Preserving transparency allows one to overlay images on top of one another, such as a logon on top of an image, and also allows one to more easily fill in transparent areas with tools such as Photoshop’s Content Aware Fill.
When exporting PNG files, I recommend choosing a bit depth of 16 when you’re planning to further edit the PNG, and 8 when you’re not – when you’re posting to the web, for example. (A 16 bit image has more information that can allow you to edit heavily without banding and other issues appearing, but it also has double the file size of an 8 bit image. Read my 8 bit, 12 bit, 14 bit, 16 bit — What Does It Really Mean to Digital Photographers? article for more on this.)
Book Module Improvements
Now in a welcome enhancement in the Book module, if you drag a photo from the filmstrip to somewhere on a page where there is no photo cell, a new cell will be created with the photo.
This also works when you drag a photo from an existing cell on a page to somewhere on the page where there is no cell – a new one gets created. Note though that the cell where the photo came from is still there – it’s now empty. If you’re not planning on putting another photo in it, then right-click and remove it – or better yet, don’t use this technique of dragging the photo out of its cell – instead, move the original cell and photo by dragging from the center square handle.
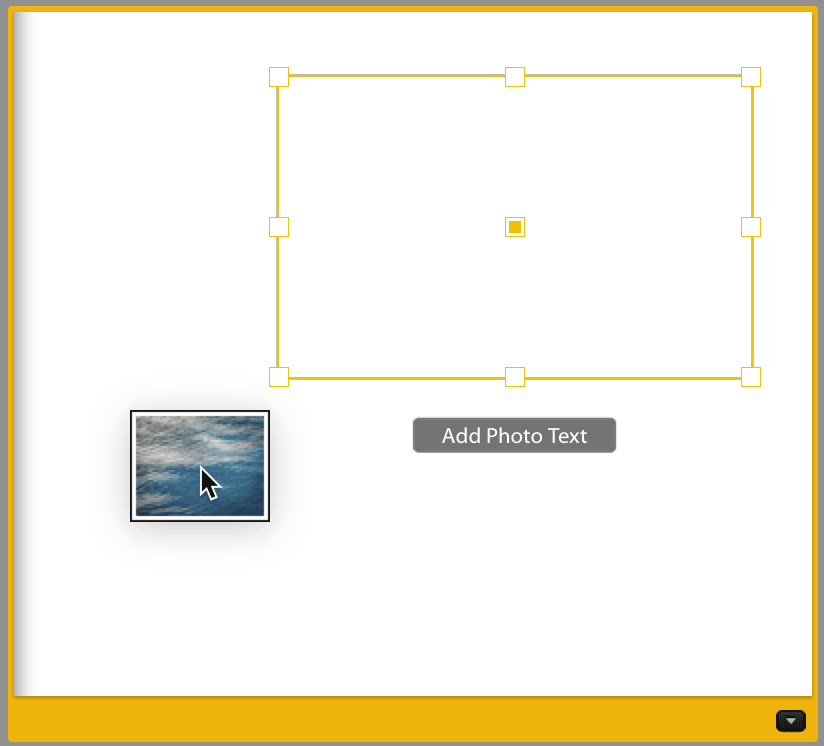
Dragging the photo from the top right cell and dropping it in the bottom left will create a new cell with the photo in it – but the top right cell will still be there, empty, and this can create confusion. If your goal is to move the photo, instead of dragging the photo out of the cell, drag using the center square handle to move photo and cell.
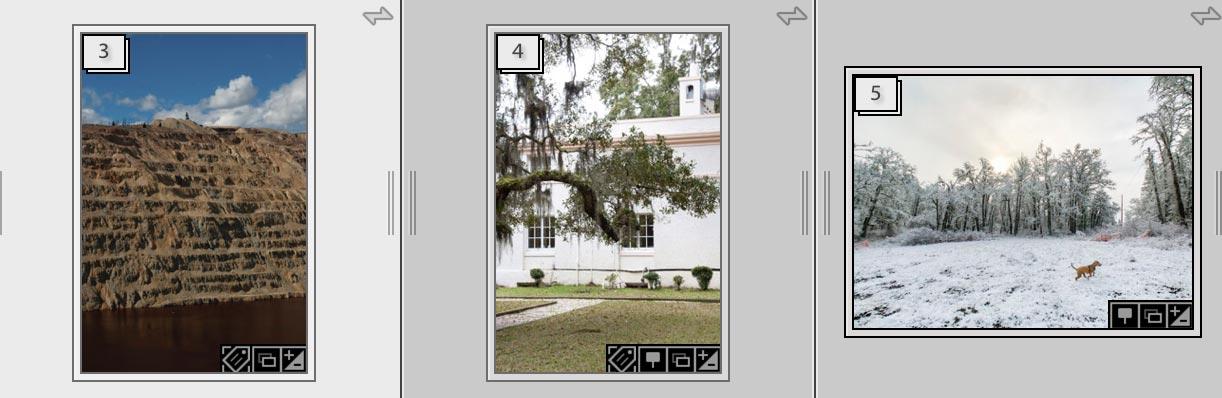
Filmstrip Index Numbers
Index numbers have been added to the filmstrip. These are the same index numbers that display in the grid (if you have them turned on in the grid) – they number images in your selected collection or folder from 1 to N, where N is the number of photos in the collection or folder.
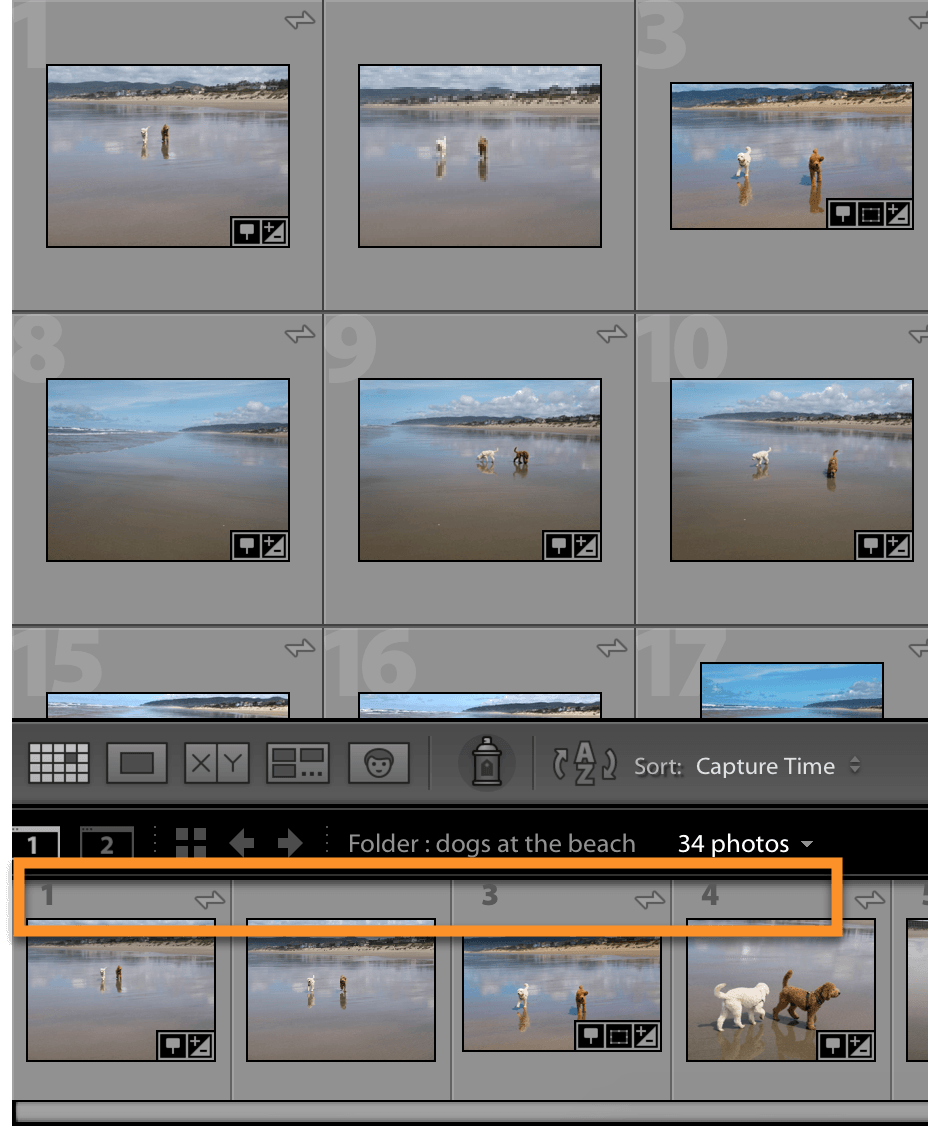
Whether you have grid index numbers turned on or not (in View>View Options), the same index numbers will now display in the filmstrip (see orange area in this screenshot.)
To turn the filmstrip index numbers off (or on), right-click in one of the filmstrip thumbnails and choose View Options>Show Index Number.
