Adobe released a new version of Lightroom today and announced that its name is being changed to Lightroom Classic CC. The name Lightroom CC is being given to the new cloud-based solution also released today. While this name change most likely signals that Adobe thinks the future lies with the new Lightroom CC, Senior Product Manager Tom Hogarty says that Adobe also remains committed to Lightroom Classic. Read my article, Which Should I Use, Lightroom Classic, Lightroom CC or Lightroom 6? for a comparison of the applications.
For more information on how this Classic 7 release fits in with all of the big Adobe Lightroom news this week, be sure to visit my Lightroom Classic 7 and Lightroom CC resource page.
Subscription Only
The Lightroom Classic 7 release is only available to Creative Cloud subscribers – there will be no more perpetual versions. If you don’t want a subscription and you’re still using Lightroom 5 or an even earlier version, the perpetual Lightroom 6 is still for sale. It will get 1-2 more small updates in the next few months to support new cameras and to provide bug fixes and lens profiles, and then it will be permanently frozen.
The Creative Cloud Photography Program is still $9.99, and in addition to Lightroom Classic and Photoshop, it also includes the new cloud-based Lightroom CC program and a small amount of storage for it. Do review the availaable plans – they’re covered in my Which Should I Buy, Lightroom CC, Lightroom Classic, or Lightroom 6 article (or visit Adobe.com.)
If you’re new to subscribing, also read my FAQ about Adobe cloud subscription programs.
Upgrading to Lightroom Classic 7
Free “Learn Lightroom Classic 7 New Features” Video Series
FOR A FREE DOWNLOAD of all of my video tutorials covering the the new features in Lightroom Classic, as well as videos on how to upgrade to Lightroom Classic, an introduction to Lightroom CC and how to migrate your Classic catalog to Lightroom CC, go to this page.
Highlights of What’s New
The focus of today’s Lightroom Classic 7.0 release has been to improve performance, but there are a few other new features as well. Watch the video below for highlights of what’s new, or read on.
For best quality, after hitting Play, click on the sprocket wheel in the bottom right of the video and choose 720/HD.
Range Mask
Range Mask is a fantastic new feature available in the adjustment brush, graduated filter and radial filter that allows us to narrow down the areas to be affected by these tools to just those of a particular range of colors or a range of tones. As those of you know who use these local tools, when you want to brighten, darken or make other changes to just a local area of your photo, the challenge is to select that area without spending a ton of time defining it with the brush. Range mask will build a sophisticated mask for you.

A color range mask with a selection of yellows in the photo.
Underlying photo © David Cox.
In the video tutorial below, learn everything you need to know about Range Mask:
For best quality, after hitting Play, click on the sprocket wheel in the bottom right of the video and choose 720/HD.
Embedded Preview Workflow
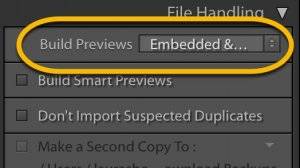
Are you used to seeing a “Loading” message as you move from photo to photo in the Library module after import, and having to wait as Lightroom builds its standard and 1:1 previews? The speed at which Lightroom Classic builds these has been improved, so it’s possible that you will no longer see this message as you cull your photos. If you do though, consider turning to the new optional “Embedded Preview” workflow – this allows you to use the previews created by your camera while you cull your photos so that you don’t have to wait for Lightroom to build its own. This should please some of you who have been using Photo Mechanic for culling before import into Lightroom. Watch my video tutorial below for details, or read on.
For best quality, after hitting Play, click on the sprocket wheel in the bottom right of the video and choose 720/HD.
In the Import dialog, choose “Embedded and Sidecar”. If you are shooting raw+JPEG Lightroom will use the JPEG. If you are shooting just raw, it will use the preview that you saw on the back of your camera.

After import, in Grid view you’ll see double-arrow badges on your photos indicating that you are working with the embedded preview, and in Loupe view you’ll see an “Embedded Preview” label. Click on either the badge or label to have Lightroom build its own preview.

If you edit the photo in Quick Develop or the Develop module, Lightroom will automatically build its own previews.
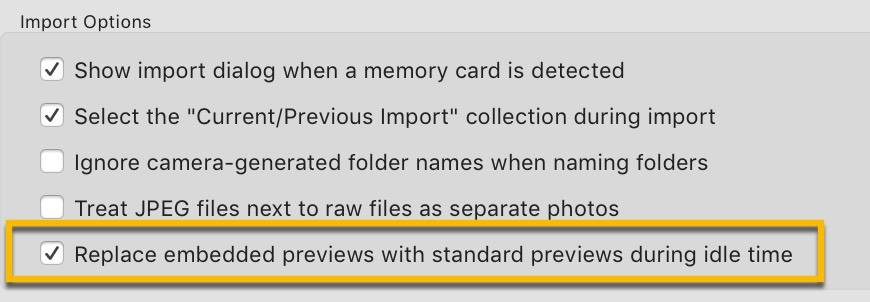
If you want Lightroom to automatically replace embedded previews when it’s idle, go into Preferences (Lightroom>Preferences on Mac, Edit>Preferences on PC) and on the General tab check the preference in the Import Options section:

Note that you’ll most likely see your images change when the embedded preview sare replaced! The ones from your camera use all of your in-camera settings that don’t apply to raw files, such as picture mode, saturation, contrast, sharpening and color space. This has always been the case, but now you’re attention is drawn to it. If you want an appearance closer to the embedded preview, look into using camera profiles.
Some cameras do not embed full-size previews. This is important if you zoom in on photos as you cull. If the preview size is less than 50% of the raw file size, Lightroom will go ahead and build and load its own 1:1 preview. If it’s over 50%, it will enlarge the embedded preview – which is not a good choice when you’re trying to judge sharpness since enlarging can make a photo soft. To get around this, shoot raw+JPEG, where you choose the Large Fine (full size high quality) in-camera JPEG setting. To see what size previews your camera embeds, load a raw file into Jeffrey Friedl’s Metadata Viewer.
Performance Improvements
There are lots of performance improvements in this release. How much they improve your experience will depend on your system configuration and workflow. There are improvements in:
- Time to start Lightroom (catalog loading time)
Library
- Building of Standard previews (A colleague of mine who tested found a 60+% improvement on Mac and Windows)
- Building of 1:1 previews (Same colleague: 30+% improvement)
- Faster rendering in Grid, Loupe, Filmstrip on Windows
- Library Loupe-view walk when importing with Minimal previews
- Switching amongst collections an collection sets – thumbnails are rendered more quickly in the grid, especially with smart collections.
- Delete Collection process
- Faster rendering of high-resolution Standard previews (greater than 2,000 pixels on long edge). Be sure Standard preview size is set to Auto in Catalog Settings>File Handling – this will detect your monitor size and build appropriately-sized previews.
- Import from Another Catalog
- Multiple HDR and Panorama merges: these are now added to a queue and are started only if CPU usage falls below a threshold. This provides better GUI responsiveness while merge operations are in progress.
- Sync (to mobile, web, etc) is automatically paused during import to improve import performance
Develop
- Switch from Library to Develop
- Loading of images, partially because histogram data is now cached
- Those using GPU acceleration on at least Mac OS 10.11 and Windows 10.0.14393 with dedicated video memory of 1.0+ GB should also see improvements in:
- Local adjustment responsiveness and brush speed
- Spot healing responsiveness
- Moving from image to image (walking), especially at 1:1
- No color glitches as you engage siders
New Camera Support
Raw files from the following new cameras can now be imported:
- Nikon D850
- Olympus OMD E-M10
- Mark III
- Samsung Galaxy S8
- Samsung Galaxy S8+
Click here to see a list of all cameras supported in each version of Lightroom (and Camera Raw).
New Lens Profiles
Miscellaneous Changes
Import
- You can now sort in the Import dialog by file type. Using this will be an easy way to avoid copying and importing JPEGs when you shoot raw+JPEG and don’t want the JPEGs.
- Photoshop Elements 2018 catalogs can now be imported.
- Tethering: Canon and Nikon SDKs used for tethering have been updated to support their latest cameras.
Library
- Default sort order after Import has changed from Added Order to Capture Time
- Smart Collections criteria additions: Title “is empty” and “is not empty”; Lens Profile Correction “is true” (applied) and “is false” (not applied).
Develop
- Auto Mask in the adjustment brush will now respect noise reduction that you have done in the Detail panel, so it will be less likely to confuse noise for edges. For best results, set noise reduction to taste before doing your adjustment brush work.
- Due to the Auto Mask improvement, which can change the appearance of adjustment brush auto-mask work done before, there is a new process version (version of Develop technology) – Process Version 4. Earlier versions have been renamed 1-3. You’ll see that all your photos from earlier versions of Lightroom have a lightning bolt below the Histogram indicating that they are in PV 3. There’s no need to update all of these – images will automatically update to PV 4 when you do further editing work on them, unless they already have adjustment brush auto mask work. If they do and you want to update that work to the improved auto mask, click on the lightning bolt to update your image. (If you’re coming from Lightroom 3, then read my article on Process Version, as the implications for you are much greater.)
- Use of the adjustment brush to draw a circular pattern: edges used to be jagged – they should now be smoother.
Export
- There is a new metadata option in the Export dialog: “Include All Except Camera Raw Information”. This excludes the text that listed what edits you made to your photo. (To see this text, open an edited file into Photoshop, go to File>File Info, and click on the Raw Data tab.) This will not only preserve your privacy in this area, it will also reduce file size.
Video
- The framework used in the Slideshow module and in video editing to render and process videos has been updated. You won’t see green frames any longer with videos from Live Photos.
Preferences
- The Camera Raw cache minimum is now 5 GB, up from 1 GB – this will be adjusted upwards automatically.
- The “Lightroom mobile” tab in Preferences has been renamed “Lightroom CC” to reflect the new Lightroom CC ecosystem (Lightroom mobile, web and the new cloud-based Lightroom CC program.)
Related Content
There are many, many more announcements today – a new cloud-based Lightroom CC application, new features and Adobe decisions in Lightroom mobile, new features in Lightroom web, and more.

