
Here’s a complete list of all the new features and changes in Lightroom CC / 6. For video tutorials explaining all the features and changes, visit (this Lightroom 6 resources page).
Photo Merge HDR
- Designed to merge multiple exposures to increase dynamic range. It is not designed to give creative HDR looks, that plug-ins such as Photomatix provide.
- Access by selecting two or more raw files, then go to Photo>Photo Merge HDR, or right click and choose Photo Merge > HDR, or Ctl-H.
- Options to align and auto-tone photos. In the case of elements that have moved between frames, option to deghost the result. Deghosting analyzes local areas and chooses one frame from the series to use in that local area.
- Resulting file is a 16-bit raw (DNG) file – with all of the editing flexibility and advantages of a raw file!
- Run in “headless mode”, skipping the dialog and using your prior settings, with Shift-Ctl-H.
- Often does best with just two or three exposures.
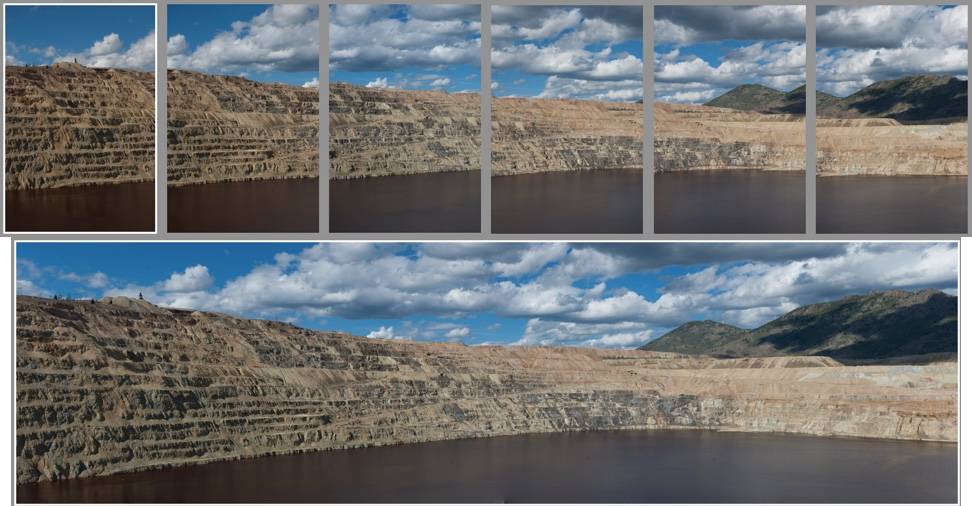
Photo Merge Panorama
- Stitch overlapping individual photos into a panorama – vertical, horizontal, or 360 degree.
- Access by selecting two or more raw, JPEG, TIFF or PSD files, then go to Photo>Photo Merge Panorama, or right click and choose Photo Merge > Panorama, or Ctl-M.
- Resulting file is a DNG file – if the originals were raw files, the result is still a raw file with all of the editing flexibility and advantages of a raw file!
- Run in “headless mode”, skipping the dialog and using your prior settings, with Shift-Ctl-M.
Face Tagging
- Enter the new People View (shortcut O) with a folder or collection of photos that have people in them. Lightroom will detect faces in the photos, and then you can add people keywords to these faces. This new feature speeds up the process of adding people keywords, and allows you to to add keywords to face regions in photos, not just to photos generally.
- Indexing:
- The facial recognition algorithm requires building an index of your photos (i.e. identifying face regions in photos).
- Indexing will ask to turn on the first time you enter “People” view for your entire catalog. Note that if your catalog is large, indexing the whole catalog could take hours or days. While it will run in the background so you can do other work, it will affect performance. I recommend not turning this on until you have experimented with face tagging and are committed to using it. You can turn it back on by clicking on the Identity Plate in the top right.
- If catalog-wide indexing is not turned on, then indexing will run just for the selected source and only while in People view. It will also run in loupe view, for the current photo only, if you activate the Draw Face tool.
- If Smart Previews, or embedded JPEG thumbnails in raw files, are available, indexing will be faster, since Lightroom won’t have to read the entire raw file off of disk.
- If a photo is offline (and no Smart Preview is available) Lightroom will not try to index it. If indexing is turned on for the whole catalog, Lightroom will automatically index offline photos when they come back online, the next time Lightroom is launched.
- Using Face Tagging:
- Access People view via the button on the toolbar, or via the View menu.
- People View shows all the faces that have been detected in the currentlyselected source. If Lightroom is confident that several faces are in fact the same person, it will group them together into a stack.
- The default sort order is “Name”. This will sort the unnamed people alphabetically by suggested name first, and by stack size second.
- When you name a face, or a stack of faces, the faces move from the Unnamed People section of the grid to the Named People section of the grid.
- You can drag and Drop faces from Unnamed to Named stacks.
- There is a running count of faces in both the Named and Unnamed sections
- You can multi-select and name multiple selected faces at the same time.
- When typing names in People view, auto-complete will only suggest other person keywords.
- Double clicking on a named person takes you to Single Person view. Double clicking on an unnamed person takes you to loupe view. Double clicking on any face in Single Person view takes you to loupe view. Double clicking in loupe view takes you back to People view, if that’s where you entered loupe view from.
- The Export dialog includes a “Remove Person Info” checkbox which will prevent the person keywords from being included on export.
- Face info is included when importing from another catalog or when creating virtual copies
- Draw Face Tool / Overlay
- After tagging all detected faces, it’s important to check all photos for undetected faces. Do this in Loupe view (E). Use the new Draw tool in Loupe view to manually add face regions.
- The Draw Face tool is automatically selected whenever entering loupe from People view, though it can be manually selected in Loupe view at any time by clicking on it on the toolbar.
- When you double click on a face in People view, it takes you to loupe view with the Draw Face tool active (and face regions visible). Double clicking in Loupe view will then take you back to people view.
- Face regions show or hide in Loupe view automatically depending on whether or not the Draw Face tool is selected.
- Keyboard Shortcuts and Context Menus
- When a single face is selected in the Unnamed section, you can activate the text field under it with the KBSC Shift+O
- “O” toggles People view.
- Confirm the suggested name by using Shift + Enter
- When you press the Option/Alt key and scroll the mouse over a face stack, a preview is shown of all the faces in the stack.
- The Delete key in People view will delete the selected Face region.
- In People view, the “Find Similar Faces” context/right-click menu item takes you to Single Person view with that face as the search face.
- Right-clicking on a face in People view gives you context menu items which will take you to the Folder or Collection which contains the photo.
- “S” expands or collapses a selected stack in People view. You can also click on the stack badge to expand and contract the stack. Both long press and short press behaviors work.
- Long press – expand until you let go o Short Press – expand or contract Keyword Behavior in Face Tagging
- You can right-click on keywords and choose “Convert Keywords to Person Keywords” to convert them to Person keywords
- If you convert a parent keyword, all the children keywords will also be converted to Person keywords.
- If you apply an existing keyword to a face in People view, the keyword will be automatically converted to a person keyword.
- You can also right-click on a keyword and select “Put New Person Keywords Inside This Keyword” to set it as the default parent keyword for all new Person keywords.
- People keywords show in the Keyword list, in both the new “All” tab, as well as the “People” tab.
Performance Improvements
- GPU acceleration: Lightroom can use the Graphics Processing Unit (GPU) to improve slider responsiveness in the Develop module.
- GPU support is enabled by default. To disable, go to the new “Performance” tab in the Lightroom preferences, and uncheck the “Use Graphics Processor” checkbox. When enabled, Lightroom will automatically determine whether the system’s GPU can be used to accelerate image drawing. If yes, Lightroom will display the name of your graphics card below the checkbox. Otherwise, Lightroom will display an error message.
- Minimum system requirements: 64-bit only, Open GL 3.3 and up; Mac OS 10.9 and higher; Windows 7 and higher.
- Make sure that your video drivers are up to date. On Mac, video drivers are updated via OS update, but on Win, the OS is not always accurate and may tell you that outdated drivers are just fine. It may be necessary to visit the card manufacturer’s web site to download a dedicated video driver update utility if you are having problems.
- Convert to DNG on import is now a separate background task that runs after import.
- Import speed on Mac has been improved. It is now on par with manually copying files to a folder in Finder and then adding to Lightroom.
- Thumbnail loading performance is improved after an Import.
- Export speed has been improved
- History panel load time improved
- Develop image switching time reduced, when working with a large list of Develop presets.
Library Module
- Activity center: click on the identity plate to access, pause and resume background processes (face detection catalog indexing, syncing with Lightroom mobile, and address lookup (reverse geocoding).
- Import to a collection: in the File Handling panel of the Import dialog, choose to add photos to an existing or new collection, as you import them.
- Keyword Painter: can now be loaded with keywords from saved keyword sets. With Keyword Painter tool active, press shift to bring up the Keyword Set UI.
- Filter box added to Collections panel, to search for collections. To access, click the “+” in the header of the Collections panel, and turn on “Show Collection Filter”.
- Added the ability to reset Lightroom preferences on launch by holding down Opt/Alt-Shift as you launch.
- Catalog backup changes:
- Backup dialog has option to change backup frequency, so you don’t need to go into Catalog Settings to change this.
- Backups are now compressed zip files. This saves space, and reduces the likelihood that you will accidentally open and use a backup catalog.
- Shift-click in Quick Develop for smaller increments (1/6 stop rather than 1/3)
- Percentage options added to image resizing section of Export
- Preference added the Filmstrip section of the Interface tab in Preferences to make badges in the filmstrip ignore clicks.
- New “Auto” standard preview size, found on the File Handling tab of Catalog Settings. Automatically builds previews at your monitor resolution (up to 2880 pixels).
- Added 250% option to the Windows UI scaling preference.
- Flag and Rating categories have been added to Metadata filters, in the Library Filter bar.
- Camera + Lens and Camera + Lens Setting have been added to the Loupe Info options in the View Options dialog.
- Pinstripe option removed from preview window options; replaced with “Darker Gray”.
- Library export can kick off up to three simultaneous renders.
Develop Module
- Filter brush: add to or remove from your graduated filter or radial filter mask using a brush. Click “Brush in the area above the sliders, or use Shift-T to toggle between filter edit and brush mode. Mask overlays have also been added to these tools.
- Pet eye tool: within the red eye tool, for fixing flash-filled animal eye pupils. Option to apply a catch light.
- “Auto” button added to to the crop tool to auto-level photos. Alternatively, shift+double-click on the Angle slider label.
- Updates to Local Ajustments:
- Adjustment brush strokes can be repositioned by dragging edit pins. (For previous behavior of dragging on edit pins to adjust slider values, use Alt/Opt+ drag up or down.)
- Draw a straight line by clicking at one end, and then shift-clicking at the other end.
- Lens Corrections panel message indicates if a built-in lens correction has been applied (micro 4/3s and mirrors cameras have built-in profiles applied and don’t need one applied manually)
- Keyboard shortcut added to cycle through Upright modes: Ctl+Tab. Preserve your crop on Mac with Opt+Ctl+Tab.
- CMYK support added to soft proofing. This is useful for soft proofing images used for Blurb books created in the Book module, since Blurb uses a CMYK profile. Download the profile from Blurb.com.
Slideshow Module
- Pan and zoom, enabled with a checkbox. Slider for setting amount of movement.
- Up to 10 music tracks. Drag tracks up or down in the list to change order.
- Sync slide transitions to the beat of the music, with a checkbox.
- Aspect ratio preview: preview slideshow at your screen aspect ratio, or your intended output aspect ratio (16×9 or 4×3)
- Quality options: to preview playback more quickly. Will only affect quality of playback within the application, not quality of export.
Map Module
- Architectural changes, but no feature or functionality changes.
Web Module
- Removal of flash galleries, addition of three HTML5 galleries – Track, Grid, Square.
- architectural changes.
Book Module
- Photo text metadata settings now saved to custom pages
Support for Touch-Enabled PCs
- New Touch workspace, with look and feel of Lightroom mobile. Switch to the Touch workspace by clicking on the Touch icon.
- Workspace includes not just controls of Lightroom mobile, but all Develop panels, local corrections and user-created presets.
- General touch improvements, such as the ability to scroll through panels, filmstrip, add flags, zoom in loupe and grid.
Tether Support
- Added for the Canon 7D Mark II and the Nikon D750
Camera Support Added
- Canon EOS 5DS
- Canon EOS 5DS R
- Canon EOS 750D (Rebel T6i, Kiss X8i)
- Canon EOS 760D (Rebel T6s, Kiss 8000D)
- Canon EOS M3
- Casio EX-ZR3500
- Fujifilm X-A2
- Fujifilm XQ2
- Hasselblad Stellar II
- Nikon D5500
- Nikon D7200
- Olympus OM-D E-M5 II
- Olympus Stylus SH-2
- Panasonic Lumix DMC-GF7
- Panasonic Lumix DMC-ZS50 (DMC-TZ70, DMC-TZ71)
- Samsung NX500
Lens Profiles Added
- Canon EF
- Canon EF 24-85mm f3.5-4.5 USM
- Canon EF 100-400mm f/4.5-5.6L IS II USM
- TAMRON SP 15-30mm F/2.8 Di VC USD A012E o Canon EF 8-15mm f/4L Fisheye USM
- Canon EF 11-24mm f/4L USM
- Canon EF 50mm f/2.5 Compact Macro
- Lomography Petzval 85mm f/2.2
- SIGMA 24mm F1.4 DG HSM A015
- Venus Optics 60mm f2.8 2X Ultra-Macro Lens
- DJI
- DJI Inspire 1 FC350
- Leica
- Voigtlander LTM 28mm f/1.9 Ultron Aspherical o Voigtlander LTM 28mm f/3.5 Color Skopar
- Voigtlander LTM 35mm f/1.7 Ultron Aspherical o Voigtlander LTM 50mm f/2 Heliar
- Voigtlander LTM 50mm f/2.5 Color Skopar o Voigtlander LTM 50mm f/3.5 Heliar
- Voigtlander LTM 75mm f/2.5 Color Heliar o Voigtlander LTM 90mm f/3.5 APO Lanthar o Voigtlander VM 40mm f/2.8 Heliar
- MFT
- Voigtlander MFT 17.5mm f/0.95 Nokton Aspherical o Voigtlander MFT 25mm f/0.95 Nokton
- Voigtlander MFT 42.5mm f/0.95 Nokton
- Nikon F
- Nikon AF NIKKOR 14mm f/2.8D ED
- Nikon AF-S DX NIKKOR 55-200mm f/4-5.6G ED VR II o Nikon AF-S NIKKOR 300mm f/4E PF ED VR
- Nikon NIKKOR 50mm f/1.2 AIS
- TAMRON SP 15-30mm F/2.8 Di VC USD A012N
- Voigtlander SL II 20mm f/3.5 Color-Skopar Aspherical o Voigtlander SL II 28mm f/2.8 Color-Skopar Aspherical o Voigtlander SL II 58mm f/1.4 Nokton
- Lomography Petzval 85mm f/2.2
- Venus Optics 60mm f2.8 2X Ultra-Macro Lens
- Pentax
- SIGMA 18-200mm F3.5-6.3 DC MACRO OS HSM
- Pentax K
- Venus Optics 60mm f2.8 2X Ultra-Macro Lens
- SIGMA
- dp1 Quattro*o dp2Quattro*
- dp3 Quattro*
- SIGMA 24mm F1.4 DG HSM A015
- SIGMA 150-600mm F5-6.3 DG OS HSM C015
- Sony Alpha
- SIGMA 50mm F1.4 DG HSM Art Lens
- TAMRON 16-300mm F/3.5-6.3 DiII PZD MACRO AB016S
- TAMRON 28-300mm F/3.5-6.3 Di PZD A010S
- TAMRON SP 70-200mm F/2.8 Di USD A009S
- TAMRON SP 150-600mm F/5-6.3 Di USD A011S
- TAMRON SP 90mm F/2.8 Di MACRO 1:1 USD F004S
- Venus Optics 60mm f2.8 2X Ultra-Macro Lens
- SonyE
-
- Sony FE 24-240mm F3.5-6.3 OSS o Sony FE 28mm F2
- Sony FE 28mm F2 + Fisheye Converter
- Sony FE 28mm F2 + Ultra Wide Converter
- Sony FE 35mm F1.4 ZA
- Sony FE 90mm F2.8 Macro G OSS
- ZY Optics Mitakon Speedmaster 50mm f0.95 Pro
- Yuneec
-
- CGO2gb