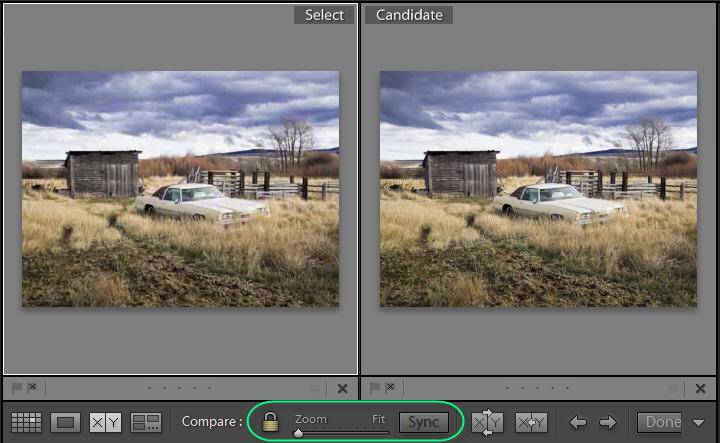
In my tutorial on jpeg quality, I displayed two photos side by side and zoomed in on them together to compare them up close. A reader asked me how I did this — thanks to this reader for giving me the idea for Friday’s Lightroom Quick Tip.
In the Library module, select your two photos (click on the first, Ctl/Cmd-click on the second). Then, in the toolbar below the grid, click on the X/Y button — this is Compare view. The shortcut “C” also works.
This displays both photos next to each other. (In my example they look like the same photo, but really are two different versions).
Notice that one of them has a white frame around it — this is the active one. To make the other one the active one, click inside it.
Your mouse is the zoom tool, so click anywhere inside the active photo to zoom in to that spot in the photo. If the padlock in the toolbar below your photos is locked, Lightroom will zoom both photos in to the same spot together. If it is unlocked, it will only zoom the active one. Click on the padlock to change the lock status.
You can control how far Lightroom zooms in either with the Zoom slider in the toolbar or the Navigator panel.
Once you are zoomed in, your cursor becomes the hand tool — click and drag to pan around in your photos. If you want only one to move, click on the padlock to unlock it before you drag the hand tool.
If you have been zooming or panning just one photo and want to get the other one to the same zoom and location, click the Sync button.
Of course you can learn more about Compare View and all of Lightroom’s different views on my Lightroom Fundamentals and Beyond Workshop on DVD. Do check it out!
Have a great weekend.
PS: If you read my jpeg quality post and are wondering how I could compare jpeg quality results within Lightroom, I exported the photo with two different quality settings, and selected “Add to this Catalog” in the Export dialog so that I could work with the jpegs in Lightroom.

