
If your iPhone 7+, 8+, X, Xs, Xs Max or Xr camera is set to capture depth information, now in Lightroom Classic CC v. 8 use Depth Range Mask within the graduated filter, radial filter and adjustment brush to confine your edits based on distance to the camera.
For instructions on how to capture images with depth information and how to use Depth Range Mask, watch my video tutorial below or read on below the video.
For best quality, after hitting Play click on the sprocket wheel in the bottom right and choose 720/HD.
Details (covered in the video):
First, capture depth information with your iPhone camera:
- Make sure you are capturing HEIC files. in iPhone Settings, go to Camera > File Format > High Efficiency.
- If you’re using the iOS camera, set the mode to Portrait.
- If you’re using the Lightroom CC camera, enable Depth Capture: Settings > Technology Previews > Depth Capture. Then set the camera mode to Depth.
Then to use Depth Range Mask:
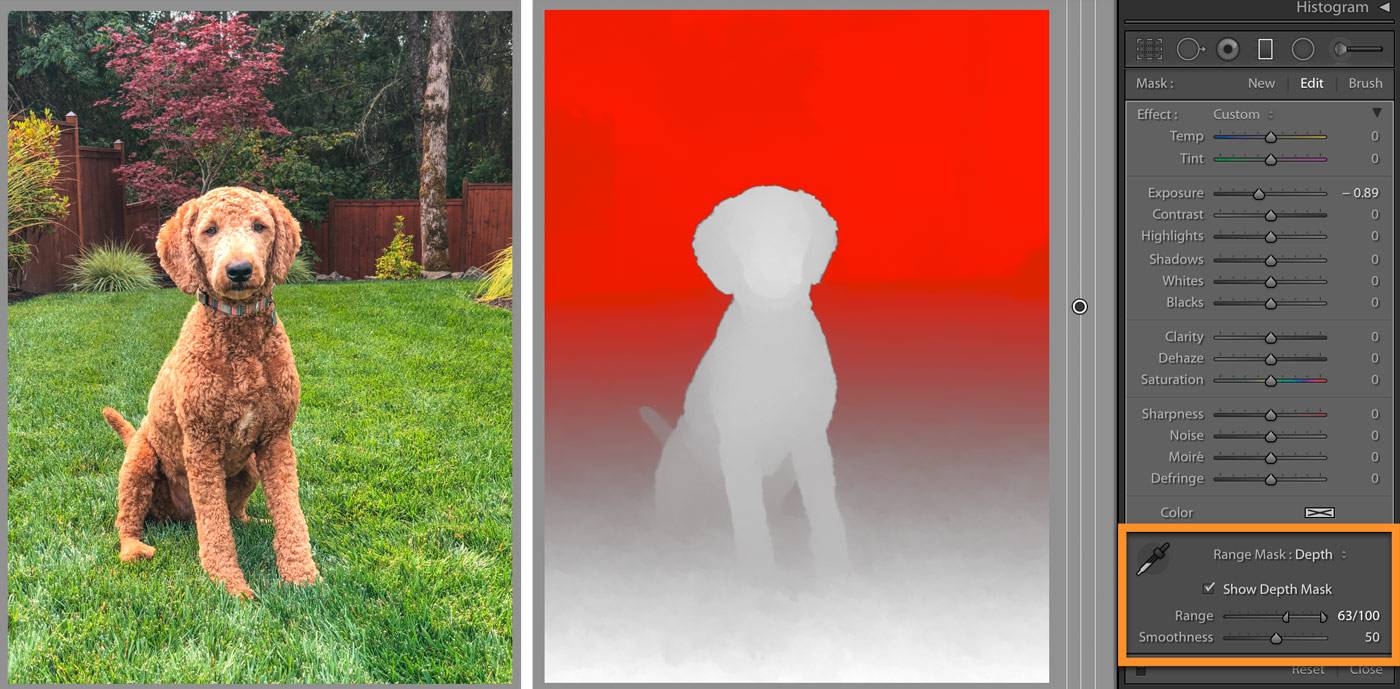
- In the graduated or radial filter, draw a filter, or in the adjustment brush, paint, to specify a starting area. (In the screenshot above I drew a filter that covers the entire image.)
- Select Depth in the Range Mask dropdown.
- Either check Show Depth Mask or hold down Alt/Opt as you slide the Range and Smoothness Sliders. With Show Depth Mask on, the background shows in black, the foreground in white, and the area affected by your Range and Smoothness selection shows in red.
- Range ranges from close to the camera (left) to distant (right) – specify what range you want your edit to effect.
- Set Smoothness for how harsh or soft you want the mask edge to be.
- Optionally, use the eyedropper to specify in your image which element you want to affect – click on a spot, or click and drag to draw an area. Then refine with Range and Smoothness.
Related Content
Video Tutorial: Luminance and Color Range Masks in Lightroom Classic CC
What’s New in Lightroom CC Desktop, iOS and Android – October 2018 Release
How to Use People View in the Cloud-Based Lightroom CC
New in Lightroom Web: Format Your Shared Albums and Collections!
Adobe’s announcement about the Lightroom Classic and Lightroom CC Releases

I update my lightroom cc and now in range mask i see depth as third option but i can not use it.I can use color or luminance but depth is grey and i cant click on it.I use last proccess 5 on image i restart pc but still nothing…it says i have lightroom version 8 but its grey and i can not do anything ….Any help?
This is addressed at 3:26 in the video, Milos. In your case, you most likely didn’t capture the depth information when you took the photo.
Is it an HEIC file from an iPhone with dual cameras, and did you use Portrait mode in the iOS camera, or Depth mode in the LR CC camera?
I am seeing a ton of problems on the internet with Lightroom 8. My problem is that I cannot sign out of Lightroom. All I get when going to HELP and sign out is a white screen with a stuck spinning circle, it never goes away. The only way I can sihn out is through the Creative Cloud app. Same thing with Photshop2019 update. Hope they can fix all the problems soon.