
 In the first article of this series on exporting from Lightroom, I discussed what exporting is, and when you should and shouldn’t export. In short, you’ll click on the Export button to export a copy of your selected photo(s) pretty much any time you want to share them with the outside world.
Now I’ll start discussing the settings in the Export dialog – in this second article I’ll start with Export Location options.
At the top of the Export dialog towards the center you’ll see a dropdown to choose whether to export to a hard drive, CD/DVD, or email:

Select the CD/DVD option from the dropdown to burn directly to disc. The Export Location section that I discuss in the rest of this article then disappears since you won’t need to specify a location on your hard drive for the files. Note that if your files take up more space than is available on your disc then Lightroom will prompt you to put in one or more subsequent ones.
Exporting directly to email is covered in a separate blog post.
The rest of this article will cover exporting to your hard drive – choose Hard Drive from the dropdown.
Choose a Location on Your Hard Drive
In the Export Location section you’ll specify where on your hard drive you want to save the exported copies and whether you want these copies to also be available in Lightroom along with the originals.
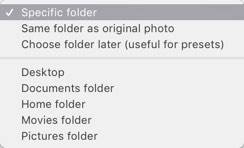
Export To:
To specify where on your hard drive the exported copies will be saved, click on the dropdown to the right of Export to: (#1 in the screenshot below.)
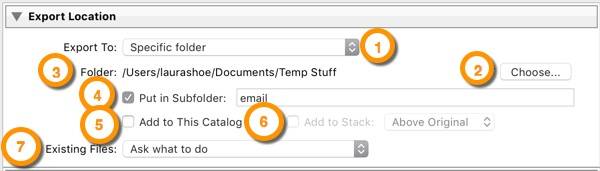
To choose a location other than one of those shown in the list, select Specific folder.
Next click on the Choose button to the right (#2 above), navigate to your desired folder, select it and hit Choose or OK in the bottom right of the dialog. This location will now display below the Export to: Specific Location line (#3).
You can have Lightroom put the files in a subfolder of your chosen folder by checking the Put in Subfolder box (#4) and then typing in a name for that folder. For example, in the screenshot above my photos will go within an “email” folder within “Temp Stuff” within “Documents”. If the subfolder doesn’t yet exist, Lightroom will create it. With this Put in Subfolder option I can easily change the subfolder from one export to the next without having to click on Choose and navigating to it (though that is also an option.)
Choose Folder Later: eventually in this series I’ll talk about how you can save your various Export settings as presets so that you don’t have to enter them all over again each time. If you want the flexibility in your preset to vary the export location each time you use it, select Choose folder later in the Export to: dropdown, and when you hit Export at the bottom of the dialog Lightroom will prompt you to specify that location.
The “Add to this Catalog” Option
As you may recall from my last article, I mentioned that I delete most of the copies that I export after I email them or otherwise send them out, since I can always export new copies if I need them again. Nevertheless I mentioned that there may be some situations where you’ll want to keep yours – for example, if you are a pro and you want exact documentation of what you sent out to a client. If you do keep them, you’ll want to also make a decision about whether these copies should be in Lightroom or not. An argument against it would be that you risk cluttering up Lightroom with these copies and you risk accidentally working on a copy instead of on your master photo. On the other hand, having them in Lightroom makes it very easy for you to access them when needed. (If you don’t have them in Lightroom you’ll access them with Mac Finder or Windows Explorer/My Computer.) To add them to Lightroom, check the Add to this Catalog option (#5).
Stacking the Exported Copies with the Originals
If you check the box to Add to this Catalog (#5), and if in the Export to dropdown (#1) you choose to put them in the same folder as the originals, and if you don’t choose Put in Subfolder (#4), then you have the option to stack the exports with the originals (#6). This links the copies and originals together in what visually looks like a stack of photos. (Photos can’t be stacked together if they reside in different folders – hence the requirement that the exports be in the same folder as the originals. For more about stacks, read this article.) I think stacking them can be really handy, since it’s a way to hide the exported copies underneath the masters when you’re not using them. Generally I therefore recommend choosing the option to put the exported copies below the originals – this way your master photo is on top of the stack and it’s less likely that you’ll accidentally work on the copy.
Existing Files: Ask What to Do
Lightroom needs to know what to do if it finds that you are exporting files to a folder that already contains files of the same names.
Ask what to do: if it finds duplicates it will prompt you to make a decision about whether to Overwrite the ones that are already there, use Unique Names, Skip or Cancel. Unique Names will add “-2” or a later sequence number to the end of the file to create a unique filename. Skip will skip exporting any that already exist, and Cancel will cancel the export entirely.
Choose a new name for the exported file: without prompting you, Lightroom will add “-2” or a later sequence number to the end of the file to create a unique name.
Overwrite WITHOUT WARNING: the old file will be wiped out and replaced by the new one – without warning.
Skip: without prompting you, export of the new file will be skipped, leaving the old one as is.
Up Next
In the next article in this series I’ll skip down to the Image Settings section to discuss Image Format (JPEG, TIFF, PSD, DNG), Color Space, Quality and Limit File Size to.

Thank you very much, Laura. This article is very helpful to me.
Con
You’re welcome, Con!
I would like to be able to export all my pictures in Lightroom (approx. 90 000, 150GB, raw ) into a directory structure same as the structure of my catalogs in Lightroom.
I also want the pictures to converted to .jpeg and with a size suitable for showing on an iPad / iPhone
And I also want a update routine for new pictures entered in Lightroom.
You can export into a folder structure mimicking your master one, Arne, using Jeffrey Freidl’s plugin. I’ll cover size settings in a later article, but you’ll use the Resize to Fit section.
Thank you Laura for outlining the meaning of all these various options-your comments are very helpful. Thanks Ron
You’re welcome, Ron!
Thank you. I am always learning from your articles and find myself tweaking my workflow with info you have provided.
You’re welcome, Jane!
Dear Laura,
I have tried to export jpeg pictures to share. The photo looked nice and sharp on Lr even with zoom to 4:1, but on jpeg, all the pixel square grain showed up, specially on face, withourt any zoom. I have tried 100% quality and 1200 pixel/in, the size has gone up to 1mg, but not improve much. What could be wrong?
Thanks,
Ying
Hi Ying, it sounds like you are exporting them too small, in the Resize to Fit section. For the same size photos as your original, uncheck this option. For smaller ones, specify the number of pixels you want. (I’ll be writing more about this sometime soon.) Note that resolution has no effect at all when you are not resizing or when you are specifying size in pixels (rather than inches) – so specifying 1200 pixels/inch is no different than 12 pixels/inch.
When I export a photo to my desktop, 4 copies always appear, with different color versions. Can you help? Thank you.
I don’t know, Susan – I’d suggest posting on lightroomforums.net where you can have more of a back-and-forth exchange and post screenshots.