 As I wrote in my recent post on sharpening in Lightroom , occasionally when I go to a photography show at a gallery, my first reaction isn’t “What great/horrible photographs!”, but rather “Wow, too much sharpening!” Sharpening has always been a tool that is easy to go to far with.
Unfortunately, with all the new powerful tools available to us, there are now even more ways to get a “Wow, you need to back off on that Lightroom slider!” reaction during your photography exhibition. The clarity slider in the Basics panel is the next-most commonly over-used tool, in my experience. [UPDATE: Clarity was improved in Lightroom 4+ – the shadows I write about here are much less frequent.]
As I wrote about in my blog post on clarity in Lightroom, clarity makes your subject look more three dimensional, by adding contrast to edges (in a much broader way than sharpening). The bright side of edges gets brighter, the dark side, darker. Too much clarity can add ugly and obvious shadows and halos around edges.
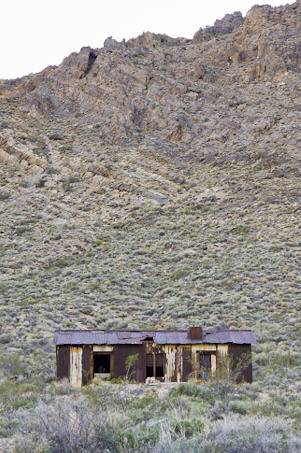
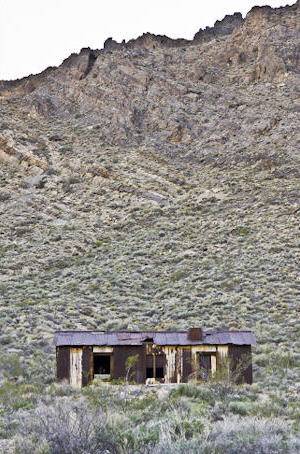
Here’s an example, before and after the application of +100 clarity:
Zoomed out this far, the scrub brush looks somewhat heavy-handed, but not that bad — but the edge of the mountain against the sky has a terrible shadow that just screams out “Too much clarity!!” You could reduce the clarity slider to get the amount that works best for both, or instead of using the slider in the Basics panel, you could apply clarity just to the foreground using the graduated filter tool.
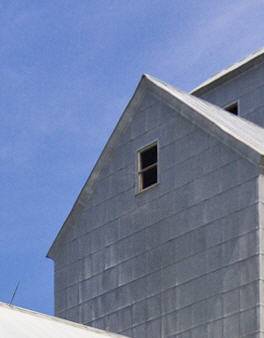
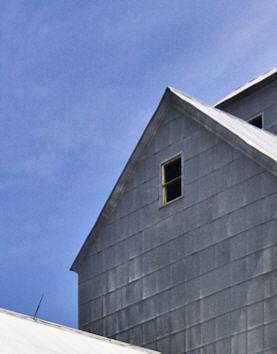
Here is another example. In this case I am zoomed in:
The dark shadow along the edge of the building isn’t as obvious in this case, but there is a terrible bright halo along the edge of the sky, making it look like the building is glowing. Backing off on the Basics panel clarity slider is what I would do in this case. You could also just apply clarity to the inside of the building with the adjustment brush. (Here’s a link to a video on the adjustment brush.)
Obviously I have pushed things very far here, to ensure that you can see the consequences. Your decisions will most-likely involve more subtlety. Now you know what to look out for — and if in doubt, be conservative… a little is usually better than none, and too much is a disaster!
Stay tuned for more posts on other things in Lightroom that friends don’t let friends do, and do consider checking out my Lightroom DVD, which covers all this and more.
[sc:signup]


[…] Friends Don’t Let Friends Use Too Much Clarity in Lightroom or Camera Raw (laurashoe.com) […]
Hmmmm, Laura. Thanks for the tip and I’m probably a guilty one. As an engineer somewhat lacking in finer artistic talent, the sharper or more clear image when not exaggerated is almost always my choice.
Will look forward to more tips and suggestions on this subject since it is getting a lot of attention.
Best,
Ed
Ha, ha, I am another culprit frequently pushing the clarity slider to the far right. I am now going to more carefully examine the output for artifacts. Thanks for the lesson.
I had forgotten about this old post, Ramin. This was much more of an issue before Lightroom 4. Clarity in Lightroom 4 and 5 doesn’t leave the harsh shadows that were common with Lightroom 2 & 3 – but of course it can still be overdone!
When would you use Shapren under Detail in Develop Module vs the “Clarity” slider?
Clarity adds contrast to edges, Fidel, but in a very broad sense, to make elements in your photo look more three dimensional. Sharpening adds very narrow contrast (just a pixel or so), to make edges look sharper. I would always use sharpening in the Detail panel, and only sometimes use clarity. Note that this article is out of date – as of Lightroom 3, you can add a lot of clarity without the ugly shadows that I show here.