
In this article, I’ll explain:
- How to assign pick and reject flags
- How to see just your picks, rejects or unflagged photos
- How to delete rejects.
How to Assign Pick and Reject Flags
Start by selecting the folder of photos you want to sort through in the Folders panel. In any of the Library module’s views, such as Grid (G) or Loupe (E) view, in the toolbar below your photo you can display pick and reject flags. If you don’t see these flags in the toolbar, click on the downward triangle to the right and choose “Flagging”. If you don’t see your toolbar at all, type “T” to reveal it.
![]()
To assign a flag to one photo, select your photo and click on the pick or reject flag in the toolbar. To remove a flag from a photo, click again on the flag in the toolbar that you assigned. You can also use shortcuts: “P” for Pick, “X” for Reject, and “U” to unflag a photo. Once you assign a flag, in Grid view and in the filmstrip you’ll see it in the top left of your photo:
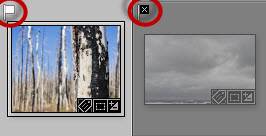
Notice also that rejected photos become grayed out in the grid and filmstrip. This is just another visual cue to you that they have the reject flag — they are still there in your folder and in Lightroom, and you can always change your mind and unflag them or Pick them.
To assign the same flag to many photos, go to Grid view (G), select the photos, and click on the flag in the toolbar or type a shortcut. Note that this will not work in Loupe view!
How to See Just Your Rejected, Picked or Unflagged Photos
Below the toolbar in the filmstrip, there is a handy Filter feature. It may start out collapsed, like mine below. If so, click where it says “Filter:” (green box ) to expand it so that you can see stars, flags, etc.
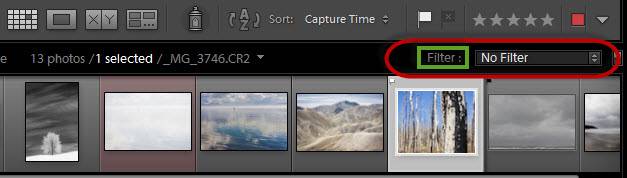
Filmstrip Filter collapsed

Filter bar expanded
To see just your picks, unflagged photos, or rejects, click on that flag in the filter bar. (You may have to click twice – once to activate the filter bar, once to select the flag status you want). To turn off the filter and return to seeing all photos, click on that same flag in the filter bar.
You may notice as you hover over the flags in the filter bar that you get tooltip “hints”. I recommend for just this one case in Lightroom that you don’t read them – they always say “Filter on flag status (any flag status)”, and in my opinion are therefore confusing.
Be careful to click on the flags in the Toolbar to assign information to photos, and in the Filter bar to view subsets of photos. In workshops I teach, when students are assigning flags and stars to photos, they often click on flags or stars in the filter bar and are surprised when their photos disappear from view.
Once I work through a shoot assigning Pick and Reject flags, I then check to make sure that I didn’t miss any — I filter on just my unflagged photos. I then work through these remaining unflagged photos, flagging them. Note that as you flag them, they will disappear from view, since they don’t meet the filter condition of being unflagged! (Some people like to work through the whole shoot with the Unflagged filter on – photos flagged disappear from view, and you can focus on just what’s left.)
Next, I turn off the “unflagged” filter by clicking back on the center “unflagged” filter flag, and then I look at just my rejects, by clicking on the third flag in the filter bar. After I double-check my rejects and delete those I want to, I turn off the Reject filter by clicking again on the Reject flag. This takes me back to seeing all photos. If I want to now just focus on my Picks, I can click on the Pick flag in the filter bar.
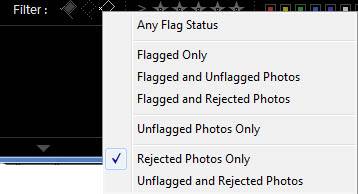
Final hint on filtering: When you click on a filter flag, it gets a little bit brighter to indicate that it is on. However, this can be hard to see, and you may get confused about which ones are turned on. To control what photos you see (i.e. filter based on), you can also right-click in the filter flag area and choose any subset (“Flagged” means “Picked”, “Any Flag Status” turns the flag filters off.)
How to Delete Rejected Photos
When you are in a folder of photos, you can filter on rejected photos, select all (Ctl/Cmd-A), and then hit the Delete key on your keyboard. You’ll be given the choice to Remove or Delete from Disk. Remove will remove from Lightroom, but they will remain on your hard drive. Delete from Disk, which I recommend 99% of the time, will also delete them from your hard drive.
Another way to accomplish the same thing without having to filter and select first, is to go up to Photo in the menu bar (top left of your Lightroom screen), and choose Delete Rejected Photos... This will take you to the same Remove / Delete from Disk dialog.
Note that if you are in a collection of photos rather than a folder, deleting becomes more complicated. Right-click on one of the photos you want to delete and choose Go to Folder in Library, and delete from within the folder.
Finally, sometimes I don’t delete all my rejects. I delete the no-brainers, but I keep the others just in case I change my mind later. In this case I stack them together. Read my article on stacking photos in Lightroom for more details.
[sc:signup]
My filters don’t stay on during an export. Ever since the upgrade last year. Is this a setting somewhere or is it the new update? I do mass quantities of exports and like to continue working during it, but it will not let me filter the photos I want to see while its doing an export. Do you know why?
I don’t, Oksana. I’d suggest posting on the Adobe Lightroom forum, or on lightroomforums.net.
I have been driving myself crazy the last couple of weeks wondering why I couldn’t get the Attributes – Flag filter to work correctly. I’d click on Flagged, Unflagged, Rejected and wouldn’t see the photos I had tagged with each of these flags. Thanks to this article I now realize I was turning on a flag filter, but before I selected another flag, I wasn’t turning the previous one OFF. I’m sure you covered this topic in one of your FAB lessons, but it didn’t stick in my memory.
Your website and your FAB series have been so helpful. I look forward everyday to watching my next lesson (I’m currently on #69 out of 75). Thank you so much for the information you provide. I enjoyed LR before, but now I’m feeling like a pro – or almost.
Thank you for your note, Lynne – I’m glad this article helped resolve your issue, and that you are enjoying my Lightroom Fundamentals & Beyond series! Congrats on making it to video 69!
You weren’t kidding on this one: “You may notice as you hover over the flags in the filter bar that you get tooltip “hints”. I recommend for just this one case in Lightroom that you don’t read them – they always say “Filter on flag status (any flag status)”, and in my opinion are therefore confusing.”
It’s been driving me batty for about 15 mins until I figured it out. Too bad I didn’t find this article first. :)
Thanks!
So I found you naming them flag tool and flag group helpful to sort the two areas out…wouldn’t believe I spent an hour in the black pit