 My goal today was to write a post on suggestions for managing your raw and JPEG photos if you shoot in raw+JPEG mode, including the option to automatically stack them together, but I realized that I haven’t written yet about the fundamentals of stacking photos — first things first!
Lightroom Photo Stacking Basics
Stacking two or more photos in Lightroom links them together, and allows you to visually stack them on top of each, so that they don’t take up as much space in the grid or filmstrip when you aren’t working on them. First let me explain how to stack photos and show you what stacks look like, and then I’ll discuss situations where you may want to stack groups of photos. Here are three (in this case very similar) photos, as they appear in the Library module grid or filmstrip:

Unstacked Photos in Lightroom Grid or Filmstrip
To stack any number of photos:
- Select the group of photos. (If they are together in a row, click on the first, then while holding the shift key down, click on the last. Finally, let go of the shift key. If they are not together, click on the first, then Ctl/Cmd-click on each additional one.)
- Right-click (Mac: Ctl-click) inside any of the selected photo thumbnails, and choose Stacking> Group into Stack.
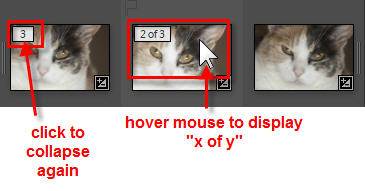
This creates and collapses the stack — in the grid or filmstrip, you will now only see the first photo, with a number on it, called the stacking badge, indicating how many photos are in the stack. Anytime you want to expand the stack to see and work with the photos in it, click on the stacking badge to expand it.
While the stack is expanded, as you hover over each thumbnail, Lightroom will display what number that photo is in the stack. (My mouse is on 2 of 3 in the screenshot below.) To collapse the stack again, click back on the stacking badge on the first photo.

Notice above that when you have an expanded stack, the grid background around your thumbnails changes to a very dark gray.
When to Stack Photos
You may find many reasons to stack photos. Here are a few situations that come to mind for me:
- very similar shots where I am going to choose just one but still want to keep the rest
- pieces of a panorama or bracketed exposures
- rejects from a shoot that I am not ready to delete
Lightroom automatically creates stacks in two situations:
- when you create a virtual copy, it is stacked with the original
- by default, when you right-click and choose Edit in Photoshop, and then save your file in Photoshop, in Lightroom that Photoshop file is stacked with the original raw or JPEG file.
When Stacking Won’t Work
Stacking of photos is only possible if the photos live in the same folder, or in a regular collection. Stacking will not work with a smart collection, the Quick Collection, or photos in different folders.
Stack Management Options
- To change which photo appears on top, expand your stack, right-click inside the chosen photo, and choose Move to Top of Stack. Also note the options to Move Up and Move Down in Stack.
- To remove a photo from a stack, right-click inside the chosen photo, and choose Stacking> Remove Photo from Stack.
- To unstack a group of photos, right-click in any one of them and choose Stacking>Unstack.
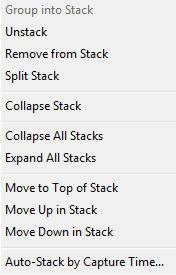
Here is the full stacking menu:

Notice the Auto-Stack by Capture Time option — this allows you to automatically stack photos shot within a time range that you define — and is what we will use in my next post on ways to manage your raw+JPEG photos.
Selecting Stacks
This is critical to understand — if you select a collapsed stack, and export, delete, or drag it to assign to a collection, only the top photo is exported, deleted or assigned. If instead you want to export, delete or assign all photos in the stack: expand the stack, select the entire group of photos (click on the first, shift-click on the last), and then export, delete or assign to the collection.
If I have one photo on top of a stack that is my pick, and other similar shots underneath, or one that is the worked-on Photoshop version, with the raw file underneath, I will keep my stack collapsed — so that when I go to export copies to share with people, I don’t accidentally send out the others. Similarly, if I used Photoshop to stitch together a panorama or to merge multiple exposures, I will have the stack collapsed, with the Photoshop file on top, and the pieces underneath.
Related Post: Stack Photos in Lightroom Automatically by Capture Time
[sc:signup]


Very, very helpful tut. It would be nice if LR would stack a group and put the rated photos on the top. I’m gonna use this a lot, I think, now that I have a better idea of how stacking works. Thanks much !
HDR sequence stacks, I will the color tag them red which I use for HDR sequence Images.
Great article, very helpful. Thanks!
Hi Laura
Thanks for this article, useful as always.
I have a dumb question: when I stack photos, I get the two side-lines indicating the stack, but don’t get the ‘stacking badge’ showing how many images are in the stack. How do I turn it on?
Scott Kelby has a useful keyboard command for stacking: CMD-G. its quicker than using the menus, I find.
Best wishes, David
Hi David, I could have sworn I answered this, but my apologies if not — if you are looking in the filmstrip, your filmstrip is most likely too small – click and drag on the top edge of it to enlarge it. If in the Grid, go into Lightroom (Edit on a PC)> Preferences > Interface, and turn on thumbnail badges.
Good article. THANKS!
I kept on trying to stack – as in rt click and choose Group in Stack – it nothing happened. Eventually I selected all photos for the stack and rt clicked and chose Unstack. Then tried again and it worked. I don’t understand why!
Good LR feature and good article on it Laura! One small “feature” that I just discovered with stacks is that Lightroom’s Library Filters will not read images that are inside a stack– only the top photo.
For example, I stacked similar images made with two different lenses. When I went looking for photos made with one of those lenses using the Library Filter, it seemed that they had disappeared. I didn’t remember deleting the photos but went to my backup drive and found them again. When I imported the files, I discovered that they were there all along, just hiding in a stack.
Stacking is a great feature, knowing its limitations can help in using it wisely.
Awe.Some….great info to have for a newbie LR user. Thanks!!
Thank you for all your help, great resource ;-)
You’re welcome, Stephen!